Showing posts with label Venise Lace. Show all posts
Friday, September 19, 2014
Friday Focus - Lace Mini Album
It is Cec here and today I am presenting the Friday Focus on Venise Laces and I am going to show you this lace mini album. For the next two weeks all the Venise Laces at The Funkie Junkie Boutique will be further discounted by 15% so this will be a perfect time to stock up.
So let's get started.
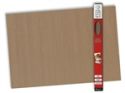
We have a thrift store nearby and I had never been inside until a few weeks ago and I found this small album for just 99 cents - what a deal and a perfect base for an album. The first thing I did was to rip out the plastic photo holders on the inside.
I won't be providing measurements because each album is unique and I had to figure out every measurement based on this particular album but I will show you the process I went through. The first thing was to cut a piece of batting to cover the album.
Next I covered both the inside and outside with a layer of woven fabric making sure that I cut it at least 3/4 of an inch larger than the album. I did not use hot glue because it isn't smooth but in the end, the lace may have covered any bumps if I had used it.
I put the inside cover on first and then ran a narrow strip of double sided tape on the fabric right next to the album edge so that when I added the top cover, I could adhere the two covers together and then the edge would not show. Once the covers were attached I cut the edges down to about 1/2" using pinking shears.
I would have preferred to cut the edges with regular scissors and fray the edges but this was cheap fabric and it would not fray straight. Usually you can pull a thread each direction to find the straight of the grain of the fabric but this would not let me so I went with the pinking shears - and got a vacuum cleaner out to pick up all the little fabric bits on my workspace :)
Next I started to make pockets for the inside of the album. I didn't have any double-sided card stock that was large enough so I just found some digital prints in my computer files that I thought would look good together (these are from Far Far Hill) and printed them double-sided on white card stock on my laser printer.
Here is a pocket all glued together. The fold-over flaps and seam at the back are glued down and there is a small strip of double-sided tape on the inside bottom, which makes this a pocket.
After I got all the pockets made I realized that I had wanted to add some inking with Frayed Burlap Distress Ink on all the edges so to make that happen on the fold-over flaps since they were already glued down, I just put a piece of paper up against the edge and got it done - where there is a will, there is a way. I made a total of six pockets
Next I made a binding system and attached it to the inside of the spine using a strong liquid glue. There is a fair bit of space between so that lots of things can be stuffed into each pocket. Each of the upright strips will have a pocket on each side. The other two pockets will be fastened to the inside of the front and back.
The next step was to adhere all the pockets. I started with the pockets attached directly to the covers and then added the pockets to the binding system making sure that they were back to back. After I finished I added an extra top loading pocket to each of the pockets on the insides of the covers but forgot to take a photo of this.
Next I made a stacked flower to go on the front. It is just a Prima flower, with a gathered piece of organza and a section cut from a piece of lace I had in my sewing room. I also crocheted a "flower" or medallion to use on the back but didn't take a separate photo of that but you will see it on the album.
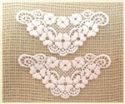
The next step was to pull a bunch of different Venise laces to work with. The best thing about this project is that you can use little leftover strips and nothing has to match. I took some lace hem binding and attached that to the sides of the front and back so that the album can be tied together when it is full.
Then I started covering the front and back with lace. At first I tried laying it out to create a pattern and then realized that it looked better if I just dove in and started adding it. Make sure that your lace overlaps onto the spine by a tiny bit.
Once all the lace was added I added a pre-made fancy tulle strip to cover the spine because something vertical looked better than a strip of lace. Then I added the embellishments - the crochet "flower" to the back, a vintage image framed in lace to the front, the stacked flower, a bunch of glittery Prima flowers that had been in a spray but I took them apart and pink pearls here and there. I also made a couple of bead charms and attached them to the spine with a tiny pink bow.
You can use any of the Venise laces (and the Venise lace appliques) that are available from The Funkie Junkie Boutique but these are the ones that I have used:
Saturday, August 2, 2014
Saturday StepXStep - A Sweet Vintage Shabby Chic Metallic Frame Tutorial
We are delighted to share a post with you by the fabulously talented Candy Colwell who is sharing a wonderful StepXStep with us...
Good morning Funkie Junkie Boutique Addicts! Let me introduce myself. I am Candy Colwell of "Creativity Is Contagious". I was thrilled when Linda asked me if I would be a Guest Designer for Frilly and Funkie.
I have to say that I am in love with Linda's appropriately named on-line store, The Funkie Junkie Boutique. It's funkie and it's fun! Her boutique carries so many unusual and hard to find embellishments that I dearly love. From her Venise Laces to her Filigree Metal Pieces and everything in between, she's got what I'm looking for to create some special pieces.
I love everything vintage and I love shabby chic. So I combined the two to create this sweet little piece that could be used as a pendant or an embellishment for a book, card or in an album.
Typically when I create, I have no idea what I am doing before I start. I start pulling out items and see where they take me. In this case, I pulled out a 2"x2" metal Memory Frame and a glass insert. That would be my beginning. I also went into my "stash" of metal pieces, including several from The Funkie Junkie Boutique, a piece of Venise lace and some beautiful old text from a booklet I bought while in Germany last week.
I measured a piece of thin cardboard into a 2"x2" square and rounded the corners.You can gently pull the Memory Frame apart so that you can add your completed insert and then close the metal frame. Here you see the frame, the glass and the cardboard insert. (You can also sandwich your insert between two pieces of glass if it is flat enough instead of using the cardboard backing.)
I covered both sides of my cardboard with the book text. I found this sweet little girl on-line and sized her to fit my background. I used a Chestnut Roan Cats Eye Ink Pad to gently darken the cut edges around her. You don't want to see white paper cut edges when doing vintage work! I cut a small piece of my beautiful Sheer 1/2" Embroidered Lace from the boutique for the top and a piece of German scrap I have had forever for the side. I also inked around the edges of the flowers after I cut them out.
For a bit of color and sheen, I added some Peacock Feathers Distress Ink and a spritz of Mint Perfect Pearls Mist to both sides of the text covered cardboard.
Next I temporarily put the little girl on the background and using that one small little piece of German scrap, I cut it into pieces to create the floral setting around the little girl. I glued them into place, leaving the rose bud at the top so that I could place my piece of beautiful lace underneath it. I added the lace with a piece of 1/8" Wonder Tape. This is a clear double sided tape that is perfect for adding laces and trims when you do not want the adhesive to show through.
The other items were glued in place using Glossy Accents. This is a wonderful product made by Ranger that can be use as a clear glue or as a clear filler. Later you will see that I decided to add "LOVE" to the lower right corner. These letters are from Tim Holtz' Words Remnant Rubs. I love his Remnant Rubs. There are several to choose from; all with great images and words and I don't seem to have the problem of all of the images not transferring that I sometimes encounter with rub ons. Now that my insert was ready to go, it was time to create a frame to compliment this sweet little girl.
I began with these pieces: a 2"x2" Memory Frame. This happens to be a copper one but any color of metal on any of these pieces would work. You will see why shortly. Next is one of my favorite pieces from Funkie Junkie Boutique; an Antique Bronze Filigree Metal Piece at the center top. Why do I love this piece so much? It's so versatile. You can add something to the center to dress it up or leave it as delicate lacy piece. It's small enough to work on intricate pieces and the best part... you get FOUR of them for $.89! DEAL!! I also added a Funkie Junkie Boutique Antique Bronze Heart dangling from the bottom on a jump ring. The other metal pieces are ones I had in my stash.
Here is why the colors of your metals make no difference; they will all be covered with paint! I find metal can sometimes be tricky to paint over. So, I first gave all of my pieces a light coat of white Gesso to give them some "tooth" to better accept the ivory colored acrylic paint I would put on them next. Thoroughly let the pieces dry in between layers of the gesso and paint or heat set them and let them cool before picking them up. Metal gets hot when it's heated and you don't want to burn your fingers!
Next I dabbed my Gathered Twigs Distress Paint on my Non Stick Craft Sheet and using my finger tip, I lightly added the brown tones to the cream colored base of each piece, including the frame.
Here are the pieces after their transformation. I have to say that I was not totally pleased with the dangling heart at first. I thought it should have more brown as a contrast so I completely covered the heart with the Gathered Twigs paint and added cream highlights. That is what is shown in the picture here. But, I changed my mind again and covered the heart with the cream paint and added Gathered Twigs highlights. That is what is showing in the final picture. I like it a lot better than the heart being darker. I also had taken the little circular pieces and stacked them using Glossy Accents to join them together. This gave them a little more dimension for each of the corners.
Here is the beginning of the frame being put together. I slipped the glass on top of the collaged piece and slipped it into the frame. Then I joined the frame together. You can see the little metal tab on the lower left corner. I chose to put the circular bale at the bottom of this piece so that I could add my dangling heart. But, you could just as easily have the circular bale at the top and string a chain through it to create a beautiful pendant. At this point, you could be finished but I think adding all of the intricate little metal pieces adds so much charm.
I first glued all of the circular corners in place. Next I added the lacy filigree piece at the top. I decided to add a small butterfly to the center, complete with little cream colored pearls for the body. Each of the corners also has a tiny cream pearl at the center. All of the gluing of the added metal pieces was done with Glossy Accents. Next I added the three other side pieces.
Finally, I added the dangling heart with a jump ring that was also painted to match the frame. In this case, I think painting each of the pieces individually, highlighting them and THEN gluing them onto the frame is a whole lot easier than trying to paint everything and highlight them after they are glued in place. I could add a bale to the top of this piece and add a chain to create a pendant. I could add a pin to the back and it could also be a piece of jewelry. But as I said in the beginning, this could also be a pretty embellishment on a card, an album, or so many other things.
A huge thank you to Linda for asking me to share my art with all of you at Frilly and Funkie. I hope that my piece will inspire you to have some fun and experiment with metal pieces in your work. I am quite sure that I will be ordering more of them and also more Venise laces from Linda right away!
Have a great week!
*************************************************************************
A huge thanks to Candy for providing us with this fabulous StepXStep this week.
Craft like Candy! You can find many of the supplies in Candy's project at The Funkie Junkie Boutique where Ranger/Tim Holtz and most other name brand products are always 20% below MSRP.
Good morning Funkie Junkie Boutique Addicts! Let me introduce myself. I am Candy Colwell of "Creativity Is Contagious". I was thrilled when Linda asked me if I would be a Guest Designer for Frilly and Funkie.
I have to say that I am in love with Linda's appropriately named on-line store, The Funkie Junkie Boutique. It's funkie and it's fun! Her boutique carries so many unusual and hard to find embellishments that I dearly love. From her Venise Laces to her Filigree Metal Pieces and everything in between, she's got what I'm looking for to create some special pieces.
I love everything vintage and I love shabby chic. So I combined the two to create this sweet little piece that could be used as a pendant or an embellishment for a book, card or in an album.
Typically when I create, I have no idea what I am doing before I start. I start pulling out items and see where they take me. In this case, I pulled out a 2"x2" metal Memory Frame and a glass insert. That would be my beginning. I also went into my "stash" of metal pieces, including several from The Funkie Junkie Boutique, a piece of Venise lace and some beautiful old text from a booklet I bought while in Germany last week.
I measured a piece of thin cardboard into a 2"x2" square and rounded the corners.You can gently pull the Memory Frame apart so that you can add your completed insert and then close the metal frame. Here you see the frame, the glass and the cardboard insert. (You can also sandwich your insert between two pieces of glass if it is flat enough instead of using the cardboard backing.)
I covered both sides of my cardboard with the book text. I found this sweet little girl on-line and sized her to fit my background. I used a Chestnut Roan Cats Eye Ink Pad to gently darken the cut edges around her. You don't want to see white paper cut edges when doing vintage work! I cut a small piece of my beautiful Sheer 1/2" Embroidered Lace from the boutique for the top and a piece of German scrap I have had forever for the side. I also inked around the edges of the flowers after I cut them out.
For a bit of color and sheen, I added some Peacock Feathers Distress Ink and a spritz of Mint Perfect Pearls Mist to both sides of the text covered cardboard.
Next I temporarily put the little girl on the background and using that one small little piece of German scrap, I cut it into pieces to create the floral setting around the little girl. I glued them into place, leaving the rose bud at the top so that I could place my piece of beautiful lace underneath it. I added the lace with a piece of 1/8" Wonder Tape. This is a clear double sided tape that is perfect for adding laces and trims when you do not want the adhesive to show through.
The other items were glued in place using Glossy Accents. This is a wonderful product made by Ranger that can be use as a clear glue or as a clear filler. Later you will see that I decided to add "LOVE" to the lower right corner. These letters are from Tim Holtz' Words Remnant Rubs. I love his Remnant Rubs. There are several to choose from; all with great images and words and I don't seem to have the problem of all of the images not transferring that I sometimes encounter with rub ons. Now that my insert was ready to go, it was time to create a frame to compliment this sweet little girl.
I began with these pieces: a 2"x2" Memory Frame. This happens to be a copper one but any color of metal on any of these pieces would work. You will see why shortly. Next is one of my favorite pieces from Funkie Junkie Boutique; an Antique Bronze Filigree Metal Piece at the center top. Why do I love this piece so much? It's so versatile. You can add something to the center to dress it up or leave it as delicate lacy piece. It's small enough to work on intricate pieces and the best part... you get FOUR of them for $.89! DEAL!! I also added a Funkie Junkie Boutique Antique Bronze Heart dangling from the bottom on a jump ring. The other metal pieces are ones I had in my stash.
Here is why the colors of your metals make no difference; they will all be covered with paint! I find metal can sometimes be tricky to paint over. So, I first gave all of my pieces a light coat of white Gesso to give them some "tooth" to better accept the ivory colored acrylic paint I would put on them next. Thoroughly let the pieces dry in between layers of the gesso and paint or heat set them and let them cool before picking them up. Metal gets hot when it's heated and you don't want to burn your fingers!
Next I dabbed my Gathered Twigs Distress Paint on my Non Stick Craft Sheet and using my finger tip, I lightly added the brown tones to the cream colored base of each piece, including the frame.
Here are the pieces after their transformation. I have to say that I was not totally pleased with the dangling heart at first. I thought it should have more brown as a contrast so I completely covered the heart with the Gathered Twigs paint and added cream highlights. That is what is shown in the picture here. But, I changed my mind again and covered the heart with the cream paint and added Gathered Twigs highlights. That is what is showing in the final picture. I like it a lot better than the heart being darker. I also had taken the little circular pieces and stacked them using Glossy Accents to join them together. This gave them a little more dimension for each of the corners.
Here is the beginning of the frame being put together. I slipped the glass on top of the collaged piece and slipped it into the frame. Then I joined the frame together. You can see the little metal tab on the lower left corner. I chose to put the circular bale at the bottom of this piece so that I could add my dangling heart. But, you could just as easily have the circular bale at the top and string a chain through it to create a beautiful pendant. At this point, you could be finished but I think adding all of the intricate little metal pieces adds so much charm.
Finally, I added the dangling heart with a jump ring that was also painted to match the frame. In this case, I think painting each of the pieces individually, highlighting them and THEN gluing them onto the frame is a whole lot easier than trying to paint everything and highlight them after they are glued in place. I could add a bale to the top of this piece and add a chain to create a pendant. I could add a pin to the back and it could also be a piece of jewelry. But as I said in the beginning, this could also be a pretty embellishment on a card, an album, or so many other things.
A huge thank you to Linda for asking me to share my art with all of you at Frilly and Funkie. I hope that my piece will inspire you to have some fun and experiment with metal pieces in your work. I am quite sure that I will be ordering more of them and also more Venise laces from Linda right away!
Have a great week!
*************************************************************************
A huge thanks to Candy for providing us with this fabulous StepXStep this week.
Craft like Candy! You can find many of the supplies in Candy's project at The Funkie Junkie Boutique where Ranger/Tim Holtz and most other name brand products are always 20% below MSRP.
Friday, May 16, 2014
Friday Focus: Venise Lace Appliques
Just a little woohoo!! from Linda... The Funkie Junkie Boutique is back in business! Come shop with us this week with a 10% off coupon - that's 10% off the already discounted prices that are already 20% off MSRP! Use the coupon code stockup4summer (from 5/16-5/22) and get an extra 10% off.
And now over to Nancy with her fantastic Friday Focus!
Hello! It's Nancy here today, and it is my honor to present this 'joy' banner for the Frilly and Funkie Friday Focus. The focus this time is on Venise Lace Appliques, and for the next week Linda will be offering an additional 15% off these gorgeous products at The Funkie Junkie Boutique!
I began by cutting my banner shapes from Maja's Vintage Springtime Basics paper collection and layering them on to Tim Holtz Grunge Paper for added strength. I crafted the top of my banner with venise lace appliques. I love working with them as they add a shabby chic touch to absolutely everything. I've layered several pieces to craft the tops of my banner. You can purchase this product line in white or hand stained by Linda. I've used a sampling of both here.
The base layer for the top was originally white. I wet down the lace applique and stained the front of the above piece using a mixture of Shaded Lilac and Milled Lavender Tim Holtz Distress Stains. It was darker than I liked so I gave it several good rinses under the faucet. After it dried I found that the back (originally the unstained side) of the piece was the perfect shade to match the papers. The next layer of my topper is a heart stained in a mixture of Spun Sugar and Tattered Rose using the same technique. The tiny flower buds in the center of each heart arrived perfectly hand stained by Linda!
For the pale yellow topper I used a mixture Scattered Straw and Antique Linen in the same method as the other stained pieces. Once again the back of the piece was just the right color for my banner. The center heart was stained in the same way as the lavender banner topper, but came out looking more blue. It ended up being just right for the creamy base layer.
The pink topper is once again the Spun Sugar and Tattered Rose Distress Stains, the unstained back becoming just the right shade for the papers after a few rinses. The center heart is stained in the Scattered Straw and Antique Linen.
The letters were cut using the Alteration's Word Play die and Grunge Paper, then painted with Tattered Rose Distress Paint. The plain center circles were cut using Alteration's Sized Circles die and Maja's Vintage Springtime Basics paper collection. The Venise Lace hearts were beautifully stained by Linda, adding the perfect finishing touch for my banners.
Once all my pieces were completed I adhered them to a length of lace using Ranger Inkssentials Wonder Tape. It is the strongest tape I've ever used and perfect for use with lace. I added some lace bows around each banner piece and attached some more of Linda's stained rose buds to the center of each.
Thank you so much for visiting today! Don't forget about the 15% discount on Venise Lace Appliques at the Funkie Junkie Boutique! Once you try Linda's stunning laces you'll be as addicted as I am. I wish you a week filled with joy and crafty fun!
Hugs,
Subscribe to:
Posts (Atom)