Adobe Digital School Collection Teacher Resources - Free Tutorials
 There is a nice selection of tutorials designed specifically for kids and for students that you can find at the Adobe Digital School Collection Teacher Resources Site. Use these lesson plans when teaching about math and science, language arts, history/social studies, and visual and performing arts. Below are some of the offerings. Visit the Adobe Students Store for special deals and coupon codes — many Adobe CS5 apps and bundles sell for 80% of the regular prices.
Math and science
• Geometric Concepts (ages 8–10)
In this lesson, students define geometry terms and then take photos of geometric figures that illustrate examples of their use in the real world. As a final product, they create a vocabulary Photo Book in Photoshop Elements that combines their definitions with their photo examples.
• Graph Plotting (ages 8–11)
• Marine World Digital Encyclopedia (ages 8–13)
Students will create web pages to communicate information demonstrating their understanding of an academic concept. They begin by gathering information and images about marine life. They then use Adobe Contribute® CS4 to add text, links, and images to a page on the class website.
• Patterns (ages 6–8)
• Plant Growth (ages 9–13)
• Visualization of the Atom (ages 11–17)
• Volcano Eruption (ages 9–13)
Language arts
• Alliteration Poem (ages 10–13)
• Creating Suspense (ages 11–15)
In this lesson, students use Adobe Premiere Elements to write short scripts and make a movie that creates a suspenseful moment. Students learn about techniques used in literature and filmmaking that create tension, and they employ this knowledge to create scenes that surprise, intrigue, and confound the audience. Dolch Word Practice (ages 5–7)
• Podcasts (ages 13–17)
• Storyboards (ages 11–14)
In this lesson, students select a poem, identify the poetic devices, sketch a storyboard, and make a video for the poem. By doing this activity, students learn about presenting a story in pictures and about chronological order. They also learn about the importance of storyboards in creating digital movies.
• Understanding Idioms (ages 11–13)
• Video Narratives (ages 14–17)
• Visual Dictionary (ages 11–17)
• Visual Pun Fun (ages 11–17)

History/social studies
• A Person in Time Online (ages 11–17)
Students will conduct research on a historical figure and then design a web page based on how this person would want to be represented on the Internet. During this project, students will learn about primary and secondary resources, cite research, and make a case for their web page decisions.
• Advertising Poster for a Political Candidate (ages 11–13)
• Civic Documentaries (ages 11–17)
Students will choose an issue that affects them, the school, or their community to document in a short movie. Students will interview individuals on both sides of the issue, integrate video clips, create the documentary, and write a reflection detailing the learning process.
• Oral and Visual Histories (ages 10–13)
Visual and performing arts
• Collages (ages 10–13)
• Digital Dali: Surrealism in Art Today (ages 8–10)
In this lesson, students turn everyday digital photographs into surrealist-style artwork using Photoshop Elements. This activity helps students enhance their creativity and better understand surrealistic techniques by working with lighting, color, and movement to transform their pictures.
• Impressionist Artwork (ages 8–14)
Students will explore the impact of photography on impressionism by taking photographs around the school to turn into impressionist works of art. Students will illustrate their understanding of impressionist-era work through the different imaging techniques they choose to use.
• Pioneers of Music (ages 11–17)

Turn A Photo Into A Sketch For Making Coloring Books
 Want to make some nice coloring books? The first step is to turn a photo into a sketch, and that's exactly what we'll do now. This tutorial is fairly easy and consists of just 6 steps.
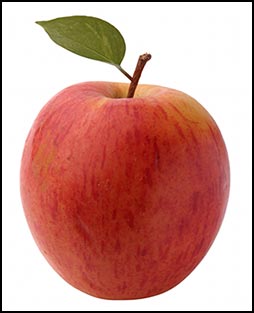
Start with your selected photo. Prep it so it's exactly the dimensions and resolution you want your final document to be.
STEP 1 - Duplicate The Background Layer
First duplicate the background layer. Go Layer> New> Layer via Copy. Now we have 2 layers, the Background Layer, and Layer 1.
STEP 2 - Desaturate The Photo
With Layer 1 selected, choose Image> Adjustments> Desaturate. This gives us a grayscale version of the photo.
STEP 3 - Duplicate Layer 1
At this point you must duplicate Layer 1. With Layer 1 selected, go Layer> New> Layer via Copy. Now we have 3 layers, the Background Layer, Layer 1 and Layer 2.
Next we'll be working with Layer 2.

STEP 4 - Invert Layer 2
With Layer 2 selected, go Image> Adjustments> Invert. This will make your photo look like a negative.
STEP 5 - Change The Layers Blend Mode To Color Dodge
In the Layers Palette change the Layers Blend Mode for this layer (Layer 2) to Color Dodge. This will make your photo almost completely white, but don't panic! Everything is going to work out just fine.
STEP 6 - Apply The Gaussian Blur Filter
Go Filter> Blur> Gaussian Blur. When the dialog box appears start by moving the Radius Slider all the way to the left. Once you've done that you can start to slowly move it to the right.
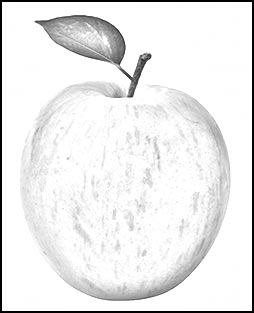
Now here comes some real Photoshop magic — because as you move the slider your sketch will start to appear.  At this point take time to experiment and make sure you are getting the desired effect.
Bigger numbers create a more pronounced effect, but at some point this will turn your sketch back into a photo, which you don't want, so when you reach that point simply nudge the slider to the left just a little and that should do it!
For my apple sketch I used a Radius setting of 9.8 pixels.
Experiment With Settings
This technique will also work with the Motion Blur Filter and the Radial Blur Filter. The reason I mention this is sometimes an image will not work as expected, and so you have to try different methods.
Calling All Cezannes
Now print out your best sketches and create some nice coloring books, then give the kids some crayons and see what kind of crazy masterpieces they come up with!


 I See iPod People — The Photoshop Silhouette
If you're crazy about those iPod ads and want to make one yourself, it's actually pretty easy. The first thing you'll need is an image of someone that you can extract from the background without too much work.

 Create A Sepia Tone Effect In Photoshop
Creating the Sepia Tone effect is pretty simple because Photoshop CS has a Sepia Tone setting in its collection of photo filters. Don't have CS yet? This tutorial includes an alternative pre-CS method as well.

 Wrap Text Around An Object
Learn a quick and simple technique that will let you wrap text around an object. Plus you can download a free high resolution version of the photo used in the tutorial.


 The Photoshop Blog offers the latest Photoshop and Digital Photography news and software updates, tips and tutorials, and random thoughts from graphic artist, digital photographer and Photoshop expert Jennifer Apple.

![]()
![]()
![]() Get all your Photoshop upgrade options and the best prices at the Adobe Store.
Get all your Photoshop upgrade options and the best prices at the Adobe Store.![]() Watch free Photoshop Elements video tutorials from Total Training.
Watch free Photoshop Elements video tutorials from Total Training.![]()

