Showing posts with label Shabby Chic. Show all posts

Wednesday, August 14, 2019

Field Notes: A Vignette for The Funkie Junkie Boutique Blog

Sara Emily Barker https://sarascloset1.blogspot.com/2019/08/field-notes-vignette-for-funkie-junkie.html Mixed Media Vignette Tim Holtz 1

Hello and welcome! Today we start a new challenge at The Funkie Junkie Boutique blog, and it's my turn to host. I'm calling my challenge Let's Do It Again! and here are the details:

Have you ever made something that you wish you could do over? Perhaps it was a technique you tried and didn't get the results you were hoping for. Maybe you didn't have just the right product you wanted to make your project just perfect. Or maybe a friend asked you to make something like it for them. Now's your chance for a do-over. Choose one of your own posted vintage or shabby chic projects and do it over with a bit of a twist. Be sure to link back to the post of the project you are making over and tell us why you wanted to do it a second time and what's different about it this time. We like to see your entry be in the vintage or shabby chic style we prefer. 


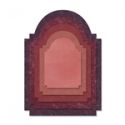
I chose to make over my Pretty Little Birds vignette, because a sweet blog friend asked if she could buy my vignette. Since that one had already been spoken for, I promised to make her another as a gift. This one has so many of the same elements and techniques, but varies mostly in color and style. I would say my original is more vintage, while this leans toward being shabby chic. I also had no choice but to design this a little differently, because this was the only box I had that would fit the embroidery hoop.


After applying several coats of gesso, I altered the box to look like real wood with Rusty Hinge and Vintage Photo Distress Spray stains and Walnut Stain Distress Oxide spray. I thought I had taken photos of the process, but they seem to have disappeared. This is a different process than I did on my original vignette box.

I start with a gesso base. Next I apply stain directly from the bottle to a cosmetic sponge and make vertical streaks of the two colors down the boxes outer surfaces. Next I mix a couple drops of oxide with collage medium and apply with my finger. I had to work quickly, because Distress Collage Medium dries very quickly.

Sara Emily Barker  https://sarascloset1.blogspot.com/2019/08/field-notes-vignette-for-funkie-junkie.html Faux Wood Tutorial

In the end, I swiped random areas of the outer edges with Distress Crazing I had left on my fingers and highlighted the cracks with Distress Crayon.

Sara Emily Barker https://sarascloset1.blogspot.com/2019/08/field-notes-vignette-for-funkie-junkie.html Mixed Media Vignette Tim Holtz 2

I crackled the background for the embroidery hoop like I did in my original post, but this time, I sealed it right away with Distress Collage Medium Matte, and then adhered the Aviary Collage Paper with the matte collage medium. 

I wanted to make this one lighter, so while I still used Distress Crayons to color the image, I used Tumbled Glass. I also smeared with a little Cracked Pistachio Distress Oxide Spray that was on my finger. I chose to keep the original patina of the hoop, because it was so pretty.

As before, I backed the hoop with a die cut circle (Stitched Circles) and adhered Crochet die cuts around the edge.

Sara Emily Barker  https://sarascloset1.blogspot.com/2019/08/field-notes-vignette-for-funkie-junkie.htm Crackle Tutorial

Sara Emily Barker https://sarascloset1.blogspot.com/2019/08/field-notes-vignette-for-funkie-junkie.html Mixed Media Vignette Tim Holtz 3

I stuck down three pieces of foam core to fill the opening at the bottom and topped that with a piece of cat food box.I coated the chipboard with gesso, then adhered bits of Aviary collage paper. I coated both the chipboard piece and the Idea-Ology Quote Chips with Crazing, and when dry, smeared with crayon, dipped into puddles of watered down oxide spray and finally, spritzed with Black Soot marker.

 (Just to be clear, no food touches the chipboard; they are just cardboard layered between cans of food within a box. I'm glad I hoarded some of these, because I found out that each can of food is equivalent to a human eating a Big Mac every day. No wonder Roger's so fat! No more Big Macs for the kitty, and no more chipboard to hoard.  :(:( ) 

Inside edges and background paper (Wallflower; thank you to Kathy Clement for her generous gift! She sent me a HUGE stack of Tim Holtz papers and packs of Distress crayons. She sure knows how to spoil a girl!) are covered with leftover bits of collage paper. I coated the edges with Crazing and smears of Ranger Opaque Crackle Paste. When dry, I sprayed lightly with Twisted Citron Oxide spray. The background paper has crackled stenciling and spritzes of Vintage Photo Distress Spray stain and Oxide spray.

The lip of the box is painted with Walnut Stain Distress paint and then crackled with the Ranger paste. To highlight the cracks I smeared with Vintage Photo crayon.

Sara Emily Barker https://sarascloset1.blogspot.com/2019/08/field-notes-vignette-for-funkie-junkie.html Mixed Media Vignette Tim Holtz 4

I didn't have anymore robin eggs, so I had to make my own. I had these cheapo plastic eggs in my stash, and I altered a pair of yellow ones with gesso, oxide sprays, Distress paint and markers.

The Idea-Ology Quote Token is altered with Picket Fence paint.


Sara Emily Barker https://sarascloset1.blogspot.com/2019/08/field-notes-vignette-for-funkie-junkie.html Mixed Media Vignette Tim Holtz 5

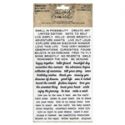
Lastly, I made the little stack of field notes with pieces of kraft paper and discontinued Kraft Glassine paper, wrinkled and blended with Walnut Stain ink. I topped with a snip from the Wallpaper stash and tied with cord.

Here are some additional close up photos for you to enjoy.

Sara Emily Barker https://sarascloset1.blogspot.com/2019/08/field-notes-vignette-for-funkie-junkie.html Mixed Media Vignette Tim Holtz 6

Sara Emily Barker https://sarascloset1.blogspot.com/2019/08/field-notes-vignette-for-funkie-junkie.html Mixed Media Vignette Tim Holtz 7

Sara Emily Barker https://sarascloset1.blogspot.com/2019/08/field-notes-vignette-for-funkie-junkie.html Mixed Media Vignette Tim Holtz 8

Sara Emily Barker https://sarascloset1.blogspot.com/2019/08/field-notes-vignette-for-funkie-junkie.html Mixed Media Vignette Tim Holtz 9

Sara Emily Barker https://sarascloset1.blogspot.com/2019/08/field-notes-vignette-for-funkie-junkie.html Mixed Media Vignette Tim Holtz 10

That's all for me today, but if you stop The  Funkie Junkie Boutique blog, my talented teammates will inspire you with their do-overs for the 'Let's Do It Again!' challenge. Then it's over to you! I can't wait to see what you choose to do over! Hugs and Blessings! Sara Emily


The following products were used and can be purchased at The Funkie Junkie Boutique:

Tim Holtz Idea-ology Collage Paper Aviary
Stampers Anonymous Tim Holtz Mini Layering Stencils - Set 27
Sizzix Chapter 2 Tim Holtz Thinlits Crochet
Sizzix Framelits Die Set 6PK - Stitched Circles
Distress Oxide Sprays: Antique Linen, Twisted Citron, Cracked Pistachio, Faded Jeans, Walnut Stain
Ranger Tim Holtz Distress Crayons - 6PC Set #3
Ranger Tim Holtz Distress Crayons - 6PC Set #5
Ranger Tim Holtz Distress Crayons - 6PC Set #7
Ranger Tim Holtz Distress Ink Pad - Walnut Stain
Distress Paint: Walnut Stain, Picket Fence, Cracked Pistachio
Distress Spray Stain: Vintage Photo, Rusty Hinge
Ranger Tim Holtz Distress Collage Medium Matte
Ranger Tim Holtz Distress Collage Medium Crazing
Ranger Opaque Crackle Texture Paste


Monday, August 20, 2018

Beautiful Day

Sara Emily Barker http://sarascloset1.blogspot.com/ Shabby Card Faux Driftwood Tim  Holtz Sizzix Alterations Stampers Anonymous Distress Oxide 1

Welcome friends and visitors! Today I'm sharing a card I made for my daughter--just because. Once again, I've used my treasured Tim Holtz 3D Texture Fades. I hope you are not getting tired of seeing these on my projects. I don't think I'll ever tire of using them! They are so versatile, and it's super easy to achieve incredible depth and texture on any project you might choose to use them on.

Sara Emily Barker http://sarascloset1.blogspot.com/ Shabby Card Faux Driftwood Tim  Holtz Sizzix Alterations Stampers Anonymous Distress Oxide 2

The frame is made from card die cut with Stacked Archway and then passed through my die cut machine with the Lumber embossing folder.  I scored a few extra vertical lines on the panel after embossing, wanting to give the appearance of narrow boards. Inked with brown Distress inks and smeared thinly and randomly with DecoArt crackle paint, I think it looks like shabby driftwood.  I used Tim's Splatter Brush with Ground Espresso Distress paint for some woodworm holes.

I love the Botanical 3D Texture Fade in Shaded Lilac Distress Oxide! Just a bit of Seedless Preserves oxide and Ground Espresso ink bring out even more of the wonderful dimension. A little splatter of white chalky paint and some stitching add more detail.

Sara Emily Barker http://sarascloset1.blogspot.com/ Shabby Card Faux Driftwood Tim  Holtz Sizzix Alterations Stampers Anonymous Distress Oxide 3

Those delicate flowers are stamped with Tim's Flower Jar stamps on watercolor paper, painted with Distress Oxides and Marker using a water brush. These are super easy to cut out using the Flower Jar Framelits dies.

Sara Emily Barker http://sarascloset1.blogspot.com/ Shabby Card Faux Driftwood Tim  Holtz Sizzix Alterations Stampers Anonymous Distress Oxide 4

I chose a vintage button and some crocheted lace from my stash. I patted the lace with Antique Linen oxide pad and spritzed with water to age the pure white lace. The bits of greenery are from the same Flower Jar stamp and framelits sets. The detail on these is amazing!

Sara Emily Barker http://sarascloset1.blogspot.com/ Shabby Card Faux Driftwood Tim  Holtz Sizzix Alterations Stampers Anonymous Distress Oxide 5

I added a Tiny Text Remnant Rub to a piece of card and blended with Frayed Burlap ink for my sentiment.

Sara Emily Barker http://sarascloset1.blogspot.com/ Shabby Card Faux Driftwood Tim  Holtz Sizzix Alterations Stampers Anonymous Distress Oxide 6

The butterfly is from Botanical Layers, and I  coated it with Vintage Collage Medium. I love the Ideaology Index Clips. This one is smeared with crackle paint and frames a Remnant Rub from the Words collection.

Sara Emily Barker http://sarascloset1.blogspot.com/ Shabby Card Faux Driftwood Tim  Holtz Sizzix Alterations Stampers Anonymous Distress Oxide 7

I layered everything over another Lumber panel, finished in the same way as the frame.

I hope you enjoyed my card as much as I enjoyed making it and that you are inspired to get out your crafty supplies and get creative! As always thank you for your visit and wonderful comments!

Hugs and Blessings!
Sara Emily

These products were used and can be found at The Funkie Junkie Boutique:

Wednesday, July 11, 2018

Prima Havana Shabby Chic Card

Sara Emily Barker http://sarascloset1.blogspot.com/ Prima Havana Shabby Chic Card #prima #havana #lavender #rosegoldwax #timholtz #3D embossing #botanicaltexturefade 1

Welcome, friends! It's Wednesday and time for the Funkie girls to post their inspiration at Frilly and Funkie for our current challenge "B" Happy chosen by Frilly teammate, Cec.

Here's what Cec has to say about her chosen theme: "Create a shabby chic or vintage project that makes you happy and features birds, bees and/or butterflies. You must use at least one of these things with wings and it must have a place of prominence on your creation but if you wish to use two or more, please feel free to do that."

Butterflies, birds and flowers all make me happy, so I've used plenty to embellish my shabby chic top fold card (yeah, I know, so different for me!). I chose to work with Prima's Havana and Lavender collections in stock at The Funkie Junkie Boutique, because they,  too, make me happy with their lovely designs and shimmery highlights.

Sara Emily Barker http://sarascloset1.blogspot.com/ Prima Havana Shabby Chic Card #prima #havana #lavender #rosegoldwax #timholtz #3D embossing #botanicaltexturefade 3

I made my background with Tim Holtz Botanical 3D Texture Fade and one of the beautiful papers from the Havana A4 paper pad. I just gave the paper a wash of gesso and while still damp, ran it through my die cut machine with the folder. I let it dry completely and swiped Prima's Rose Gold Metallique wax over the raised areas with my finger.

Sara Emily Barker http://sarascloset1.blogspot.com/ Prima Havana Shabby Chic Card #prima #havana #lavender #rosegoldwax #timholtz #3D embossing #botanicaltexturefade 4

I actually used products from three different Prima paper collections to create and embellish this card. 'Blessed is die cut from one of the Lavender Journaling Cards using a Tim Holtz Stacked Postage die. I edged it with more Rose Gold wax and layered it with Havana Ephemera, Lavender paper and Cherry Blossom washi tape. The key is from Linda's shop; it's colored with Prima Platinum Crackle Paste.

Sara Emily Barker http://sarascloset1.blogspot.com/ Prima Havana Shabby Chic Card #prima #havana #lavender #rosegoldwax #timholtz #3D embossing #botanicaltexturefade 5

This dimensional butterfly is Lavender's Aislinne. I love how everything works so well together. I've tucked in a pair of Heirloom Roses colored with Gunmetal alcohol ink and Rose Gold wax and some fern from Funkie Florals 3.

Sara Emily Barker http://sarascloset1.blogspot.com/ Prima Havana Shabby Chic Card #prima #havana #lavender #rosegoldwax #timholtz #3D embossing #botanicaltexturefade 6

The shimmery butterfly is from the Havana Ephemera pack and the small one on the Havana Camila flower is fussy cut from the Lavender A4 paper pad. There are pages of these beautifully colored
butterflies in the pad, and that's what sold me on this collection. 


Look at that shimmer on this one! You might also pick up the shimmery crackle on the pieces inserted in the mixed media die cut. I gave them a coat of the Platinum crackle paste. I used a couple more of the papers from the Havana A4 paper pad to add layers.

Sara Emily Barker http://sarascloset1.blogspot.com/ Prima Havana Shabby Chic Card #prima #havana #lavender #rosegoldwax #timholtz #3D embossing #botanicaltexturefade 7

Inside, another of the papers from that same stack, this one featuring some more delicate butterflies and tropical birds. Love this paper!

Sara Emily Barker http://sarascloset1.blogspot.com/ Prima Havana Shabby Chic Card #prima #havana #lavender #rosegoldwax #timholtz #3D embossing #botanicaltexturefade 8

I pulled out a few more of the ephemera to make a little side load pocket and this simple tag. The larger butterfly on the pocket is another fussy cut from the Lavender paper pad. The pocket is the perfect size for a gift card. I've made this card for my brother and sister in law who will be hosting us for part of our upcoming vacation, and we usually give them a gift card to their favorite local restaurant.

Sara Emily Barker http://sarascloset1.blogspot.com/ Prima Havana Shabby Chic Card #prima #havana #lavender #rosegoldwax #timholtz #3D embossing #botanicaltexturefade 2

That's what makes me "B" Happy! Be sure to stop by Frilly and Funkie for more inspiration from both my Frilly and Funkie teammates. What makes you happy? I hope you'll find time to share your project featuring bees, butterflies or birds and play along in our "B" Happy challenge at Frilly and Funkie.  As always, there's a $25 shopping spree to The Funkie Junkie Boutique for a random winner or you could be named one of the Design Teams four favorites and win a chance to Guest Design at Frilly and Funkie.

Challenge shares:
Country View July 2018 - In The Summer Garden Actually, I've only seen two butterflies in my garden this season!


Thank you for your visit today and for taking your time to leave your precious comment!
Hugs and Blessings!
Sara Emily

These products were used and are available at The Funkie Junkie Boutique: