Friday, 12 September 2008

Spicy Marinated Salmon with Raw Bean Salad

Guess what???

I'm moving house soon, having finally managed to lease my place out! I'm happy in some ways, but sad in others - I've had many good times in my wee flat and am sorry to leave it. Even worse, I will no longer be Kittens in the Kitchen... as the cats can't come with me to my new place.* So I guess I'll just need to be Kittie in a Different Kitchen...

But on the positive side, I'm moving for a very good reason (which I'll tell you all about very soon) - and now that I'm moving out, I know that my plans are actually starting to come together!

Anyway, less of the cryptic ramblings and onto the food!

I have about 3 weeks left in my flat - which means three weeks to run down the store cupboard and freezer - I won't be able to take much with me. So I think it is time for another Store Cupboard Challenge! It is something I had been thinking about doing anyway, and seems to be a bit of a theme in the food blogosphere at the minute, what with Judy's clean out, and Heather's purge...

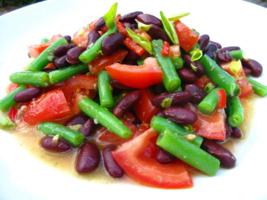
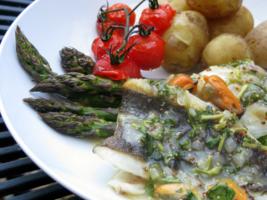
I quite like raiding the pantry and freezer - it makes me feel like I'm on an extended episode of Ready, Steady, Cook! So I started off with this dish - using up some beans and tomatoes from the fridge, 2 almost empty packs of cous cous from the cupboard, and a couple fillets of salmon that I got for a end of day bargain price of £1.20!

The beans and tomatoes are deliberately all but raw. If you don't fancy raw beans feel free to give them a bit of a steam before adding them - I really fancied the crunch factor of keeping them raw though.

Try eating it hot from the pan - or cold the next day for lunch!


Spicy Marinated Salmon with Raw Bean Cous Cous

I haven't really put specific quantities - add more or less cous cous to pad it out - or more veg to up the health factor!
  • 150g salmon fillet
  • 1 tsp sesame oil
  • 1 tsp hot sauce
  • 2 tbsp light soy sauce
  • Juice of 1 lime
  • 1 tbsp honey
  • 1 clove crushed garlic
  • 12 grated ginger
  • cous cous
  • stock
  • 3 large tomatoes, diced
  • olive oil
  • salt and pepper to taste
  • Various beans, I used dwarf and sugar snap, cut into bitesize pieces!
Prepare the Salmon...
Chop the salmon into bite size pieces and place in a bowl. Mix together the sesame oil, hot sauce, soy sauce, lime juice and honey and pour over the salmon. Mix well, cover and refridgerate for an hour or two.

Prepare the Cous Cous...
Toast the cous cous for a couple of minutes in a dry pan, until it turns golden. Remove into a bowl and drizzle over about a tablespoonful of olive oil and a bit of salt and pepper. Remember the stock is saltly too, don't over season! Use your fingers to mix the olive oil into the cous cous - get it all covered and make sure there are no lumps! Add hot stock onto the cous cous, until it is just covered. Cover the bowl and leave for 10 minutes.

This won't actually cook the cous cous thoroughly - we're going to add more stock in a bit if we need to. I find doing it this way helps make it fluffy - not soggy!

After the 10 minutes are up, fluff the cous cous well and add the tomatoes and beans.

Cook...
Heat some olive oil in a hot wok. Drain off the excess marinade from the salmon and add the fish to the pan. Cook quickly over a hot heat so the outside gets a bit of a crust, leaving the inside not quite cooked. Don't worry if some of the chunks break up, it's all part of the charm!

Remove the salmon to a bowl.

In the same wok heat a spot more oil add the ginger and garlic and cook out for a couple of minute. Throw in the cous cous mix and fry for a couple of minutes, letting the cous cous pick up all the flavours from the salmon. If the cous cous is still al dente, add a bit more stock (remember the tomatoes will release some juices which will continue to soften the cous cous!)

Return the salmon to the wok and combine with the cous cous.


Serve with a smug grin safe in the knowledge that this is delicious and good for you! And maybe a glass of crisp white wine - it is Friday after all!


Left over tip!
I had some leftovers, so mixed them up with a bit of whisked egg to form a pliable mixture. Formed it into a couple of patties and rolled in panko before doing a shallow fry. I forgot to take pictures - so you'll have to take my word for it, but these were fab!!! Which I ended up having for breakfast the next day as I was out of bread!


* Don't worry, they are being looked after by a friend of mine until I'm in a position to get them back...


This recipe is all mine, so I'm sending it over to Lore's Original Recipes event.

I had to double check, but cous cous is a pasta - so it's one for Presto Pasta Night - this week being hosted by Psychgrad and Giz over at Equal Opportunity Kitchen!

Because I got the salmon so cheaply, this worked out to be a very cheap dinner - costing about £2.70 for 2 large portions, plus leftovers! Scale it up to 4 and we're still under £5, so this is my submission to this week's Frugal Friday!


Culinarty Original Recipe RoundupPresto Pasta NightsFrugal Fridays

Monday, 1 September 2008

Pretending It's Summer... Fusilli with Macerated Tomatoes & Garlic

Phew!

It's just been so warm out there that I can't bear to put the oven on. I've been living on cold beer, salad and ice-cream. Even the thought of turning on the hob bring me out in a sweat.

Nah, not really...

Though we did have a pretty nice day on Saturday - sat out on the beach and didn't even have to put on our sweaters until 7pm! (Actually it was really nice - I even went for a swim!) But that's not the point. When I made this last week, we had barely had a glimmer of sun in weeks (ish...) So I thought I would attempt to bring some sunshine into our lives with this no-cook pasta sauce.

And it worked. It tasted like greenhouses, gardens and lazy bees*... the noise of lawnmowers over the way, and the bbq two doors down. And just so long as I turned up the central heating and put on my SAD light, I was almost able to persuade myself that it was summer after all...


Fusilli with Macerated Tomatoes & Garlic

Feeds 4...
  • 500g fusilli
  • 100g emmental, finely grated
  • 12 large tomatoes, diced
  • 4 cloves garlic, crushed (reduce this if you have a date later ;)
  • handful greek basil
  • 3 tbsp balsamic vinegar
  • 1/4 cup olive oil
  • salt and freshly ground black pepper to taste
Put all the ingredients, except the pasta together. Mix well and leave for a while - ideally about an hour!

Cook the pasta according to the packet. Add the tomato mix to the pasta and toss to mix well.

Taste and adjust seasoning if required.

Serve with a cold beer, in a bikini!


* no, not actually.


Another pasta dish for Presto Pasta Night! This week being hosted by Abby of Eat the Right Stuff!

Presto Pasta Nights

Friday, 22 August 2008

More noodley goodness: Orange & Ginger Soba Noodles

I found this recipe a while back, on my first visit to the beautiful vegetarian Indian food blog, Saffron Trail. And despite never having tasted it, I got a real craving for it a couple of days ago!

It's basically a noodle dish with a nice bit of steamed veg... and a gorgeous orangey, gingery, peanut butter dressing! Yum. I mixed the dressing up, and I could have probably eaten the lot of it with a spoon! (Peanut butter soup!!) I think this dressing would go amazingly well as a dipping sauce for chicken too.

While the original recipe calls for smooth peanut butter, I only had crunchy at home. While I probably will try it with smooth when I get a chance, I really liked the extra texture that the crunchy peanut butter added.

This is a great dish, quick and relatively healthy. I made up a batch in the evening and had it for dinner, then took the leftovers to work the next day. You must do this!!! It was even better on day 2!

Anyway, happy Friday everyone! Long weekend for me due to a public holiday... to celebrate I'm heading up to Notting Hill Carnival! Cross your fingers for some sun!

Orange & Ginger Soba Noodles

Serves 4...
  • 3 tbsp crunchy peanut butter
  • 2 tbsp toasted sesame oil
  • 3 tbsp soy sauce
  • 1 tbsp grated ginger
  • Juice and zest of one orange
  • 1 tsp red chilli powder
  • 250g soba noodles
  • 6 Runner beans, cleaned and thinly sliced
  • 3 carrots, ribboned
Prepare the Dressing...
Whisk together all the ingredients except the noodles and veg - taste and adjust seasoning or acidity - I added a dash more orange juice and another dash of soy. Set aside.

Prepare the Noodles...
Cook noodles according to packet - probably 5/6 minutes. Drain and rinse under cold water.

Prepare the Veg...
We want these to be super lightly steamed - the crunch of the carrot ribbons go so well with the silky noodles! So maybe 3 minutes for the beans, and just a couple of minutes for the carrots.

Chuck it All Together!
If you want to eat this warm, heat the noodles by pouring boiling water over them. Mix together the veg and noodles; give the dressing a last whisk, then pour it over the top.

Mix through so that all the noodles are coated in the dressing.

If you fancy a faff, decorate with some raw carrot ribbons and orange segments. Or not!

Either way, tuck in, slurp it up, and wonder why you've never tasted gingery orange peanut butter before... Enjoy!


Another Friday trio!

This week I'm going to send this over to Ruth at Once Upon a Feast for Presto Pasta Night! Though I think I'm early - at time of writing the last round up hadn't even been posted!

Its near the end of the month, so a cheap dinner is even more appreciated than usual. And that's why I'm going to send this to Frugal Fridays! Even taking into account that I used posh organic soba... this would feed 4 for about £4 - or ~ $8!

And finally, this is my second submission to Ruth's Bookmarked Recipes event. Check out the round up on Monday!


Presto Pasta Nights Frugal Fridays

Monday, 18 August 2008

Hot Pork and Shrimp Glass Noodles

This dish is based on one I had at a work BBQ a few weeks ago. Made by a lovely Thai woman and served cold as a salad, it was my favourite food of the day! I have tried to recreate it here - but I think I am still missing something... if I see her again, I'll be sure to get a full recipe!

Don't get me wrong, it was still really tasty... it just wasn't exactly the same. And I can't figure out quite what I need to change... But I'm sure I'll have fun trying to work it out!

Advance notice - I'll be getting Scottish Scran 3 out to you any day now... I'll give you a clue... it's a trooty affair!


Hot Pork and Shrimp Glass Noodles


Prepare the Dressing...
  • Juice of 2 lemons
  • 4 tbsp fish sauce
  • 1 tsp maggi sauce (or dark soy if you can't get maggi!)
  • 1 cloves garlic, crushed
  • 1" ginger, finely grated
  • 1 tsp dried chilli flakes
  • 1 tbsp rice wine
  • Soy sauce to taste
  • 1 tsp of toasted sesame oil
  • 1 tbsp sugar

Mix all the ingredients together and whisk well to combine. Set aside in the fridge until the other ingredients are ready... but make sure you whisk again before using!

And the Rest...!
  • 300g bean vermicelli
  • 150g raw shrimp, peeled, cleaned and butterflied
  • 300g ground pork
  • 1 tbsp fish sauce
  • 1 cloves garlic, crushed
  • 1" ginger, finely grated
  • 1/2 tsp dried chilli flakes
  • 1 small handful peanuts, roasted and roughly chopped
  • 1 tsp of toasted sesame oil
  • 3 spring onions (scallions!), finely shredded
  • Handful cilantro, roughly chopped
Prepare the Noodles...
Boil some water on the stove. Cook the noodles in the water for 4 minutes, or according to the packet - do not overcook or they will fall to pieces later!

Once cooked, run them under cold water to stop them cooking any more and set aside.

Prepare the Base...
Heat a little oil in the bottom of your wok until it is very hot. Crumble in the pork, then stir fry for three to four minutes. Keep it moving!

Add in the ginger, garlic, sesame oil, fish sauce and dried chilli.

Once the pork is cooked add in the shrimp and continue to stir fry until the shrimp are cooked.

Serve!
Take the dressing out of the fridge and give it a wee taste. Does it need anything (a touch more chilli, sugar or salt perhaps? Or maybe it's perfect as it is!)

Place the noodles in a big bowl and pour over half of the dressing (you did remember to give it another stir right?) Use chopsticks (or a pasta server!) to give it a good mix.

Chuck the peanuts, cilantro, scallions, pork mix and the rest of the dressing on top and combine well.


Mmmmm... gotta love that porky noodle goodness!!!

Sending this over to Kitchenetta of Got No Milk who is hosting this week's Presto Pasta Night!

Thursday, 14 August 2008

Orzo with Chicken, Chorizo and Aubergine

This is yet another spur of the moment dinner, inspired purely by what I had left in the fridge - namely a pack of chicken thighs and an aubergine. I had to be out the door within the hour too - so it had to be ready in half an hour... and it was!

After the slight confusion from Tuesday's use of the word courgette (zucchini!), I think it may well be wise to explain up front that an aubergine is none other than the North American eggplant. What I didn't know, is that brinjal also means aubergine in India and South African English! (I always assumed it was an Indian ingredient that I couldn't get here!!)

Want more? Well, aubergine and brinjal have etymological similarities, both deriving from Arabic/Sanskrit. (The Sanskrit vatin-ganah begat the Persian badin-gan and badin-gan begat the Arabic al-badinjan and al-badinjan begat the Catalan albergínia and albergínia begat the French aubergine... which us Brits basically stole for our own!)

The North American/Australasian use of eggplant started in the 18th century - when some fruits* were white or yellow, and resembled goose or hen eggs!

Language lesson over for the day - let the recipe begin!

Orzo with Chicken, Chorizo and Aubergine

Makes loads!!
  • 6 chicken thighs, bone in and with skin
  • 1 aubergine (eggplant!)
  • 100g chorizo, chopped into smallish chunks
  • 1 tin chopped tomatoes
  • 1 clove garlic, minced
  • 250g orzo
  • 1 tsp paprika
  • cayenne pepper for seasoning chicken
  • 250ml water or chicken stock
  • oil to fry
  • salt and pepper to taste
Prepare the Meat...
Heat oil in a hot pan. I used olive oil, tempered with some ground nut to reduce the smoke point. Throw in the chorizo and fry for a minute or two. Keeping it moving so it doesn't burn. Ideally we want some crispy edges... and for some of the tasty spicy oil to be released. Remove the chorizo from the pan and turn up the heat to very hot

Cut off any excess fat or skin from the chicken, leaving enough on protect the meat when searing. Season with salt and cayenne pepper.

When the oil is hot, carefully lay in the chicken thighs, skin side down. Allow to sear for 2/3 minutes - the skin should be nicely crisped and browned, but not burnt. Remove to a plate and reduce the heat to medium.

Prepare the Pasta...
In a saucepan, mix the orzo with the tomatoes, garlic, paprika and seasoning. Top up with the chicken stock or water and bring to the boil. Place the chicken thighs into the pan skin-side up, cover and simmer for 10-15 minutes - or until the chicken is cooked through.

Prepare the Aubergine...
Meanwhile, cut the aubergine into 1" chunks and add them to the frying pan that the chicken/chorizo was cooked in. Fry until browned, but don't overcook!

Serve!
When the pasta/chicken is ready, mix in the aubergine and serve. Preferably with a large glass of red!


Oh - I seem to have a three in one foodie event situation again!

As it cost about £3.70 (just over $7 ?) for the whole thing, I'm going to make this my second submission to Frugal Fridays! And if it's not quite as healthy as last week's entry - I still don't think it's doing too bad!!

Although almost all of my recipes are my own, I've singled this one this week to send to Lore at Culinarty for her Original Recipes event... It was just so yummy, I felt it had to be shared!

It's the first time I'd cooked with orzo - and I'm definitely going to be stocking up. I'm sending it to Ruth at Once Upon a Feast, who is hosting Presto Pasta Night this week!


Culinarty Original Recipe RoundupPresto Pasta Nights

Frugal Fridays


* oh yeah, did I mention they are fruits not vegetables?!

Wednesday, 6 August 2008

Hot Lemon Asparagus Bucatini with a Scottish Twist!

Have you ever tried bucatini? (At least I think it's bucatini - it could well be maccheroncelli or perciatelli. If anyone knows the difference - check out below and let me know what you think!) It's a long hollow pasta, kind of a cross between spaghetti and macaroni, and it's perfect for eating with smooth sauces.

I picked up a packet of bucatini a few weeks ago, and set about making up a smooth sauce. This is from my backlog - when I constantly had a fridge full of asparagus and had just made my Scottish sausage.

Because I invented this all by myself, I'm sending it over to Lore at Culinarty for her Original Recipes event...

And because it's pastalicious I'm sending it to Michelle at the Greedy Gourmet, who is hosting Presto Pasta Night this week...

And (yes, another one!) because this is cheap as chips (or as close as!) it is going to be my first submission for Frugal Fridays - the whole thing will feed a family of four for less than $10! And it's super healthy!


Hot Lemon Asparagus Bucatini with Crunchy Sausage Topping!

Serves 4 messy people...
  • 4 large tomatoes
  • 12 thick spears of asparagus
  • 1 onion
  • 2 clove garlic
  • 1/2 tsp hot sauce
  • 1 tbsp tomato purée
  • The zest of one lemon
  • 150g Scottish sausage meat (or substitute with another sausage meat. If you have to.)
  • A couple of tbsps of fresh oregano leaves
  • A little olive oil to fry
  • 1/2 tsp sugar
  • salt to taste
  • bucatini to serve
Prepare the veg...
Trim the woody ends from the asparagus, and cut most of the spear into chunks - reserving the tips.
Chop up the onions and garlic - make 'em as chunky as you like - we're going to blitz it in the end anyway!
Chop up the tomatoes, skin, seeds and all.

Make the sauce...
Heat the olive oil over a medium heat, add the onions and garlic, then fry for a few minutes until softening. Throw in the tomatoes (along with any juice), the lemon zest, hot sauce and the tomato puree. Add the sugar and some salt - you can always add more salt later to taste, but it is better to add it as early as possible.

Cover and simmer for 15 minutes - the tomatoes should release enough liquid to make the sauce, but if not, top up with water or stock.

Make the Crunchy Sausage Topping...
Meanwhile, break up the sausage meat into lumps and place into a medium, hot pan. You shouldn't need any oil as the sausage will release plenty. Fry for 5-6 minutes, keeping the sausage moving, breaking it up as it cooks. Once cooked, turn up the heat to high and fry for a minute or two without moving it to give a crunchy edge to the meat.

Finish the sauce...
After the 15 minutes is up, put in most of the oregano and the bits of asparagus stem - reserving the tips. Cook for another couple of minutes, then remove from the heat.

Put the sauce into a liquidiser or use a hand blender to blitz it to a smooth sauce.

Return to the heat, add the asparagus tips and cook for 3-4 minutes.

Put it all together!
Cook the pasta according to the instructions on the packet, then add to the pot of sauce. Mix well, so that the sauce sooks* into the pasta. Place into a bowl, top with the crunchy sausage pieces and the remaining oregano.

Eat!
This was the hardest bit - this is seriously messy pasta to eat! It was on the floor, face, sofa and cat by the time I was done. Worth it though!!


* Although not really a Scottish Scran post - the addition of the square sausage definitely warranted disclosure of another Scottish word!

Sook (v) - to suck
The best way tae eat this is tae sook it a' up an no worry aboot the mess yer makin'

Alternate use:
Sook (n) - a suck up/ brown-nose/ teacher's pet!
See her? She's a wee sook so'n she is!


Culinarty Original Recipe RoundupPresto Pasta Nights

Frugal Fridays

Tuesday, 8 July 2008

Watercress and Rocket Blue Cheese Pesto

'Pesto' basically means to pound or crush. And traditionally pesto is made by pounding herbs and garlic with a mortar and pestle. But pounding makes me tired, hot and grumpy, so I revert to my old faithful - Mr Kenwood! End result? Gorgeous pesto in 5 minutes!

Typically, the pesto most people know and love is Pesto alla genovese - basil, garlic, olive oil, pinenuts and a hard cheese. My version uses rocket, watercress and creamy blue cheese... really quite different - and I loved it! One of the reasons I don't make pesto too often is because it costs a fortune to buy that much basil here (yes, I have tried to grow it - plants always commits suicide within weeks in my keeping... ;) But I will definitely use this as a way to use up excess herbacious leaves - they usually end up in the bin!

Now I know some people like their pesto chunky - but my personal preference is a full blitzing. If you'd prefer more texture to your pesto, put all the ingredients in at once and blend to desired bittiness!

I'm sending this over to Gay at a Scientist in the Kitchen, who is hosting Presto Pasta Night this week for Ruth at Once Upon a Feast!

Watercress and Rocket Blue Cheese Pesto


Excuse the dark piccy - I took this to a friend's house for dinner, and forgot my camera, so this is a phone camera shot!!
  • 150g watercress/ rocket, washed
  • 2 cloves garlic, crushed
  • 1 small handful pinenuts
  • 3 tbsp blue cheese
  • extra virgin olive oil
  • salt and pepper to taste

Prepare the Pinenuts...
Roast your pinenuts in a hot dry pan for a minute or two - for an extra bit of depth!

Make the Pesto...
Put the garlic and pinenuts into your processors and blend until fairly smooth. Add the watercress and rocket and continue to whizz until the leaves are finely chopped. Incorporate the cheese - as it blends drizzle in olive oil until you reach your desired consistency.

Taste and adjust seasoning.

Serve!
I used mine to make blue cheese spaghetti with asparagus - cook the pasta according to instructions, chucking in the aspargus for the last minute or two of cooking. (Yes, steaming it would be better - but this way is so much easier... less pans to clean too ;) Strain out the aspargus and chop into bite size lengths. Drain the pasta, reserving some of the cooking liquor. Add the pesto to the pasta (I used half of the above portion to feed 4), top with the asparagus and crumble over more of the blue cheese. A sprinkle of roasted pine nuts on the top - and you're ready to slurp!

Thursday, 12 June 2008

Balsamic-Caramelised Echalion Pasta with Meatballs!

Well, it's Day Four of Kittie's new job - and it's going well so far! I'm missing not being too busy to check out as many blogs as I would like - not to mention posting here. But hopefully it will settle down over the next few days and I'll work out a new routine!

Update! Since my last edit (it was originally Day Three!), I have been told I am going to be moved onto another new project - to make better use of my talents... I didn't realise you got IT Project Cooks!! ;)

In the little time I have today, I thought I would pass on this great pasta dish. As you may have guessed, I've had a bit of a thing about caramelized onions recently - I keep making up big lots of them then chucking them into various dishes! Nom nom nom... my favourite so far was the chicken and caramelized onion risotto... nom nom nom!

This started out as a what-can-I-make-without-leaving-the-flat dish... Armed with a bag of Ikea meatballs, a bag of banana/ echalion shallots, a tin of tomatoes and an excuse to open a lovely bottle of red, I stormed the kitchen, banged together a few pots, and 45 minutes later sat down to a lovely bowl of...


Balsamic-Caramelised Echalion Pasta with Meatballs

Add meatballs/ pasta to stretch this up to 4!

Woo hoo - two weeks in a row! This is my effort for this week's Presto Pasta Night - hosted by Ruth at Once Upon a Feast. Hang on - oh no it isn't... This week it is instead being hosted by Kevin at Closet Cooking!!
  • Ikea meatballs (ok then, make 'em from scratch if you're feeling energetic!)
  • 400g tin chopped tomatoes
  • 150ml red wine
  • 1 red bell pepper, chopped
  • 6 echalion shallots, caramelized with a touch of balsamic - see here for details!
  • 1 clove garlic, minced
  • Fresh oregano, chopped (from my garden!)
  • 2 Bay leaves (Also from my garden - it survived the snails!)
  • pasta to serve - I used some barollo linguine (which is why is looks a funny colour!) but I didn't enjoy it too much and won't buy it again!
Prepare the Sauce...
In a pan, heat a glug of olive oil and lightly fry the garlic for a minute or so. Add the tomatoes, wine, oregano, bay leaves and bell pepper.

Simmer for 20 minutes until the sauce has deepened to a dark red, and the raw tomatoey smell has gone.

Season to taste

Finish the Sauce...
Add the meatballs and continue to cook until they are cooked/heated through.

Add in the caramelised onions and combine well.

Serve...
With a sprig of fresh oregano and the pasta of your choice!

Tuesday, 3 June 2008

Quick and Easy Hot Shrimp and Edamame Udon Soup

I absolutely love making soup - and recently especially so if it contains noodles, seafood and chillies... it's more of a pasta dish than a soup really. Yet I get to feel smug that I've only had soup for dinner!

The soup below takes about 15 minutes to prepare if you have all the ingredients prepared - perfect for a healthy mid week dinner.

Its been a while since I've taken part (or at least it feels like it!) so I'm sending this over to Presto Pasta Night - hosted by the lovely Ruth at Once Upon a Feast.


Hot Shrimp and Edamame Udon Soup

Serves 2 big bowls, or four as a starter!
  • 1" piece grated ginger
  • 1 clove garlic, crushed
  • 1 tbsp tom yum paste - eek, I cheated! You could probably use whatever paste you wanted here - or even none at all, it still has a load of flavour!
  • 1 pt chicken stock
  • 1 pack udon noodles
  • 1 tbsp fish sauce
  • 2 handfuls raw shrimp (apologies for vague quantities - I pulled them out of my box of frozen shrimp in the freezer... doesn't matter anyway - add as much or as little as you fancy! Oh, and I add mine from frozen :)
  • 1 handful shelled edamame beans (see above!)
  • 1/2 bell pepper, diced into large bits
  • 1 small tin of coconut milk
  • A couple of drop of roasted sesame oil (if you have it... gives a lovely deep flavour)
  • Light soy sauce, to taste
  • Lime juice, to taste
  • shredded scallions, sliced thai chillies and cilantro to garnish!

Par-boil the Noodles...
I reckon this gets rid of the starchiness and gives a cleaner soup - but I haven't done a side to side comparison with the same brand of udon, so could possibly be talking out of my proverbial!
Put the noodles into a pot of boiling water and simmer for one minute - until they have just lost their brittleness. Drain and rinse under cold water.

Prepare the Base...
Heat a glug of nut oil in your hot wok and add the ginger, garlic and paste if you're using it and fry for up to a minute, until sizzling! Add the chicken stock and fish sauce and bring to the boil.

Bringing it all Together...
This bit depends a bit on the cooking time of the udon noodles, and what state the shrimp are in. My shrimp were large and frozen - so I gave them 8 minutes. The udon noodle pack recommended 7-8 minutes, so I chucked em in a couple of minutes after that. The edamame beans and pepper went in 3 minutes before the end, along with the coconut milk.

Serve!
Use a pasta server to scoop out a portion of noodles into each bowl, top with the remaining shrimp and veg, then ladle over the remaining broth.
Add a drop of sesame oil on to each.
Serve with the scallions, chillies and cilantro, soy sauce and lime juice on the side, to allow each eater to adjust to taste!

Thursday, 8 May 2008

Left Over Roast Beef Tagliatelle with Caramelised Onions

Ok... now in your head, start thinking of Fleetwood Mac, Albatross....

... are you ready?

... doo be doo be doo be dooooo.....

(cue food porn voice)

... This is not just pasta, this is silken, al dente tagliatelle mixed with succulent cubes of rare roast beef...

...in a rrrrich, red wine sauce with just a hint of heat from dried red chillies, laden with sweet caramelised onions...

... this is not just garlic bread, this is home-made focaccia, split and spread with garlic and black pepper infused butter, baked in the oven until crispy at the edges...

...This is not just food, this is kittie's leftover roast dinner food!


Ok, ok, so I'm being even more random than usual... For those of you not based in the UK (or perhaps for everyone if my impression was that bad ;) that was a mini-spoof of the M&S food adverts. Which shouldn't really be allowed on telly until after the watershed!

Anyway, without further ado, here is my entry for this week's Presto Pasta Night - a fabulous weekly event hosted by Ruth at Once Upon a Feast - if you like pasta - get over there and check it out!

Leftover Roast Beef Tagliatelle!


  • Left over rare roast beef, cut into cubes
  • 1 tin chopped tomatoes
  • 1 shallot, finely chopped
  • 1 clove garlic, crushed
  • 1 glass red wine
  • 2 red onion, halved and thinly sliced
  • 1/2 tsp red chilli flakes
  • Olive oil to fry
  • 1/2 tsp sugar
  • salt and pepper
  • Pasta to serve
Caramelise the onions...
Over a very low heat, place the sliced onions in a pan, add a glug of olive oil and gently fry. Once they start cooking down add a pinch of salt to stop them burning, and a pinch of sugar to encourage the natural sweetness of the onions. Cook for 30-40 minutes until dark golden and caramelised, adding a little bit of water if required to keep them moist.

Meanwhile... make the sauce...
Heat a glug of olive oil and gentry fry the shallot and garlic until soft. Add the wine, tomatoes, 1/2 tsp sugar and chili flakes. Simmer gently for 25 minutes and turn the heat off. Add the roast beef cubes. You want to keep these as tender as possible - so allow them to be heated by the heat in the sauce - don't allow to boil again.

And the garlic focaccia...
To accompany it I served the remains of the focaccia I made for Taste and Create. I mixed some softened butter with a bit of olive oil, one crushed clove of garlic and a few decent grinds of black pepper. I split the bread in half, and spread the cut side with the butter mixture. I then wrapped it in foil and chucked it in the oven for 10 minutes - opening the foil for the last couple of minutes to let the edges start crisping!


Serve the sauce thoroughly mixed with the tagliatelle - with the garlic bread on the side!

Monday, 28 April 2008

Vietnamese Crab Noodle Salad

Mmmm... I made this salad last week when I was ill with the cold - I figured I needed something with pretty strong flavours just so I could taste it! And it definitely hit the spot!!

I'm back at work now - feeling loads better. Luckily the cold didn't impact my appetite at all - even though I had days when I couldn't taste anything at all... Y'know - it's really hard to cook when you can't taste or smell!! I made a curry for my mum and dad on Thursday. I was using some new dried habenero chillies - and was really disappointed by how bland they were. Until my mum tried it... after the 2nd glass of water it became apparent that they weren't so bland after all!

But despite the cold and lack of taste, in the end I did manage to do some cooking - I just wasn't up to posting! And not being able to leave the house too much definitely helped me stick to my store cupboard challenge!

I'm sending this over to Ruth at Once Upon A Feast for Presto Pasta Night. I'm so glad you're feeling better now Ruth!

Vietnamese Crab Noodle Salad

Per person, multiply at will!

For the salad:
  • rice vermicelli noodles, soaked according to packet, rinsed in cold water
  • 1 scallion, shredded
  • 1/2 medium carrot, grated
  • 5 radishes, grated
  • 1/4 cucumber, seeds removed, and chopped into chunks
  • white crab meat (mine was from a tin!)

For the dressing:
  • 2 tbsp fish sauce
  • Juice of half a lime
  • 1 Thai red chilli, finely chopped
  • 1 clove garlic, crushed
  • 1" piece ginger, finely grated
  • 2 tbsp sugar
  • 1 tsp rice vinegar (optional!)
Garnish:
  • handful of raw peanuts, roasted and roughly chopped
  • rough chopped cilantro

To make the dressing...
Put all the ingredients in a bowl, and mix until the sugar is dissolved

Put the salad together...
Pour half of the dressing over the drained noodles and mix well. Mix the salad veg together with the remaining dressing.
Put the noodles in the serving bowl and top with the veg, then the white crab meat.

Top with the peanuts and cilantro... and enjoy!

Tuesday, 8 April 2008

Ravioli with Walnut, Spinach and Porcini

So on my first proper cooking day of my Store Cupboard Challenge (I didn't think that Kraft mac n' cheese last night counted ;) I decided it was time to use up the block of white stilton that I had picked up at the weekend. I had never cooked with it before - but as it was only 30p from the deli counter, so figured I would work out a use for it!

I was going to make cheesecake with it, but my biscuits for the base had gone stale. So I set my mind to a savoury plan... What I really fancied was gnocchi, but I didn't have any potatoes. Eventually I hit on ravioli - but other than white Stilton, I couldn't think what to put in it! I wanted to keep it quite soft and rich - most of my available ingredients were too demanding for this!

The combination of porcini, spinach and walnut wasn't one I'd tried before - but the flavours worked well together. Though I think it was a little rich for a main - I think in future I would serve two or three as an appetiser.

Also, I had never made stuffed pasta before - but I'm happy to report it was fairly event-free!

On a completely separate aside, I went to bed fairly soon after eating this, and it did cross my mind to be concerned about cheese-induced nightmares... But that was not to be - I had very bizarre dreams, which were exceptionally vivid - but not bad at all! Today I found this article comparing the effects of eating British cheese on dreams - and according to the study 85% of females who eat Stilton before bed have very vivid and crazy dreams... So go on gals - knock yourselves out!

Ravioli with Walnut, Spinach and Porcini


I'm sending this over to Ruth at Once Upon A Feast for Presto Pasta Night - though I think she has put me to shame with her proper ravioli making equipment!
  • 250g white stilton
  • 50g dried porcini
  • 2 egg yolks
  • 1 large bunch spinach
  • 2 cloves garlic
  • 1 banana shallot
  • 1 small handful shelled walnuts, roughly chopped
  • 1 handful shelled walnuts, blitzed to crumbs!
  • 1 tsp corn flour, dissolved in a couple of tbsps water
  • 200g tipo 00 flour
  • 2 eggs
  • semolina flour for dusting
Pour a cup of boiling water over the porcini and leave to soak for 30 minutes, or until rehydrated. Strain, reserving soaking liquor.

Making the pasta!

In a blender, blitz half of the mushrooms to a puree. Heat some olive oil and fry the puree for a couple of minutes.

In the blender, mix the flour, mushroom puree and 2 eggs to make a dough - adding a little of the mushroom liquor if required. Remove from the blender, knead for 2/3 minutes until elastic, wrap in film and refridgerate for at least 30 minutes.

Take a look at my post on roasted garlic pasta for more details on making and rolling pasta - I won't write out the details again here!

The filling!

While the pasta is resting, use your blender (yes again! I can't imagine life without my kenwood! ;) to mix 200g of the white stilton and two egg yolks until fluffy.

Chop the shallot, crush one of the garlic cloves and finely chop the remaining porcini. Over a medium heat, fry these for a few minutes until soft. Add to the stilton mix.

Wilt the spinach for a couple of minutes until soft. Strain and squeeze to remove excess water. Add 3/4 of the spinach to the stilton mix reserving the other quarter for the sauce.

Blitz the mix a few times to combine the ingredients, then add the handful of roughly chopped walnuts.

Season well with salt and black pepper!

Make the Ravioli!
Roll out the pasta to the 3rd thinnest setting (See how to roll here!). Cut sheets into manageable sizes! Lay one sheet of pasta out, and place teaspoons of mixture onto it, leaving enough space round the edges to seal it.


Brush the edges with water, and lay another sheet of pasta on top. Starting from one end of the sheet, use a cupped hand to seal the stuffing inside the pasta - making sure there is no air pockets. Cut the raviolis out, trimming the edges as required.

The Sauce!
Dead easy - do this just before serving! Heat a glug of olive oil, crush the remaining garlic clove and fry gently for a minute. Add the remaining spinach, the strained mushroom soaking liquor and the cornflour mix. Stir in the rest of the walnuts, and bring to the boil, then crumble in the remaining stilton. Remove from the heat and stir to melt the cheese into the sauce.

Finishing the Dish!
Cook the ravioli in plenty of boiling salted water for about 3 minutes. Place into a warm dish and drizzle with some olive oil and some of the walnut sauce. Note that the walnut sauce is pretty rich - you don't need much!


Wednesday, 2 April 2008

Squid & Chorizo Linguine... and a helluva lot of it!

Yesterday marked another foodie first for me...

...I cooked with fresh squid!

This time last year I could barely even eat it - until I tried the most amazing Indonesian squid starter... and became slightly hooked. So when I saw squid yesterday in my fishmongers, I knew it was time...

I got him to clean it for me - I wasn't quite that brave yet. And it was a Tuesday night - why not avoid effort where you can! Then I wandered back to work, stored the squid in my work fridge (!) and set about deciding on a context for my purchase. The sun was streaming in through the window (which made me believe that Spring was maybe just a little bit more here than it actually was) and I decided that a salad would be perfect. With thanks to Peter for his suggestions, I wandered off home to get the rest of my ingredients for his Prawn and Grilled Calamari Salad.

But then real-life got in the way... as it so frequently does. In this instance, in the shape of a beer-garden with a patch of sunlight - and two G&Ts! By the time the sun went in, and resumed my journey home, I was absolutely FREEZING!

The salad no longer seemed so appealing, and instead I started craving pasta - and a lot of it. So I give you instead...

Spicy Squid & Chorizo Linguine

Makes two HUGE servings!

I still nicked some of Peter's flavours - spot the difference ;) And, as this is the first pasta I've cooked for weeks, I'm going to send this over to Ruth at Once Upon a Feast for this week's Presto Pasta Night!

  • 1 large squid, cleaned
  • 100g chorizo, cubed
  • couple of big handfuls of rocket
  • 1 red chilli, finely chopped
  • 2 cloves garlic, crushed, but kept separate
  • 6 sundried tomatoes, very finely chopped
  • 1/3 cup balsamic vinegar
  • 1/2 tsp sugar
  • 1/2 tsp dried red chilli flakes
  • a punnet of cherry tomatoes
  • olive oil for frying
  • linguine to serve
Turn on the oven to 180c. Wash the cherry tomatoes, and place in a baking tray. Roast until further notice!

Prepare the squid by butterflying it, then cutting into two halves lengthways. Using a serrated knife, score the squid in both directions to create diamonds. Score quite deeply - but don't but through! Slice the squid body into strips and place in a bowl with the tentacles, a glug of olive oil, 1 crushed clove of garlic and the fresh red chilli. Mix well - make sure the squid is well covered, then set aside.

In a heavy based frying pan, fry the chorizo over a high heat to colour the edges. Remove from the pan with a slotted spoon and set aside. (Now's probably a good time to put the pasta on!) Add a wee bit more olive oil to the pan if required, and add the other clove of garlic, and the dried chilli. After about 30 seconds, add the balsamic vinegar and the sugar, and allow to reduce for 2/3 minutes. Add the sun-dried tomatoes and chorizo cook for a further minute or so then set aside.

Once the pasta has just about cooked, drain - reserving about a cup of the cooking liquor. Return the pasta to the saucepan, with the cooking liquor, the rockets and the chorizo mix. Get the roasted cherry tomatoes out of the oven and chuck them in too! Stir well and set aside while the squid is cooked.

In the same hot pan used for the chorizo mix, throw in the squid. Allow to cook for 2/3 minutes, keeping it moving all the time.

Dish up the pasta mix into a couple of bowl, then place half of the squid on top of each.

Enjoy! Btw... see the photo below? I ate that whole bowl of pasta. In one sitting. And then ate the leftover fish kebabs from the night before. Then half an Easter egg.

So maybe I should have salad tonight!

Sunday, 9 March 2008

Home Coming Thai Noodle Soup!

I survived!

I have just returned from a week's skiing in Obertauern, Austria - and have made it home pretty much in tact... although I do have some very attractive bruises. Especially on my butt from where A pushed me off the chairlift... (apparently it was an accident...)

So now I'm home, washing done, cats treated and mollycoddled to make up for the neglect. It's after midday, and I'm in my PJs, about to start looking through my Google reader to see what new fabulous recipes have been concocted in my absence. (Current unread sat at 237!)

But before I do, here's a quick post of some thai noodle soup I made last night when I got home. After the stodge of Austrian cuisine, I was desparate for something light and spicy! Which isn't to say I didn't enjoy the stodge - more to follow on that later (homemade cheese spatzel with roast onions anyone??)!
...
...
...
Oops... I got sidetracked! And now it's no longer Sunday, but Monday night - and I have even survived the first day back to work! Still not had a chance to catch up on my food blogs though...

Anyway - back to the recipe... and I'm going to send this over to Ruth at Once Upon a Feast for Presto Pasta Night!


Thai Chicken Noodle Soup


Makes one huugge bowl - or two normal sized ones...
  • 1 large banana shallot, halved and finely sliced
  • 1 small clove garlic, crushed
  • 1/2 teaspoon ginger, grated
  • 1 tbsp thai curry paste (I used green, but anyone would do!)
  • Half a red pepper, sliced
  • 1 chicken breast, finely sliced
  • Handful of mushrooms, quartered
  • 1 small courgette, sliced and halved!
  • 165ml tin coconut milk
  • 350ml chicken stock
  • 1 portion rice noodles
  • 1 thai red chilli, sliced
  • Small handful cilantro, roughly chopped
  • fishsauce to taste
  • light soy sauce to taste
  • lime juice to taste
Heat a small glug of olive oil in a pan, then gently fry the shallot, ginger and garlic for a couple of minutes, then add the mushrooms and thai curry paste and fry til done.

Meanwhile, cook noodles according to packet, drain and rinse.

Chuck in the rest of the veg, the stock, coconut milk and the chicken. Bring to the boil, reduce heat to a simmer, and cook for 5 minutes, or until chicken is done.

Add noodles, taste and adjust seasoning with fish sauce and soy sauce. Dish up and garnish with the red chilli and cilantro and a squeeze of lime juice!

Thursday, 28 February 2008

Puttanesca Putapasta

I had the girls around again last night. And what with my parents arriving for a visit today, I had loads of clearing up to do (and there's one corner of my bedroom is stuffed with bags that I can't quite bring myself to unpack).

But I got home from work last night, looked around and decided to ignore the rest of the house, and make a dish for Presto Pasta Night instead! (After all, it is the 1 YEAR BIRTHDAY of Presto Pasta Night - the first blog event I ever participated in. Thanks to Ruth at Once Upon a Feast for her continued efforts and humour in hosting this event!) Anyway, I needed some food therapy, so decided to make the pasta from scratch. From the kneading of the dough, to the repetitive passes through the pasta machine, this was a task to calm my mind, and soothe my soul.

A piquant, spicy pasta sauce was also required - the comfort-food blandness of mac and cheese, mashed potato or chicken soup was just too insipid to tempt me - I wanted something to burn through the fug I've been wandering through for the last few days...

A puttanesca sauce was in order - and as one of the girls doesn't like olives (or too much spiciness!) I decided to make fresh olive and chili papperadelle to go with it.

Puttanesca Puta-pasta!


For the pasta:
  • 250g semolina flour (plus extra for dusting)
  • 250g strong pasta flour
  • 18 kalamata olives - pitted
  • 1tsp ground red chillies - add more or less to taste!
  • 4 whole eggs
  • 4 egg yolks

For the sauce:
  • 50g anchovy fillets, roughly chopped
  • 3 cloves of garlic, crushed
  • 2 red chillies, deseeded and finely chopped
  • 700g ripe tomatoes - cut into quarters, deseeded and the hard core removed, then halved again (a tin of chopped would work just as well, and be much cheaper and quicker!)
  • 2 tbsp caper - rinsed/drained and roughly chopped
  • 75g kalamata olives, pitted and quartered
  • olive oil to fry
  • black pepper
  • handful fresh basil

First of all, to prepare the pasta. I went into more detail on how to make fresh pasta when I posted my Home-made roasted garlic pasta - I'll just put down the quick version here - please refer to my earlier post for details in rolling and cutting!

Blitz the olives with the dried red chili and one egg yolk until very finely chopped - but not quite a purée. You want to be able to see the flecks of olive in the finished dish!

I mixed this by in my food processor - put the flour, olive mix and eggs into a mixer with a dough blade on it, and pulse until well combined - the dough should be coming together into big chunks. If it feels sticky, add some more flour.

Turn out onto a work surface, and knead for 5 minutes until elastic and shiny. Wrap in cling film and put in the fridge for an hour or so.

Meanwhile, prepare the sauce (and this is one of the easiest sauces in the world!).
Heat a glug of olive oil over a medium heat, then saute the chilies, garlic for 1 minute, and the chopped anchovies and cook for a further minute or two until they start to melt.

Now I confess - I've never cooked with anchovies before - I don't really like them... but I do like them in cooking - and it turns out them were wonderful in this sauce - not fishy at all. So if you don't like anchovies, don't be tempted to leave them out - they really make the dish!

So at this point the sauce was smelling very anchovesque - and I was contemplating takeaway options - just in case it all went wrong.

Add the tomatoes, capers and olives to the pan - I also added a splash of water to get it going. (I also removed one portion of the sauce before I added the olives so it didn't get contaminated ;)
Add a few grinds of black pepper - you shouldn't need salt - the anchovies/capers are salty enough!

Allow to simmer for 20 minutes or so - you can tell when it's ready, because the anchovy/fresh tomato smell is suddenly replaced by something that makes you want to eat it NOW!

Take the sauce off the heat, and set to one side until the pasta is ready.


Back to the pasta!

Remove the pasta from the fridge, divide into 4 balls, keep one out, and rewrap the others.
Following the instructions here, roll out and cut the pasta in 3/4 inch widths. One tip that I've picked up since writing that blog, is that once you have rolled the pasta to the desired thickness, you should leave it to dry slightly for 5 minutes or so before cutting (start rolling the next bit!). This definitely seemed to help with the cut pieces unrolling properly.

Cook the pasta in salted water for 1 to 2 minutes then drain thoroughly.

Add the drained pasta to the sauce, and throw in the handful of chopped basil. Mix well and serve!


Wednesday, 13 February 2008

Easy Peasy Pasta... though no peas, please!

I don't like peas. Scratch that. I hate peas. In fact, you may say I'm almost phobic. I was once almost reduced to tears when a (so-called) friend saved some peas from his meal at the pub, then pinged them at me when I was trapped in the car. Peas are small, green and evil. They make a squelchy 'pop' when you bite into them. One pea, hidden away in some chicken-fried rice, will pop and contaminate the entire mouthful with its evil juice. Bleurgh.

Though I have decided I am going to wean myself away from this irrational phobia. I managed to eat a few peas recently, hidden in a highly spiced, highly textured curry. It was a big step. The pop was almost unnoticeable.

I couldn't decide what to call this dish! It's my default pasta dish, which I almost always have In Case of Emergency. It is super-easy, super-fast (about as long as it takes to cook the pasta!), and super-tasty! A couple of possible variations mean I always have the ingredients. And it never contains peas.

ICE Pasta (In Case of Emergency)

I'm glad to have an entry to Ruth's Presto Pasta Night this Friday - the round up last week was fabulous!


  • 125g pasta per person (or however much you want!)
  • a hunk of chorizo, diced
  • 1 punnet chestnut mushrooms, halved or quartered depending on size
  • 1 clove garlic, crushed
  • 1 bag wild rocket, washed
  • Small handful pine nuts
  • olive oil for frying
  • dried red chilli flakes
  • Salt and pepper
Cook the pasta in plenty of boiling salted water. When cooked, drain, reserving about 1 cup of the cooking liquid.

Meanwhile, heat a frying pan to a medium heat, add the pine nuts (no oil) and lightly toast.

Remove the pine nuts to a bowl, heat a glug of olive oil in the pan, add the chorizo and fry until the chorizo oil starts to come out.

Add the mushrooms to the pan and toss so they soak up the oil from the chorizo. Fry until the mushrooms start to cook, then add the garlic, red chilli flakes to taste, and salt and pepper. Continue to fry for another couple of minutes, or until the mushrooms are cooked through.

Once the pasta is cooked, add the rocket to the pasta pan, add the reserved cooking liquid,then add the drained pasta. Stir and allow the rocket to wilt slightly - the heat of the pasta and the water should do this for you. Add the mushroom and chorizo and mix well.

Serve with the toasted pine nuts scattered on top!

Tuesday, 29 January 2008

Baked spicy saffron macaroni!

I can't believe I've got yet another pasta dish for Ruth's Presto Pasta Night over at Once Upon A Feast! I'm sure I've cooked more pasta this month than usual :) But it tastes so good, and is so comforting on a cold January evening!

Anyway, as a variation on a theme, this week I've prepared a spicy pasta bake. It was based on an episode of Come Dine With Me (one of the best Sunday afternoon reality/cookery shows EVER! If you haven't seen it, you're missing out...!) I think the woman decribed it as a baked pasta paella!

Oven baked spicy macaroni


  • 500g cherry tomatoes
  • 1 red onion, halved and sliced
  • 2 cloves of garlic - crushed
  • 2 tablespoons olive oil
  • 11 oz small macaroni
  • 4 boneless, skinless chicken thighs, quartered
  • 6 merguez sausages (original recipe specified chorizo - but when I saw these in my local sausage shop, I had to have them!)
  • Small handful fresh chopped rosemary (I got mine from my garden - yay!)
  • 300ml chicken stock
  • Pinch of saffron
  • 200g cooked prawns - the original recipe used large raw prawns - but these were what I had!
  • Handful of basil leaves, torn, ready to serve
  • Salt and pepper

Put the cherry tomatoes into a casserole dish and sprinkle with olive oil. Roast in a preheated oven at 220c for 15 minutes. Then add the garlic and red onions, and place the sausages on top then cook until the tomatoes are soft.


Remove from the oven. Take out the sausages, and cut into chunks. Add the macaroni, chicken, and sausage pieces rosemary, stock, saffron, salt and pepper. Mix well and return it to the oven to bake for 30 minutes.

Add the prawns, stir and allow the prawns to warm through for 3/4 minutes. You don't want to put it back in the oven at this point or the prawns may go tough.

Sprinkle with basil and serve.

Tuesday, 22 January 2008

Little ears, Orecchiette and peu d'oreille...

This week's Presto Pasta Night entry was inspired by finding a lovely packet of artisan orecchiette over the weekend. Orecchiette is Italian for 'little ear' - even though Wikipedia reckons it probably originated in France... so shouldn't it be called peu d'oreille?!

Can you imagine how long it takes to make a decent bowlful of the stuff? I found a couple of youtube videos on the subject, both using different methods. This one looks more professional - whereas this one... oh no - I've lost the link... Oh well, suffice to say it seems very labour intensive and would take HOURS to make a bowlful!!

Orecchiette with Spicy Italian Sausage and Broccoli


The meat forms the basis for the sauce in this - so make sure you use good sausages! I wanted some hot Italian Sausages, but they deli didn't have any, so I used Italian garlic and basil pork sausages - and added dried red chilli and paprika as I was cooking.

Have you ever noticed that if you type the word sausages enough it starts to lose its meaning... and almost looks French! Oh - just looked it up I was right - though maybe not for the right reasons!
"The word sausage is derived from Old French saussiche, from the Latin word salsus, meaning salted."
  • 200g tenderstem broccoli
  • 400g italian style sausages
  • 150ml chicken stock (I used bouillon concentrate, made up with the cooking water)
  • 1 clove garlic, crushed
  • tbsp tomato paste
  • tsp paprika
  • tsp dried red chile flakes
  • 250g Orecchiette
  • 100g pecorino romano cheese, finely grated
  • Glug olive oil for frying
  • salt and pepper to taste
Boil a bot of salted water and add the broccoli. Boil for 4 minutes until only just tender and still pretty al dente. Remove from the water with a slotted spoon and place in a bowl of cold water to cool.

While the broccoli is cooking, remove the sausage meat from the casings and roughly chop.

Heat the olive oil over a medium heat, then add the meat. Fry for a few minutes til browned - breaking the meat up with a spoon as you go. Once browned, sprinkle over the paprika, chile and garlic.

Once you have removed the broccoli from the water, add the orecchiette and boil for about 10 minutes - until not quite cooked.

While the pasta is cooking, chop up the broccoli fairly finely. and add to the sausage meat.

When the pasta is ready, drain, reserving the cooking liquid. (I used mine to make up the chicken bouillon.)

Add the sausage/ broccoli mixture to the pasta, then add the stock and tomato pasta. Check for seasoning, add pepper and salt as required. Allow to simmer for 3/4 minutes until the orecchiette is fully cooked.

Just before serving, stir in the pecorino cheese.*

* As always, Boyfriend would rather eat his little finger than anything cheesy - so I served up his portion without - it really didn't need the pecorino - but it was a nice addition!

Thursday, 17 January 2008

Pain in the neck Pasta... Part 2!!

Well, this is the second (and hopefully last!) of my pain in the neck pasta mini series! The first was last week when I managed to put my neck out... it got somewhat better but by yesterday I was in loads of pain again. But I was recommended a chiropractor, who did all manner of strange things to my spine (acupuncture, a machine called 'thumper', posture alignment, and a bit of crick cracking!) and the upshot is, my back feels better than it has done for years. Though I am still somewhat taken aback (no pun intended, groan) that I have one leg 3/4 inch shorter than the other!!

Anyway - hope I haven't put you off your dinner - basically I made this before I went to see him - and again was focusing on max taste - minimum neck movements!

Creamy Leek Tagliatelle with Bacon & Mushrooms


I had an idea a few days ago of cutting up leeks lengthways into tagliatelle sized strips and mixing them through pasta. So I considered a few options before hitting on this combination - and hope the guys at Ruth's Presto Pasta night over at Once Upon a Feast will approve!

I did fancy a creamier sauce for a change - which is something I seldom get to eat due to Boyfriend's cream/cheese phobia. (Well, not quite a phobia, but bordering on it!) I was originally going to use a goats cheese, and just mix it into my portion, but then I saw portion size boursin cheese - each one about 16g. I used 2 for my pasta - and it was fabulous! Ok, so maybe not great for the waistline... but it was a treat! Boyfriend said it was great even without the creaminess - I just used extra stock for his.

As always my quantities are approximate. I served two good sized portions from mine.
  • handful of pinenuts, lightly toasted
  • 2 leeks - try to make sure they aren't too old, or they will go stringy - look for a diameter of less than 1.5 inches, and no yellowing.
  • Medium sized punnet of chestnut mushrooms
  • 2 rashers bacon (I used smoked back bacon, pancetta would work too... I also thought about chorizo - but my supermarket had sold out!)
  • boursin (optional and as required, see note above!)
  • About 150 ml vegetable stock
  • 1 clove garlic
  • knob of butter
  • olive oil
  • tagliatelle
  • salt and pepper to taste
Slice each leek in half, and pull out any hard core from the middle. Slice each half lengthways into tagliatelle-width strips and wash well.


Melt the knob of butter along with the olive oil, then add the leeks. Saute for 3/4 minutes, adding a couple of grinds of black pepper when they start to soften.

Add vegetable stock and simmer til tender, but still with a bit of bite.

Meanwhile, thickly slice the mushroom and roughly chop the bacon. It's probably about the right time to put the tagliatelle on to cook now!

Over a medium heat fry off the mushrooms and bacon. When the liquid comes out of them, add salt and pepper to season, the crushed clove of garlic, and turn the heat up. They are ready when all the liquid has gone and the mushrooms start colouring at the edges.

Once the pasta has cooked, drain (reserving some of the cooking liquor in case it needs loosening) and return to the pan. Add the leeks and a dash of olive oil, and combine so the leeks are worked through the pasta. Add the boursin, and mix til combined - this is when you may need some of that cooking liquor!

Place in dish, and top with the mushroom/bacon mix. Scatter toasted pine nuts on the top.


Thursday, 10 January 2008

Slow-cooked Roast Garlic Ragu

It's January - and usually a month where I try to avoid pasta... but when I found Ruth's Presto Pasta night over at Once Upon a Feast... my will-power started to crumple. Or crumble... all these carbs have affected my brain!

It all started with the
home-made roast garlic fresh pasta but I needed more... I needed a sauce! After roasting off almost a dozen heads of garlic I set my mind to what else I could use them for...

I eventually came up with this gorgeous slow cooked ragu, with a pork and beef base, finished with 3 bulbs of garlic. It sounds like a lot, but the garlic was slow roasted until there was no sharpness left - just sweet, rich garlicky lushness!


  • 3 carrot
  • 3 sticks of celery
  • 2 onions
  • 3 roasted heads of garlic
  • Some olive oil for frying/drizzling
  • 500g minced (ground) beef steak
  • 500g minced (ground) pork
  • 1 beef stock cube
  • 1 tbsp fish sauce
  • 6 drops Tabasco sauce
  • 1 tbsp paprika (preferably smoked!)
  • 500g carton passata
  • 400g tin of chopped tomatoes
  • 3 tbsp worcester sauce
  • 1/2 tsp sugar
  • 1 tsp salt
  • 2 bay leaves
  • 2/3 bottle decent red wine
I started off by preparing the 'holy trinity' of Italian cooking - onions, carrots and celery. I already had my food processor out for making my pasta - so decided to save time and effort and use it for the veg too. I finely chopped one onion and used the grater attachment for the carrots and celery. Use an ovenproof dish to sweat this mixture off for about 20 minutes, or until soft. I used my Le Creuset casserole dish to do this - after lusting after one for years, I finally bought one last year and get it out whenever I can!

As I was going for sweet, rich favours I decided to caramelise the other onion. I cut the onion in half, then thinly sliced each half. After heating some olive oil over a medioum heat I chucked on the onions and let slowly cook for abotut half an hour until they were golden and caramelised. The kitchen was already starting to smell lovely!


When the onions and veg are cooked, remove to a bowl. If you have lots of lovely burnt bits on the bottom of the onions pan, then use a bit of the wine to de-glaze, and add that to the bowl too.

In the same ovenproof pan, brown off the pork mince - make sure the pan isn't overcrowded so it fries rather than boils! As it's January and I'm trying to be healthy, I strained off the pork and discard the fat, setting the meat to one side. While this was straining I fried off the beef in the same ovenproof pan. Once it was brown I added the strained pork, beef stock cube, Tabasco, fish sauce and paprika and let it fry for a couple of minutes.

Preparation almost done! Still a lot of cook time to go though...

I added the softened veg and onions, the passata, tinned tomatoes, worcester sauce, sugar, salt, bay leaves, and finally the red wine, then brought the whole lot to the boil. I was a bit surprised at how pink it looked - but I guess I'm used to making bolognese ragu with all beef!

I think I let my ragu cook in the oven for about 5 hours - but I think it would probably be ok after 3/4 hours. I stirred it every 30 minutes or so - it was quite easy to see when it all started to come together - initially it looked quite pink and 'bitty', but once it was ready the colour deepened to a dark colour and the texture was much softer.. I didn't need to, but make sure you add some water if it starts looking like drying out.

Right - almost ready - and the kitchen should smell amazing!

I removed the garlic mush from the roasted heads, and mashed it into a rough paste, then stirred it into the ragu. You could probably serve it right then - but I had to finish making my pasta, so it went back into the oven for another 15 minutes!
I served this with my roasted garlic pasta... I know that was probably overkill - and the sauce was definitely enough to stand alone - but it really did taste amazing! I found that I didn't need too much sauce with the pasta - nowhere near the quantity I was put out when making bolognaise. It was really rich, and coated the pasta well.

And it keeps the vampires away!