Friday, 12 September 2008

Spicy Marinated Salmon with Raw Bean Salad

Guess what???

I'm moving house soon, having finally managed to lease my place out! I'm happy in some ways, but sad in others - I've had many good times in my wee flat and am sorry to leave it. Even worse, I will no longer be Kittens in the Kitchen... as the cats can't come with me to my new place.* So I guess I'll just need to be Kittie in a Different Kitchen...

But on the positive side, I'm moving for a very good reason (which I'll tell you all about very soon) - and now that I'm moving out, I know that my plans are actually starting to come together!

Anyway, less of the cryptic ramblings and onto the food!

I have about 3 weeks left in my flat - which means three weeks to run down the store cupboard and freezer - I won't be able to take much with me. So I think it is time for another Store Cupboard Challenge! It is something I had been thinking about doing anyway, and seems to be a bit of a theme in the food blogosphere at the minute, what with Judy's clean out, and Heather's purge...

I quite like raiding the pantry and freezer - it makes me feel like I'm on an extended episode of Ready, Steady, Cook! So I started off with this dish - using up some beans and tomatoes from the fridge, 2 almost empty packs of cous cous from the cupboard, and a couple fillets of salmon that I got for a end of day bargain price of £1.20!

The beans and tomatoes are deliberately all but raw. If you don't fancy raw beans feel free to give them a bit of a steam before adding them - I really fancied the crunch factor of keeping them raw though.

Try eating it hot from the pan - or cold the next day for lunch!


Spicy Marinated Salmon with Raw Bean Cous Cous

I haven't really put specific quantities - add more or less cous cous to pad it out - or more veg to up the health factor!
  • 150g salmon fillet
  • 1 tsp sesame oil
  • 1 tsp hot sauce
  • 2 tbsp light soy sauce
  • Juice of 1 lime
  • 1 tbsp honey
  • 1 clove crushed garlic
  • 12 grated ginger
  • cous cous
  • stock
  • 3 large tomatoes, diced
  • olive oil
  • salt and pepper to taste
  • Various beans, I used dwarf and sugar snap, cut into bitesize pieces!
Prepare the Salmon...
Chop the salmon into bite size pieces and place in a bowl. Mix together the sesame oil, hot sauce, soy sauce, lime juice and honey and pour over the salmon. Mix well, cover and refridgerate for an hour or two.

Prepare the Cous Cous...
Toast the cous cous for a couple of minutes in a dry pan, until it turns golden. Remove into a bowl and drizzle over about a tablespoonful of olive oil and a bit of salt and pepper. Remember the stock is saltly too, don't over season! Use your fingers to mix the olive oil into the cous cous - get it all covered and make sure there are no lumps! Add hot stock onto the cous cous, until it is just covered. Cover the bowl and leave for 10 minutes.

This won't actually cook the cous cous thoroughly - we're going to add more stock in a bit if we need to. I find doing it this way helps make it fluffy - not soggy!

After the 10 minutes are up, fluff the cous cous well and add the tomatoes and beans.

Cook...
Heat some olive oil in a hot wok. Drain off the excess marinade from the salmon and add the fish to the pan. Cook quickly over a hot heat so the outside gets a bit of a crust, leaving the inside not quite cooked. Don't worry if some of the chunks break up, it's all part of the charm!

Remove the salmon to a bowl.

In the same wok heat a spot more oil add the ginger and garlic and cook out for a couple of minute. Throw in the cous cous mix and fry for a couple of minutes, letting the cous cous pick up all the flavours from the salmon. If the cous cous is still al dente, add a bit more stock (remember the tomatoes will release some juices which will continue to soften the cous cous!)

Return the salmon to the wok and combine with the cous cous.


Serve with a smug grin safe in the knowledge that this is delicious and good for you! And maybe a glass of crisp white wine - it is Friday after all!


Left over tip!
I had some leftovers, so mixed them up with a bit of whisked egg to form a pliable mixture. Formed it into a couple of patties and rolled in panko before doing a shallow fry. I forgot to take pictures - so you'll have to take my word for it, but these were fab!!! Which I ended up having for breakfast the next day as I was out of bread!


* Don't worry, they are being looked after by a friend of mine until I'm in a position to get them back...


This recipe is all mine, so I'm sending it over to Lore's Original Recipes event.

I had to double check, but cous cous is a pasta - so it's one for Presto Pasta Night - this week being hosted by Psychgrad and Giz over at Equal Opportunity Kitchen!

Because I got the salmon so cheaply, this worked out to be a very cheap dinner - costing about £2.70 for 2 large portions, plus leftovers! Scale it up to 4 and we're still under £5, so this is my submission to this week's Frugal Friday!

Culinarty Original Recipe RoundupPresto Pasta NightsFrugal Fridays

Wednesday, 18 June 2008

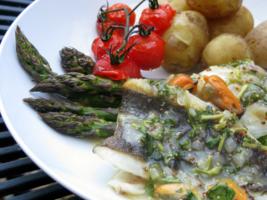
Pan-fried Dover Sole with Bean Salad

Just thought I write up a quick post to show you what I served with the bean salad I put together for No Croutons Required!

I was down at my fishmongers* and they had the most gorgeous sole - I picked up this beaut for £2!!! Bargaineous! ;)

What with all the flavours going on in the salad I figured the best treatment of this delicate fish was to keep it simple. A quick dredging of the skinned fish with flour, salt and pepper, then frying it in a medium heat pan with a good glug of olive oil for 4/5 minutes each side. Just before the first side was finished I melted in a knob of butter... Easy, tasty, perfect!

I tried something a bit different when preparing the fish this time - dover sole is notorious for getting rid of all the wee bones along the fins... so this time I left the fins on whilst cooking, then when it was cooked, used the side of the fish slice to gently pull the side fins away. Woo hoo - They came away in tact, with no little bones left to catch me out! I don't know if that was a fluke, but it definitely seemed easier than when I've left them whole in the past!

Pan-fried Dover Sole with Bean Salad


* oooo, excitement for kittie! It was the first time I'd been there in a week or so... and they've had a redesign... Now, in addition to the 'normal' fish I buy, they have a tank of live lobsters and crabs. I can't wait to try them - I've never prepared live lobster or crab before! Any tips or tricks will be much appreciated :)

Friday, 13 June 2008

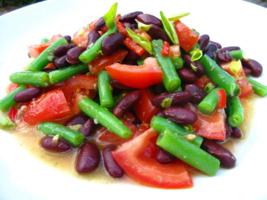
NCR: Bright & Beautiful Bean Salad with Capers & Oregano

Well, this is a first for me - sat in on a Friday night writing my blog! I never thought I'd see the day... But I've made it to the end of my first week at new work - and it's been a good one. Going to catch up on some of my reading tomorrow - I've been missing my daily blog-fix!

Anyway, I'm going to keep this entry short and sweet - it's 9pm and I'm far from ready to go out.

This is my month's entry to No Croutons Required. It was perfect timing for tonight really - healthy, tangy salad, with a hint of heat... ideal to prepare the body and soul for a good night out!

Bean Salad with Capers & Oregano


  • 2 large tomatoes, chopped into large chunks
  • 100g dwarf beans, lightly steamed, refreshed in ice water and chopped into bitesize chunks
  • 1 tin kidney beans, drained and rinsed
  • 1 red chilli, deseeded and roughly chopped
  • 1 clove garlic, fine chopped
  • 1 tbsp capers, roughly chopped
  • 2 tbsp extra virgin olive oil
  • Juice of half a lemon
  • 1 tbsp chopped fresh oregano - plus extra to garnish
  • half a cup of vegetable bouillion
  • olive oil to fry

Prepare the Kidney Beans...
Heat a glug of olive oil to a medium heat - then fry the garlic for a minute. Toss in the kidney beans and half of the chili. Fry for a minute, keeping it moving, then add half a cup of vegetable bouillion. I like my beans quite soft - so I allow this to boil away for a few minutes - alternatively leave it to sit to absorb the flavours for a bit.

Make the Dressing...
Whisk together the extra virgin olive oil and the lemon juice, and mix in the capers and chopped oregano. Season to taste.

Put the salad together!
Mix together the tomatoes, remaining chili and dwarf beans. Strain off the remaining bouillion from the kidney beans and add them to the mix. Pour over the dressing and mix well.

Give it 10 minutes to let the flavours get to know each other. This will equalise the heat from the kidney beans and the cold items - best served at room temperature I reckon!

Enjoy!

Monday, 2 June 2008

Slow-Cooked Leg of Lamb with Tomatoes, Garlic and Rosemary

This is a really unusual dish for me... yet still one of my favourites that I return to over and over. Take a look... count the ingredients.... six. Yep, six! Or maybe even just five if you exclude the seasoning. Not a chili or spice in sight!

If I saw this recipe, I would immediately be thinking: hmmm that sounds nice... now if I add a bit of smoked paprika, and maybe a touch of dried chillies... or maybe the teeniest pinch of coriander... but somehow with this dish I have always abstained. The lamb falls from the bone, it shreds as you try to cut it, so no huge lumps of meat here. The garlic and rosemary infuse both the lamb and the tomatoes; the wine and the tomatoes reduce down to a gorgeously rich sauce. This is by no means an uninteresting dish - despite the minimal ingredients... and preparation!

It was first cooked for me years ago by a friend of my parents - and it was actually the first time I really enjoyed eating lamb - up until then it had been too strong a flavour for me. (Except for teeny lamb chops - I've always loved those... drool!)

It is a quick and easy dish to prepare... just make sure you leave enough time for the cooking and resting.

I usually serve this with crispy, garlicky roast potatoes and asparagus, broccoli, or whatever other veg is in season. I couldn't find any decent 'roasty' tatties when I was making this though, so instead served it with fennel-infused rice (basically this without the saffron or turmeric). It worked well, though I probably preferred it with roast potatoes. I always try to make sure I have extra when I make this as it is great for next-day dinners. The flavours develop and mellow - and now is when you can dress it up a bit! Depending on your ratio of meat to sauce, either turn it into a pasta sauce or stuff it into a pita bread with lettuce, red onion, chillies and a sharp cheese.

Apparently simple sometimes is best!

Slow-Cooked Leg of Lamb with Tomatoes, Garlic and Rosemary

Serves 8 - though depends on the size of the leg!
  • 1 leg of lamb
  • 2 tins chopped tomatoes
  • 6 cloves of garlic, cut into thick slivers
  • sprig rosemary
  • 1/2 bottle of white wine
  • Salt and pepper to taste.
Preheat oven to 180c.

Prepare the Lamb...
Wash the lamb and pat dry. Trim off excess fat. Make regular slits into the lamb, and stuff each slit with a sliver of garlic and a leaf or two of rosemary. (Is it called a leaf? I can't think what else to call it!)

The garlic and rosemary studded lamb!

Pour over the two tins of tomatoes and the bottle of wine. Don't season at this point!

The First Cook...
Cover the lamb tightly with foil and place in the oven for 2 hours. Sometimes I turn the lamb half way through, sometimes I don't - doesn't seem to make such difference!

Stage two!
Take the lamb from the oven, put the leg onto a plate, cover and leave to rest for at least 45 minutes. This is important - not only does it incomparably improve the texture of the meat... it is also a lot easier to handle once slightly cooler!

Once rested, cut the meat from the bone. As I mentioned above, the lamb should be falling apart by this time - so don't worry about regularly sized chunks or slices. I like having some bigger pieces and some smaller bits - but it's up to you!

The Second Cook...
Return the chunked meat to the sauce, and season to taste. Return, uncovered, to the oven and cook until the sauce is suitably reduced. I generally find this takes a further 30 minutes, but don't let it dry out!

Serve!

Eat...

Sleep...

Work...

Blog...

Start thinking about dinner...

And I present you with...


Slow Cooked Lamb DAY 2!


  • Left over lamb and sauce
  • one tin cannellini beans, rinsed and drained
  • A handful vittoria tomatoes - or the smallest cherry toms you can find!
  • Some leftover caramelized onions from another dinner!
In a saucepan, reheat the lamb, pulling the lumps apart with forks until it is all shredded and gorgeous. Add the cherry tomatoes and cannellini beans and cook until the cherry tomatoes are soft but still hold their shape - imagine them popping in your mouth when you eat this - lush! Stir in the caramelised onions and serve with jersey royals and corn on the cob!

Friday, 23 May 2008

A Noteable Post and The Constant Crowd-Pleaser: Chili Con Carne

Guess what?

No... not THAT, silly...

This is my 100th post!!!

How exciting is that?! I have now been a food blogger for almost 6 months - in which time I have written on average four posts a week, concocted about 90 recipes of varying success, and entered numerous food blog events... Hell, six months ago I didn't even know events even existed!

I spend a lot of time dreaming up recipes and shopping for food, even more time making my 'creations', probably not nearly enough time photographing them (!), and hours cleaning up!

My must-read blog roll now has 14 blogs on it - with another 60/70 on my leisurely read list... (and counting - I added another this morning!) What an amazing community to be part of - I'm so looking forward to the next 100 posts!!

Anyway, reaching a milestone always leads to moments of reflection (as well as expectation!), so it is quite fitting that this post is also my entry to Tastes to Remember hosted by Sarah over at Homemade. It's another last minute entry for me - my third this week. Maybe at some point in the next 100 posts I'll develop some organisation skills?

As I mentioned when I made my Ultimate Chili Con Carne, I always remember the excited anticipation had by me and my sister whenever my mum was working away from home. Not because we were desperate to get rid of her (!) but because it meant my dad would make one of his two staples: chilli con carne or macaroni cheese (with HP brown sauce, of course!). Beloved by the three of us, those were two dishes that my mum just didn't appreciate - so when we were fending for ourselves, there was no choice but to indulge. Now, my mum is a fantastic cook - she's taught me a lot (when she comes to stay with me we spend hours watching cookery shows and deciding what to have for dinner that night!). But... kind of like me... she is pretty experimental and like to try new things - so there isn't the same constancy of dishes. (In saying that, watch this space for the BEST steak pie you'll ever taste... I'm planning a Scottish run of recipes soon!)

So, this recipe is pretty close to the one my dad used to cook for my sister and I - using ground beef and a nice amount of dried chili. And has to be served with plain rice and pita breads -open the pita pockets and stuff in as much chili and rice as you can.

Eat with your hands, in front of the telly. Just don't tell mum!


The Constant Crowd-Pleaser: Dad's Chilli Con Carne


  • 500g ground beef
  • 1 large onion, finely chopped
  • 3 cloves garlic, crushed
  • 1 tin chopped tomatoes
  • 1 carton passata (sieved tomatoes)
  • 1 beef stock cube
  • Salt and pepper to taste
  • 1/2 tsp sugar
  • 1 tsp ground cumin
  • 1 tsp ground coriander
  • 1 tbsp paprika
  • dried chillies - to taste, ground or flaked. I reckon at least 2 tsp though!! I used 1 tbsp of reconstituted holy trinity blend (Pasilla, Ancho, Mulato) and 1 tsp habenero flakes. Hot! Nice!
  • A few drops of tabasco if you fancy it (I usually do!)
  • 1 tin kidney beans

Fry...
Heat a glug of oil over a medium heat in a large saucepan, then add the onions and garlic and fry until soft. Remove to a bowl and fry off the ground beef in batches. Don't do it all at once, or you'll boil the beef instead of browning it - and lose half the flavour!

Mix...
Return all the beef and onion mix to the bowl, crumble in the stock cube and add the spices. Fry off for a couple of minutes before adding all the tomatoes and the sugar.

Simmer...
Bring to the boil, cover and simmer for 20 minutes. Taste it and adjust seasoning. If the tomatoes were very sharp you may want to add a bit of extra sugar here too. If it ain't spicy enough chuck in some more tabasco - or maybe some cayenne pepper. Make it yours baby!

Cover again and simmer for another 20-30 minutes, stirring occasionally. Add the rinsed kidney beans 10 minutes before the end.

Serve...
Like I said, lightly toasted pita breads and steamed long grain rice. Nowt else. Especially no cheese. Yes, I know it's lovely, but not for here. Save that for a huge bowl of chilli nachos with all the trimmings!

EAT!
yum nummm gobble slurp mmmmm..........


Thursday, 27 March 2008

Porcini Stuffed Pork with Red Pepper Pulse-otto!

Blimey - for some inexplicable reason I've written this post in reverse order - and it already seems really long! So I'll try to keep this bit short and sweet...

After a bout of illness, and a very unhealthy Easter Weekend, I was in the mood for a decent meal. It had to involve roast meat... and avoid starchiness! Then I remembered that I had wanted to enter this month's Waiter, there's something in my... event - which this month is... pulses! It's being hosted by Jeanne, over at Cook Sister - and I think it's a great theme! Especially as I have decided to try to eat more pulses and veg!

I've came up with a pulse-otto. Yes, yes, it's kinda twee and a bit forced, but I am starving and ready to go for lunch - so just think, risotto with lentils instead of rice ;) It was actually going to include rice initially... until I forgot to buy some... So I decided to chuck in red lentils instead. It just makes it even healthier! And even pulsier - so just right for this event!

Porcini Stuffed Pork with Red Pepper Pulse-otto!


Feeds 3 - with plenty of lentils to spare!
  • 600g pork tenderloin
  • 150g chestnut mushrooms
  • 5 cloves garlic
  • 30g dried porcini, soaked in hot water for 30 minutes, reserve soaking liquor
  • 10 slices smoked streaky bacon
  • small handful chopped flat leaf parsley
  • 15 sun-dried tomatoes in oil, finely chopped
  • Bunch spinach
  • 3/4 cup red lentils, washed
  • 1 tin green lentils (I used tinned - use whatever you have to hand!)
  • 3/4 cup broad beans (I used frozen - use whatever you have to hand!)
  • 1 red pepper
  • 1 red onion
  • Approx 250 ml vegetable stock
  • Salt & Pepper to season
  • olive oil for frying
Prepare the pork!

Preheat oven to 180c (350f).

Very finely chop the chestnut mushrooms - you could do this in the food processor, but I wanted to keep some of the texture! Chop up half of the porcini mushrooms. In a frying pan, heat a glug of olive oil over a medium heat, then fry mushrooms for a few minutes until almost cooked. Add 3 crushed cloves of garlic and continue to fry for a further couple of minutes. Remove from the heat, stir in the finely chopped sun-dried tomatoes, and season to taste.

Cut the visible fat and sinew from the pork tenderloin and cut in half lengthways to open the pork out into a flat rectangle. Cover with cling film and bash a few time with a rolling pin to flatten it out more uniformly.

Lay the washed, but uncooked spinach leaves over the pork (cut off any tough stems), then spread the mushroom and tomato mix over the leaves.

Now roll the tenderloin back up so it looks like a swiss roll!

Take each slice of bacon and flatten/stretch it out. (Either with a rolling pin, or by a knife - up to you!)

Cut one slice in half and stretch over each end of the "swiss roll". (Hmm... now is when I realise I really should have taken pictures at every step!) But basically, you are kind of sealing the ends to stop the filling coming out... Now, take the remaining bacon and, starting from the edge of the capped piece, roll up the pork log in the bacon. (I'm sure I'm making this sound more difficult than it is! Think wrapping chicken in parma ham!)

Heat a little olive oil in a frying pan, and seal the pork round all sides.

Place on a baking tray and roast in oven for 45 minutes (if using a meat thermometer, reading should be about 160c). Remove from oven, cover and leave for 10-15 minutes to rest.

The Pulse-otto!
Meanwhile, while the pork is roasting, start making the pulse-otto!

In a deep pan, sauté the onions and red peppers until soft. Chop up the other half of the porcini mushrooms and add to the pan. Crush two cloves of garlic and add them - and the red lentils - to the pan Allow to sauté for a few minutes more.

Add the strained mushroom liquor and the stock to the pan until the lentil are covered by about an inch.

Simmer for about 15 minutes, or until the lentils are tender. Add the broadbeans and green lentils, cover and set aside.

To serve!
Once the pork has rested, slice into 1cm rounds. Dish up a couple of spoonfuls of the lentil mix, top with the pork slices, and serve with roast vegetables.


**************************************

Note on re-heating!

I had about a third of this left to reheat the next day. I hadn't sliced it yet, as I was concerned that the pork would dry out or become tough.

To get6 round this, I mixed up a little vegetable bouillon (fairly weak) and put it into a frying pan (about 1cm up the sides). I then sliced the remaining pork, and put it into the pan. I poached it gently for 3/4 minutes, basting to ensure the top was warmed through also. It worked well - the pork was still tender and juicy!

I had some tomatoes going spare, so sliced them in half, chucked on a drizzle of olive oil, and sprinkled on some garlic salt and red chilli flakes. 10 minutes under a medium/high grill til they were just starting to collapse - yum!

Tuesday, 15 January 2008

My smug and tasty bean salad!

Well, after my speedy efforts to cook myself a quick dinner last night, I found myself with time to spare to make something nice and healthy to bring to lunch today!

After going for sushi on Saturday night, and snacking on pork gyozas when watching Terminator 2 on Sunday, I was feeling somewhat Japanese inspired, and decided to do something with edamame beans (soybeans) - but I can't take credit for the salad idea, as I nicked it from from Marks and Spencers...!

It tastes fabulous, and is super healthy. Unfortunately since I started typing this I've scoffed a choccie biscuit - but I still feel fairly virtuous!

Tuna and Bean Salad with a Spicy Sweet Chilli Dressing


Now, I have absolutely no idea what quantities I used - so am going to use handfuls! I made enough for 2 lunches - add or remove from this as required... Though it will keep for a couple of days in the fridge - just don't put the dressing on until you are ready to eat it. I reuse an old vitamin bottle to take salad dressings to work - then just shake it up and pour it on!

  • 200g tin tuna steaks
  • Large handful of broad beans (I used frozen)
  • Large handful of edamame beans (I used frozen)
  • Large handful of sugarsnap peas
  • 100g fine green beans, chopped into 1cm long pieces
  • Small handful of chopped coriander
  • 2 large handfuls leafy salad (I wanted to get rocket for this, but the shop didn't have any - so I tried pea shoots instead - lovely! Watercress would also work well)
Cook the broad beans , edamame and green beans for 3/4 minutes, or until just tender, then plunge into iced water to refresh. Drain well.
Divide the cold cooked beans between two dishes.
Place a handful of the salad leaves on top of the beans and top with the coriander.
Scatter over the sugarsnap peas.
Flake the tuna steaks and divide between the two dishes.

The dressing:
6 tbsp sweet chilli sauce
Juice of one lemon
Dash soy sauce
2 tbsp olive oil

Shake dressing ingedients together well, and pour over salad just before eating.