Today Stephanie Howell brings you the final installment of our JBS Christmas Garland, another lovely star (complete with a doily, of course!) to shine upon us. Stay tuned as soon we'll be back with the finished garland with all the lovely ornaments strung along it.
Supplies: Large Chipboard Star, Vintage Holidays Christmas Mini Paper Sheet, Vintage Holidays Christmas Accessory Sheet, Black Chalkboard Alphas
Showing posts with label christmas garland. Show all posts
Thursday, December 1, 2011
Tuesday, November 29, 2011
Christmas Garland #14 by Megan Klauer
Today we have another installment in our Christmas Garland, this one by Megan Klauer. I love the regal quality of this little banner as it shares the good news to all the earth. Thanks for the inspiration Megan!
Supplies: Vintage Holidays Christmas Mini Paper Sheet, Vintage Holidays Christmas Accessory Sheet, Family Tree Aunt Grace Paper, Vintage Christmas Chipboard Buttons, Garnet Superior Stick Pen, Mercantile Exclusive Die-cut Journaling Card - Star
Wednesday, November 23, 2011
Christmas Garland #13 by Doris Sander
Hello! Doris here! I have to tell you that I had so much fun creating this ornament that I had to make a layout using the same technique! It's really been so exciting seeing what everyone else comes up with for the Christmas Garlad. If you've missed any, you can find them all HERE. And stay tuned as we still have a couple more ornaments to share next week, then the finished product!
To start out, cut a 4x6 piece of carstock and choose seven of your favorite patterned papers (I ended up not using the black piece you see here). Trim the patterned paper into 1x1 inch squares and begin adhering them to the cardstock. Once the cardstock is completely filled, sew lines down each column and across each row in a grid pattern (optional). Adhere the 4x6 sheet directly to the top of your large chipboard heart then trim off the edges. Use an emory board to sand the edges smooth.
These photos are from back in 2007. I had to photograph my neice's wedding. Gabriel was the ringbearer and somewhat traumatized by having to perform his duties with the assistance of his uncle instead of his mommy. Poor little boo.
To start out, cut a 4x6 piece of carstock and choose seven of your favorite patterned papers (I ended up not using the black piece you see here). Trim the patterned paper into 1x1 inch squares and begin adhering them to the cardstock. Once the cardstock is completely filled, sew lines down each column and across each row in a grid pattern (optional). Adhere the 4x6 sheet directly to the top of your large chipboard heart then trim off the edges. Use an emory board to sand the edges smooth.
Adhere two of the small chipboard flag banner pieces as shown, then cover the fronts with Terrifically Tacky Tape (or glue). First place your chipboard heart in the center, then apply glitter to the remaining portions of the banner pieces.
Staple a length of seam binding tape to the heart and then tie it in a double bow. Sew some charms to the center of the bow.
Punch holes in the top of the heart to string it up. Done! So cute!
And now create a fun layout using the same technique!
Staple a length of seam binding tape to the heart and then tie it in a double bow. Sew some charms to the center of the bow.
Punch holes in the top of the heart to string it up. Done! So cute!
And now create a fun layout using the same technique!
These photos are from back in 2007. I had to photograph my neice's wedding. Gabriel was the ringbearer and somewhat traumatized by having to perform his duties with the assistance of his uncle instead of his mommy. Poor little boo.
Labels:
christmas,
christmas garland,
doris,
red/black
Tuesday, November 22, 2011
Christmas Garland #12 by Lisa Dickinson
It has been fun to watch our Christmas Garland Project come together, piece by piece! My contribution to the garland is a simple scallop-trimmed heart with the jolly old elf himself in the middle.
Heart Garland by Lisa Dickinson |
I started with a large chipboard heart base, covering it with a pattern from the Mini Pattern Sheet of the Holiday 2011 collection. I punched a scalloped border from the Christmas Carol Index paper and adhered it along the back edge of the heart. The plastic Santa ornament is from the November Project kit. I took apart the "halves" of the Santa and glued the front half to the center of my heart. Topped off with a bit of twill ribbon, baker's twine, and a dangling chipboard button, it's ready to add to the design team garland.
Be sure and check back here, as we'll be posting the completed garland all together soon!
Labels:
christmas,
christmas garland,
lisa,
Vintage Holidays
Monday, November 21, 2011
Christmas Garland #11 by Celeste Smith
To create my banner piece, I simply covered a chipboard star with pieces of Vintage Holidays Christmas Accessory Sheet I had sewn together. Then I added silver garland-like trim to the outside of the star to give it a festive Christmas feel. Instead of punching a hole to thread it along the banner, I made a loop so it will sit a bit higher on the strand.
We are very sad to report that Celeste is leaving the JBS team. We would like to take this opportunity to thank her for all her hard work and brilliant creativity this past year. Thanks Celeste! :)
Friday, November 18, 2011
Christmas Garland #10 by Mindy Miller
Watching this Christmas garland take shape, I've been been thinking how the individual pieces are so versatile. They would make wonderful ornaments for a tree or several hanging from greenery on the mantle would be a nice touch. Or how about using one as a gift packaging embellishment?
My contribution to the garland is an embellished chipboard star. The star is covered in patterned paper from the JBS Christmas collection and slightly distressed with Jenni Bowlin Brown Sugar ink and the Ranger ink blending tool.
I added a small pinwheel created with Core'dinations cardstock that is distressed with gold ink. The pinwheel was then topped with mini chipboard flags run end to end behind a Jenni Bowlin Vintage Christmas chipboard button.
Here's a look at how I added the jewel at the bottom and used the same piece of twine to create a hanger.
I threaded the length of twine through the jewel and then behind the star through two holes punched in the chipboard. The twine is simply knotted at the top.
Here's a list of the supplies for this project available at JBS Mercantile:
There are still several pieces to add to our garland, so make sure you stop by again tomorrow to see what's next!
Mindy
Labels:
christmas,
christmas garland,
mindy,
Vintage Holidays
Thursday, November 17, 2011
Christmas Garland #9 by Keisha Campbell
For my addition to the garland-I used the chipboard house & new Christmas papers. And I grabbed a few goodies from Michael's-the snowman, Santa head, and the red glittered berry leafy ball bell thing!!! I also added some of that vintage German foil Jenni usually adds to the kits and one of her new brads.
Wednesday, November 16, 2011
Christmas Garland #8 by Waleska Neris
I love combining chipboard pieces. For my garland piece I decided to combine the large star and the small bird. These are perfect for Christmas and for this project they just seem to belong together. I cut out the holly berry leaves and bells from patterned paper then added some 'berries' to the bird's beek.
Supplies: Chipboard Stars, Bird Chipboard, Christmas 2011 Accessory Sheet, Christmas 2011 Mini Pattern Sheet, Christmas 2011 Wrapping Paper, Pearl and Rhinestone Charms - Garnet, Coredinations Embossed Cardstock-Grandma's Rocker Crosshatch, Coredinations Embossed Cardstock-Scarlett Wallpaper
Thanks for the inspiration Waleska!
Monday, November 14, 2011
Christmas Garland #7 by Ranjini Malhotra
When Doris came up with the idea of the entire design team creating individual pieces to be contributed to our Christmas garland, I thought it was a fabulous idea. I've loved seeing all of the girls' gorgeous pieces and it's been a reminder of how versatile and lovely Jenni Bowlin products are!
I wanted to use Jenni's tart tins and a Christmas themed bingo place card and concocted this piece. I chose the "Give" Bingo Card and added the Santa image and bell because it called to mind the Salvation Army Santas with their bells that collect for the needy during the holiday season and I love the giving aspect of the holidays.
The Santa card came from Jenni's new holiday collection papers, and I added it to the top half of the place card, after adding double stick tape and red glass glitter to edge the top of the card. I also backed the card with cardstock so as to prevent the place card from folding in the middle where the prescored fold is.
Glitter and foil are a must for Christmas, so I used the foil bits from the November project kit as well. But the real fun came about when I got out my can of red spray paint and painted the tart tin. I loved the option of custom coloring the tin so much that I can't wait to do the same for future holidays -- I can visualize lovely pastel painted tins all done up with clear glitter for Easter! Tip for spray painting, set the tin inside a shallow cardboard box in a well ventilated area. I used Krylon Short Cuts in Red Pepper, which is a 3 oz. can of spray paint I found at Joann's for $3.99. Use a light hand, hold it atleast 6" away from the tart tin and spray light coats waving the can back and forth as you spray until you get full coverage. It dries pretty quickly. I sprayed the inside first, then turned it over and sprayed the outside and let it sit to dry.
I also found a whole package of real silver bells - 12 for 50 cents (!) at my local thrift store and spray painted the metal bell as well. I attached the tin to the card by using my manual craft drill to drill a hole in the tin and anchoring it with a brad to the card so as not to worry about it breaking or falling off the card. I added one of Jenni's chipboard buttons in the center of the tin to cover up the brad and a white seam binding bow and baker's twine for hanging.
I can't wait to see the entire garland with all the pieces hanging side by side! In the meantime, you can view all of the individual garland projects by clicking on the tag "christmas garland" at the bottom of this post.
Friday, November 11, 2011
Christmas Garland #6 by Betsy Sammarco
Here is my contribution to the wonderful Christmas garland that is being created right before our eyes!
A covered a Chipboard Butterfly with one of my favorite new Christmas 2011 patterns: Carol Index. From the bottom of the butterfly, I've hung a crystal and Rhinestone Charm.
To create the center bundle of embellishments I glued wired ribbon, a paper flower created from the Trendy paper line, and a Rhinestone button together. These 3 things are adhered to the butterfly on a foam pop dot. The Rhinestone Stick Pin antennae are stuck right into the foam dot!
Keep coming back to the blog as the design team reveals their contributions to the Christmas Garland!
Labels:
betsy,
christmas garland,
Vintage Holidays
Wednesday, November 9, 2011
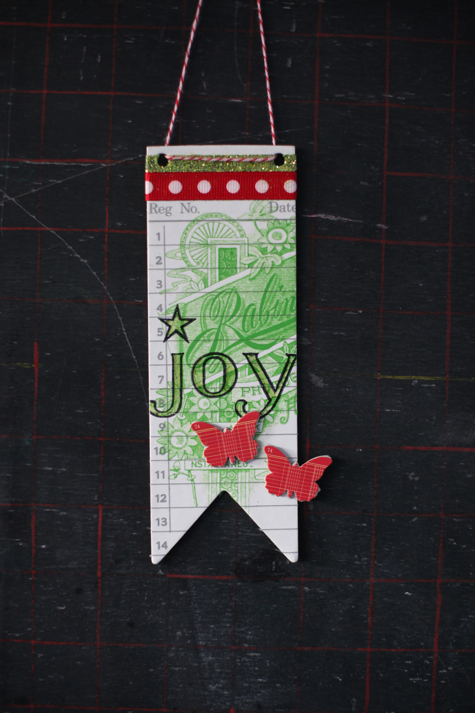
Christmas Garland #5 by Shimelle Laine
All this month, the JBS design team are working on a collaborative project - a Christmas garland made with all sorts of Jenni Bowlin product! I started my contribution with one piece from the large chipboard banner set, then layered two rub-ons over the top. First the silver receipt, then the photo design in green (that colour is a members' exclusive, and I love the fresh, spring green mixed with Christmas tones).
At the top, double-sided tape was my friend. I used it first to adhere a length of ribbon to the chipboard, then ran another length of tape to cover in sparkly green glitter. You can't make Christmas decorations without glitter! It's the law.
I stamped Jenni's new alphabet (in the store soon) with black Staz-on ink and replaced the dot on the j with the star stamp in the set. I added just a tiny bit of colouring inside the letters with a pale green marker. And then finished everything with two red butterfly stickers and the plain chipboard butterflies to give them some extra dimension.
Join us all month long for little bits of Christmas wonder with Jenni Bowlin Studio!
Love & glitter,
Shimelle
PS: Join me this weekend for three days of Christmas crafting fun with tutorials, Christmas journal preparation and more, including some special JBS projects, of course. It starts on Friday and it's completely free - just stop by shimelle.com!
Tuesday, November 8, 2011
Christmas Garland #4 by Dina Wakley
I made this with a combination of JBS Christmas goodies, as well as vintage items that came in November's Antiquarian Kit (if you're not getting the add-ons, you're missing out! Such fun stuff!). I cut the little cardboard tails (that are under the chipboard button) from the packaging the buttons came in. That red school-paper print is just too fun to throw away.
JBS Products Used:
Christmas Chipboard Buttons
Christmas Place Cards
Christmas 2011 Accessory Sheet
Don't miss out on any of our Christmas Garland pieces!
Thanks for the inspiration Dina!
JBS Products Used:
Christmas Chipboard Buttons
Christmas Place Cards
Christmas 2011 Accessory Sheet
Don't miss out on any of our Christmas Garland pieces!
Thanks for the inspiration Dina!
Monday, November 7, 2011
Christmas Garland #3 by Jill Sprott
Hi all! It's Jill here, with another addition to our communal Christmas garland.
All this month on the JBS Mercantile blog, we will be sharing our individual contributions to a group Christmas garland, incorporating our favorite chipboard pieces, bingo cards, or journaling cards. Joining Becky's "Home for the Holidays" and Briana's damask bird is this Christmas tree, which was pieced together by inverting a scalloped banner piece for the tree and a small flag banner for the trunk (painted with Brown Sugar).
I covered the tree with strips of patterned paper from the JBS Christmas 2011 collection, including Carol Index, Holly Stripe, and the B-side of the Accessory Sheet. Over these patterns, I added rows of embellishments, including pearl flowers, doily flowers, and garnet charms...
as well as Micro Dot Alterable Alphas and chipboard buttons.
Be sure to check back all this month to see the garland come together, piece by lovely piece!
Friday, November 4, 2011
Christmas Garland #2 by Briana Johnson
I made this ornament using a Jenni Bowlin Studio chipboard bird for the base. It can be hung as an ornament or strung on a garland or hung in the middle of a wreath or from a door knob, whatever you can think of. I've told you how much I love that Cabbage Flower (damask) stamp so I took the opportunity to use it again here to add pattern to my bird. I stamped on a sheet of cream paper, with Chili Powder Ink, then traced the bird shape over a spot where I thought the pattern would fit well onto the bird body. I like that the pattern doesn't cover the entire bird, I don't know why, I just do : )
I punched a small hole with my Crop-a-dile to add a JBS Rhinestone Brad for the eye. I also backed the brad with a vintage metal finding. I used THIS video tutorial from Jenni on how to make the flower except I used sheet music instead of tissue paper. I backed the flower with tinsel wire rope/trim (that I've seen in craft stores in the holiday crafts section, the kind you see on Victorian ornaments) that I stretched out and twisted all around the back of the flower. Next I layered a JBS chip button with a black doily and another JBS Christmas chip button. I covered the little bird wing in Jenni's black polka dot paper and also added a little banner cut from a piece of her new red/black line paper. See supply list for details.
The sentiment on the bottom is from the Christmas 2011 paper. I cut a few pieces of the same shape from cardstock and layered it for stability. I inked the edges with Chili Powder Ink. I was out of jump rings so I had to make my own with gold wire. I think I ended up liking that better, maybe it looks a little more handmade. I used Jenni's bead dangles on my links. I had to get a little creative on how I did the hooks on the back. The first hook is the gold wire wrapped around the back of the rhinestone brad. The second gold wire was looped in the back and stapled from the front. I used the bird wing to hide the staple.
I wish I had an entire little feather tree of JBS ornaments! I'll need to get to work on that : )
Supply List:
Bird Chipboard
Chipboard Buttons - Red Line
Chipboard Buttons - Vintage Christmas
Clear Stamp - Cabbage Flower
Decorative Brads - Rhinestone
Doily Flowers - Black
Haven - Accessory Sheet
Pearl & Rhinestone Charms - Black
Pearl & Rhinestone Charms - Cream
Christmas 2011 - Accessory Sheet (also found in the project kit this month)
Red & Black Extension 4 Paper - Inkwell (available in the main kit this month)
Chili Powder Ink
Ink Blending Tool
P.S. You have time to pick up these goodies or the ones for the Advent Calendar ~ especially since there's a lot of red and green supplies on sale ~ by the 5th and have them shipped with your JBS Mercantile kits to save on shipping. Just make sure and check the box to have the shipping combined at check out. If you happen to place multiple orders send an email letting them know so they can manually take care of that for you.
P.S.S. This month the design team members are creating Christmas ornaments to string on a garland. Mix and match your favorites and create along with us! Click on Christmas Garland to see more.
Labels:
briana,
christmas,
christmas garland,
Vintage Holidays
Thursday, November 3, 2011
Christmas Garland #1 by Becky Novacek
This month the design team is getting ready for the holidays by creating Christmas ornaments to string along a garland. We hope you'll find a few pieces that you love get inspired to create along with us. Today's holiday ornament is from Becky Novacek who writes, "Hi, Becky here sharing a little holiday inspiration. I love being home for the holidays! All the traditions and comforts, with family all around. It's my favorite. This little banner piece includes many of my favorite JBS products. My new favorite JBS pattern paper is the floral at the top border (it's included in the November Papercrafting Kit or as our new Extra Paper option!)....I want to use it on everything! The chipboard pennants are another favorite that I want to use more! I'm getting very inspired to make things for the holidays!"
Supplies: Alterable Alphas Graph, Ledger, and Microdot, Scrap Patterned Paper, chipboard backing, Chipboard Banner Pieces, white seam binding tape, Red Die-Cut Journaling Cards
Subscribe to:
Posts (Atom)