Zobrazují se příspěvky se štítkemVehicles. Zobrazit všechny příspěvky

pátek 14. dubna 2017

The Pyre Hellbrute

It took forever and a year, but I have finally finished my Dark Vengeance Hellbrute - another addition to my starting The Pyre warband. Behold!


I absolutely love the design of this thing. From the horns to the sprouting tentacles, the Hellbrute is the epitome of Chaos as a malevolent, ever-changing force. While it's perhaps not suitable to some of the more conservative Chaos legions, it works pretty well for most warbands, and for a snap-fit model included in a starter set box, the level of detail is pretty much incredible.

Regarding the paintjob, I've based the thing white and used Troll Slayer Orange for the armour plates and Warplock Bronze for the armour edges. I decided to go with red color on the daemonic flesh and used Mephiston Red with Bloodletter highlights - I'm very happy on how the glaze made the organic parts stand out, especially in the chest area. The wet look of the tentacles has been done using Gloss varnish.


It's no big secret that the back side of this miniature is not as well-detailed as the front, especially when it comes to the huge blobs of flesh around the spine - which is, in my opinion, a very cool part of the model and at least works well as a distraction from the less detailed parts.


I haven't modified the miniature much, though one thing I really wanted to do was to add a Heavy flamer to its arm - after all, what screams The Pyre more than a Dreadnought armed with two fire-based weapons? I went with a rather simple conversion - after cutting away the chains under the left arm, I've glued on an imperial guard vehicle heavy flamer and covered it with tubes made of green stuff to give it a fused look. The result looks pretty good and works great for barbecue.


Basing has been done in the same style as the rest of my The Pyre warband - as scorched earth, though at first it seemed a little boring, so I've added a dead marine under the creature's feet (and to taunt a friend, I've chosen a Dark Angel for the victim). I really like these weird mutated feet by the way - they help to enforce the overall "living metal" feel of the miniature. I know I'm in the minority here, but I really wish these would have been kept in the Hellbrute box as an option... oh well.


One final thought - I really wish this miniature had Monstrous Creature rules instead of Walker. Afterall, it's apparently much more organic than a Dreadnought suit, and a change to MC could make an insteresting spin on the classic Dreadnought rules. However, for some odd reasons, in 40K Aliens-style walker suits and Eldar giant mecha get MC rules, while this does not. That's just classic Games Workshop game design.

Anyway, thanks for reading!

sobota 11. března 2017

Alaitoc War Walker 2

It's been some time since I finished my first War Walker, and given how good these are in the game, it was inevitable to get second one sooner or later. So, here it is!


War walkers are fun (if a bit challenging) to assemble and paint. For me, this one was a good practice at painting the Alaitoc scheme, and I've learnt an important lesson as well (more on that soon). Again, I've built this one with Scatter Laser and Eldar Missile Launcher weapons as this proved to be a pretty effective combination, even though it lost the Laser Lock combo. Flyers and light vehicles beware!


 I had some trouble getting back the right marble pattern after such a long pause from Eldar models but luckily enough, my artistic girlfriend helped me - thanks for that! In the end I'm most satisfied with the paintjob. The canopy, however, ended up looking really bad. During the modelling process I accidently got some plastic glue onto the inner side of the canopy... Which had an immediate effect on the material transparency. The canopy is therefore much darker than on my first War Walker, which sucks... The lesson: keep plastic glue the hell away from transparent bits!
 

Still, the two models don't look so bad together. It's still hard to justify the difference in my head though. Hopefully I'll eventually find a spare canopy... Or paint a power field effect of sorts over these. Given how rare these bits are, I think I'll take a long break first.

One new thing I did for this model was painting the patterns around upper engine exhausts (or perhaps coolers?) with yellow color. It's a really nice bit of eye-candy contrasting with the dark-blue marble around it, so I've used the opportunity and repainted the part on the first model as well.


Well, that's about it. Thanks for reading, and, in case you have a comment or suggestion for the canopy problem - I'm one big ear!

pondělí 31. srpna 2015

Genesis Chapter Land Speeder Typhoon (new pics)

Thanks to my friend Vojta, I have some new beautiful pictures of my Land Speeder Typhoon (check link for full article about the model).

genesis chapter land speeder 40k
 
genesis chapter land speeder 40k

genesis chapter land speeder 40k

genesis chapter land speeder 40k


Hope you enjoyed the pictures! They definately remind me how cool the classic Games Workshop designs are.

sobota 28. února 2015

Alaitoc War Walker

After almost half an year, I finally returned back home - and now I'm almost drowning in paint and getting lost in the labyrinth of model boxes everywhere around me! In this quick update, I would like to share some pictures of my first painted War Walker.

alaitoc war walker

Again, this was the first time I applied the marble color scheme to something this big - and I'm pleased with the result. I tried to make a good mixture between light blue, blue marble and yellow to make the model well-defined and visible. The protecting glass was washed with blue ink and covered with Ardcoat (gloss varnish), which gave a rather nice effect in the end. 

alaitoc war walker

The model is armed with a rather universal configuration - Scatter Laser and Eldar Missile Launcher. I already had a small testing game againstTyranids and it definately got its points back - can't wait to assemble more of these!

alaitoc war walker

What I really love about this kit is the Eldar Dreadnought Base - some really nice details there! I had fun covering the base with a layer of swamp-like mud and grass, using Stirland Mud for the texture. I guess I will need to experiment bit more with the other War Walker bases, though, to make them look more different.

Anyways, see you soon! Getting back to The Pyre now...

čtvrtek 5. září 2013

Genesis Chapter Vindicator

In too deep, against all odds brothers!

It has been some time since I posted an update for my main army, the glorious Genesis Chapter. So here is the assault gun of Index Astartes, the Demolisher-wielding Vindicator.

Genesis Chapter Vindicator

This is the first vehicle I painted mostly with Mephiston red instead of Mechrite red and Blood red and I'm glad the difference from Blood red is only minimal. Regarding the dirt on the Siege Shield, it has been done with Stirland mud and some washes. A picture from my (rather crappy) camera follows:


The model is not much decorated - and for a reason. I love the Vindicator kit, so I bought another one, which will serve as a command vehicle for the army (or perhaps for an Apocalypse formation). I want that one to clearly stand out, so the first one has been left rather bland. Therefore, the only decorations on this one are the ammo loader on the back, and an aquila sign.


I guess some additional scriptures or purity seals wouldn't hurt though. Perhaps I will revisit the model when I will have the "command" Vindicator finished. At the moment, I'm working on a Razorback for a Veteran or Command squad - I'm undecided on its function yet, though it will surely be much more decorated than this one.

Thanks for reading and for any possible C&C!

neděle 28. dubna 2013

Bad Moons Deff Dread

It took me way, way too long to finish painting this bad boy - but now it's finally done!


The color scheme used is pretty much the same as with my other Bad Moons, eg. Bad Moon Yellow contrasted with Tin Bitz and other metallics. The challenge with this model was to make it look rich and colorful without it getting too incoherent or rugged. I think we (that is, me and my awesome girlfriend) have succeeded in that - the colors are coherent and well contrasted, yet there are many "chaotical" places that remind us that this is an orkish Deff Dread, and of a rich, garish clan indeed.


I wanted the walker to look as if it is closing towards the enemy, its chainsaws buzzing, its pincers snapping and its weapons firing hell. Unfortunately, the pose didn't end up very photogenic and looks a bit static, too (making the Dread lean a bit forward would help, I think). Currently, the model is armed with a Skorcha (I love that one) and a Big Shoota, just in case it would get immobilized. Both weapons are magnetized though, so I might exchange the underwhelming shoota for another Skorcha, or perhaps a rokkit or even a CCW.


After spending so much time with this guy, I decided to name him - and what better name there could be for a behemoth like this than Gork. Now I'm seriously thinking about getting a second one named Mork! Regarding the gore on its left CCW, it has been made with liquid green stuff, bit of sand and static grass, plenty of red and a shiny finish of 'Ard Coat. It looks nasty.


The funny part about the model is the base. Yep, I'm talking about that one Grot Rigger (not about the butchered guardist corpse!). I bought the fantasy model for few cents at second market and simply had to convert it into a 40k grot! The goggles are made out of green stuff putty, while the hammer has been "converted" out of a sprue bit and a pin. He looks remarkably calm for someone standing in front of a giant killer machine - perhaps he is looking over the battlefield for possible loot, or he is just used to situations like these, like a propa' grot rigga' anyway!

Anyway, time for me to rest (and get to those Killa Kans)! As always, C&C is most welcome!

středa 26. září 2012

Genesis Chapter Land Speeder Typhoon

Edit (08/2015): New, beautiful pictures of this vehicle are available in this post.

I have finally finished my Typhoon Land Speeder - and I've spared way too much time with this contraption. It came with the Dark Angels Battleforce box - a great buy, but with outdated LS kit; be sure to have some rubber band handy in case it doesn't hold together when glueing.


I've spent quite few weeks painting this one and I'm happy with the result (though I'm quite annoyed by my low photographic skills, still have a lot to improve in that!). The crew was inserted after painting the cockpit, which delayed me quite a bit, but it was definately worth it.

Genesis Chapter, Land Speeder, Land Speeder Typhoon, Space Marines, Typhoon

As mentioned earlier, the assembly didn't go well, and it can be seen. The spoiler at the back is slightly curved, no matter how hard I tried to make it straight - it came like this right from the box! I was quite worried about the flimsy support of the missile launchers too, but in the end they are just fine. I guess these bugs are not present in the modern kit, though.

Genesis Chapter, Land Speeder, Land Speeder Typhoon, Space Marines, Typhoon

Since the beginning I wondered how can the rather weak flyer support mostly used for jetbikes and deffkoptas hold something as big and heavy as is the Typhoon. Oh well - it can't! It didn't take long and the support pole broke. I improvised and used a small plastic rock (coming from a toy) with green stuff for a new base. Now I wish I would have put more thought into this, but hey - at least it stands, and in a more interesting angle too!

Genesis Chapter, Land Speeder, Land Speeder Typhoon, Space Marines, Typhoon


I tried to follow Index Astartes while working on the markings. This Land Speeder actually comes from the 7th Company, which functions as a reserve of bike- and landspeeder-trained Assault Marines. Their codex colour is steel, therefore the Boltgun Metal shoulder trims. I think reserve companies are greatly under-represented on the table.

Anyways, see you soon, and sorry for the big delay!

úterý 10. července 2012

Ork Bonebreaka Gunwagon finished!

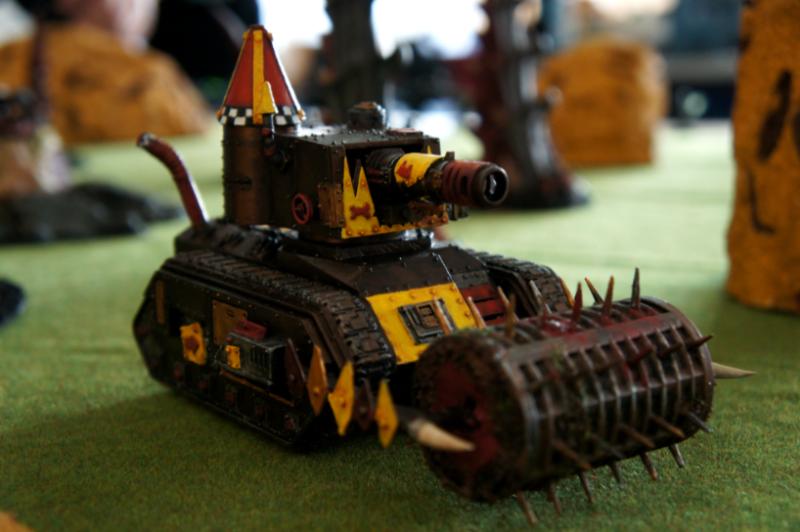
Nearly a year ago I started working on a Bonebreaka gunwagon - second edition Epic ork tank armed with a Battlecannon and a Deffrolla. I made two posts with the vehicle, and now it is finally finished and painted. So, let's see the beast!

Luckily enough, I took the vehicle to a 6th edition test game on a gaming con, and a friend took some very nice pictures of the vehicle - this reminds me how important it is to have a good camera and know how to use it! I'll post about the game soon.

Battlewagon, Bonebreaka, Chimera, Gunwagon, Kitbash

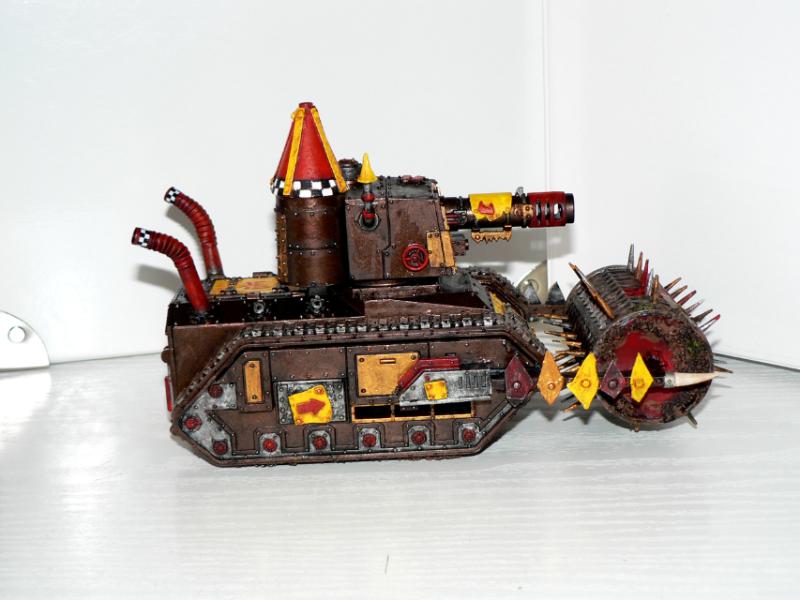
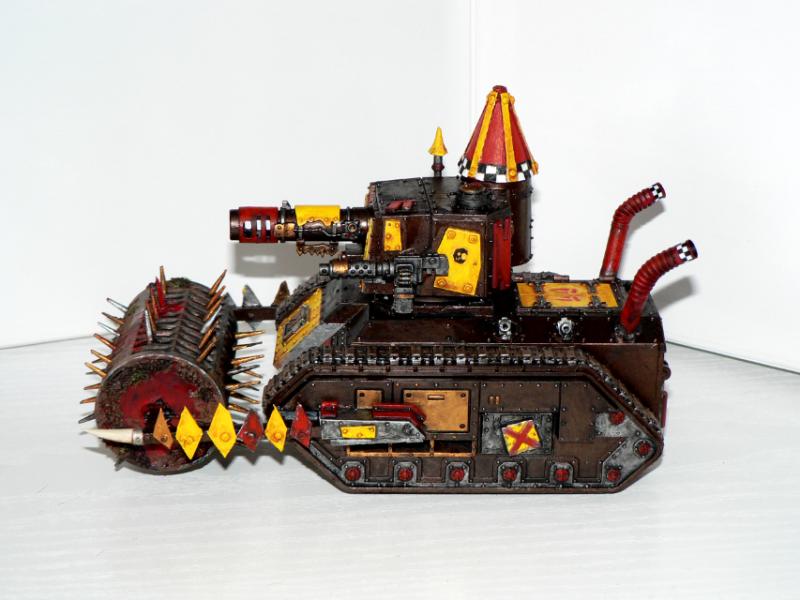
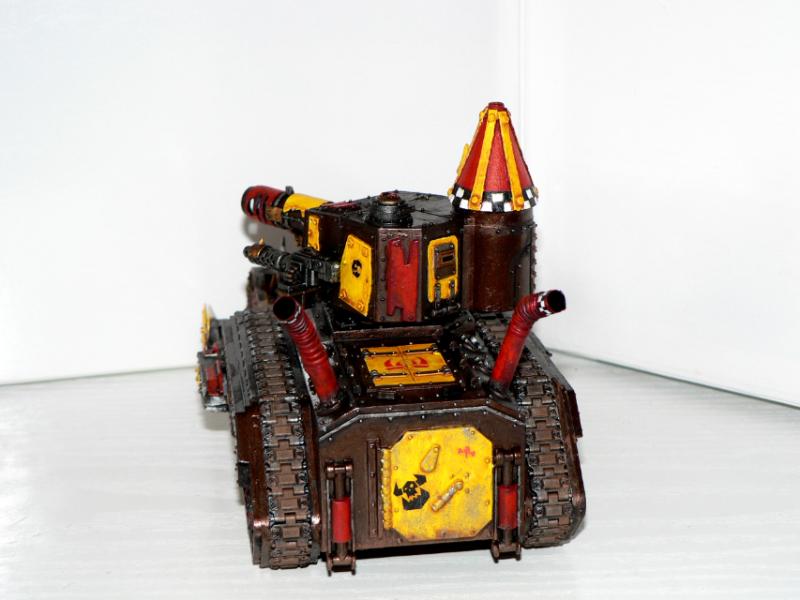
Since my last update, I have added a conical (or should I say "comical") turret and some more details - for example the mushroom-like exhaust pipe on top or the teeth-like plates on the deffrolla holding arms. I've decided to "barricade" any leftover holes with small pieces of plastic, so it looks like the Orks looted the original weaponry and did not care much about replacing it or fixing the damage.

Let's look at some more regular pictures of the vehicle:

Battlewagon, Bonebreaka, Chimera, Gunwagon, Kitbash

I'm very proud of the paintjob, this must be the best looking vehicle I have so far (not that there are many). I actually mobilized my girlfriend for this one, and she has painted most of the vehicle! My job was mostly washing and highlighting the wagon, and adding transfers and dirt. And I think we both succeeded, the vehicle looked very good on the tabletop - pity it didn't kill anything!

Battlewagon, Bonebreaka, Chimera, Gunwagon, Kitbash

I hope you like the wagon and find it interesting or even inspiring. I really think second edition ork vehicles such as Bonebreakas, Gutrippas or Pulsa Rokkits deserve a second chance - in fact, now I think I'll start a Bonecruncha project one day!

One last thing - this vehicle has been actually made with the Dakka Dakka Ork Vehicle Competition 2011 in mind. So if you like it, you can give it a vote here! It's also worth checking the poll for other vehicles, you can find some truly incredible orky contraptions there.

Thanks for reading and see you soon!

středa 21. března 2012

Finished: Magnetized Predator

Edit: Be sure to check out the wallpaper-size picture of this tank here!

It took ages, but my Predator is finally finished! I decided to make its weapons magnetized - after all, you never know whether the Annihilator pattern won't be worth it when the next Codex gets released. Anyways, let's see the dakkapred first!


I tried to make the vehicle more detailed and more weathered than my Rhino. More bright colors are used (mainly for targeters), and I've done some weathering around the exhaust pipes - nothing more than a simple drybrush, but it feels good.


A side view on the Destructor pattern, showing the weathering and a heavy bolter. I use a 1:1 mix of Tin Bitz and Chaos Black for the black metal on weapons.


I've already tested the Destructor in a small battle and I have to admit it is a beast (at least when it comes to putting down Orks). Yet, somehow, I like the design of Annihilator more, and I guess it can be seen on the model. A sniper tank with four lascannons (ok, three and a half, technically) just deserves respect; I wish this setup would be more worth it in-game. As a side note, I'm glad I got all the insignia right this time (gotta love that Insignium Astartes).


Finally, the controversial Maverick (or "autolas") pattern. Somehow this pattern actually feels the most basic for me, since it was the only one featured in Final Liberation, the game that got me into this hobby.

Anyways, let's take a short look on the magnetizing!

Magnet, Predator, Magnetized Predator Turret

The turret wasn't really hard to magnetize. What you need are 3mm wide, 1mm high neodymium magnets; they fit the holes almost perfectly. I also advise glueing a small piece of plastic on the turrets lower side, so that the weapon holds firmly and doesn't fall down (which is always a risk with small magnets). If you look carefully, you can see on the picture that I used just a small piece of sprue there, and it works great.

Magnet, Predator, Magnetized Predator sponsons

The sponsons are harder to magnetize right. I decided to go the easy way and replace the whole weapon support with a line of magnets - it works pretty good and is not really noticable on the model. Just be *very* careful to glue everything right and even, so you don't end up with the weapons leaning in sloppy angles. Drilling a correct size hole into the weapons themselves is annoying as well; perhaps a bit of green stuff might help there (didn't try though).

Magnet, Predator, Magnetized Predator

So here's the model with all its parts separated. The army building possibilities are great with magnetized models, but to be honest, if you are a perfectionist, go with the normal, un-magnetized look. If you are more into gaming, though, magnetizing will allow you to try a lot of options without proxying or buying multiple models and the Predator is a good model to get a grip on it, since you need magnets of only one size. Be sure to get a good bunch of them, thought - the turret part requires at least 6, and the sponsons require anywhere from 4 to 12, depending on the way you deal with it.

Anyways, I hope you like the vehicle! See you soon.