Showing posts with label seafood. Show all posts

Monday, July 20, 2009

Teriyaki Cod


For some reason, I don't cook fish very often. I think it is because I just have it in my head that fish is a bit fiddly to make. However an easy recipe and one of my favourite fish recipes is teriyaki cod fish. This dish is also perfect to put into your bento lunches. (To be honest, a good slice of cod fish is quite expensive here, so I don't make this that often.)

This is a slight update on the recipe I posted for this dish before- this is now my latest standard way for making all things teriyaki... 

Teriyaki Cod Fish
2 pieces black cod fish fillet
4 Tbsp soya sauce
3 Tbsp sake
3 Tbsp mirin
2 Tbsp sugar

1. Mix the liquids and sugar together until the sugar has dissolved. Marinate the fish in the liquid for 15 minutes.

2. Heat up a small frying pan, and add the fish. Leave for a minute, then turn over. When the fish is just cooked through, remove from the pan.

3. Pour the rest of the marinade into the pan, and let it bubble until the liquid has reduced and thickened into a sauce. Turn off the heat. Coat the fish with the teriyaki sauce and serve. 


Thursday, November 20, 2008

Scallop & Sausage Aglio Olio

sausage scallop pasta
This is another of my favourite pastas. Usually I just make this pasta with sausage, but on special days I like to add some scallops to it. Continue reading for the recipe...

Scallop & Sausage Aglio Olio Spaghetti
(serves 2)
250g spaghetti
1 whole bulb garlic (or less if you are not a garlic fan)
light olive oil
2 polish sausages (use 3 -4 sausages if you making the sausage version without the scallops)
8 large scallops, sliced into half
wild rocket leaves (optional)
Sea salt and freshly ground black pepper
  1. Cook the spaghetti in salted boiling water according to the packet instructions (less one minute).
  2. Peel and finely chop the garlic, slice the sausages thinly and slice the scallops into half.
  3. When the spaghetti is cooked, rinse with cold water to stop the spaghetti cooking, drain and set aside.
  4. In a saucepan (I use the same one I boiled the spaghetti in), heat up the chopped garlic with some light olive oil over low heat.
  5. Fry the garlic until golden and fragrant (make sure it doesn't brown or burn). 
  6. Turn up the heat to medium and fry the scallops until they are just cooked, then remove them from the saucepan and set aside.
  7. Add the sausages and fry a little, then add the spaghetti into the saucepan. (You may need to loosen the spaghetti a little first with some water as it may have clumped together.) 
  8. Mix well, then add the scallops back to the saucepan and stir gently. 
  9. Season with some sea salt and freshly ground black pepper. 
  10. Top with some wild rocket leaves (optional).
Tip: Add some chilli flakes or chilli oil to the pasta for a spicy version.

Back

Thursday, November 13, 2008

Lazy Tuna Mentaiko Spaghetti

lazy mentaiko
I usually use fresh mentaiko when making mentaiko spaghetti, but on days I'm feeling extremely lazy, I do resort to using a packet of pre-made mentaiko sauce. At first I was a little suspicious of mentaiko from a packet, but it isn't too bad, and the MSG it contains naturally makes it taste better. I find adding some canned tuna also adds to the flavour.
Continue reading...

Lazy Tuna Mentaiko Spaghetti
(serves 2)
200g spaghetti
1 packet mentaiko spaghetti sauce (I use S&B Spicy Cod Roe Spaghetti Sauce - there are 2 sauce sachets inside each packet, as well as shredded nori seaweed)
1 can tuna, drained (preferably in olive oil)
  1. Cook the spaghetti according to the instructions, less one minute.
  2. Add the drained tuna and mentaiko sauce to the spaghetti, and combine well over low heat. 
  3. Sprinkle with shredded nori and serve immediately.
Note: There are many different brands of pre-made mentaiko sauces/mixes; some are dried, others a thickened sauce. Naturally, choose a brand which you prefer. They should be available at your local Japanese grocer or in supermarkets that stock Japanese products.

Back

Wednesday, October 8, 2008

Garlic-Butter Seafood Pasta

marinara pasta
When I was young, my mother used to make a seafood pasta we called spaghetti marinara, but it was a garlic & butter-based seafood pasta. Therefore I grew up thinking marinara sauce contained seafood (with or without tomatoes). It was only later that I realised this is not quite accurate. The word "marinara" is from the Italian marinaro (sailor), therefore many people assume the sauce contains seafood of some type. Actually, the sauce first originated in Naples after they were introduced to the tomato, and it was a meatless sauce made by the sailors. Most marinara sauces contain olive oil, ripe tomatoes, garlic and herbs. 

The butter-based seafood pasta my mother made is still delicious though, whatever you call it...

Continue reading...


Garlic-Butter Seafood Pasta (Mum's "Marinara")
(serves 2)
250g spaghetti (or any long, thin pasta like linguine, or bavette (as in the photo)
1 bulb garlic (if you are not a garlic fan, reduce the amount to half a bulb, or less)
variety of seafood - I used 6 mussels, 6 prawns, 100g scallops and 170g clam meat (this was a little extravagant; you can cut down on these amounts)
10 - 20g butter
light olive oil
sea salt and freshly ground black pepper
chilli oil (optional)
  1. Boil water in a large pot, add some salt and cook the pasta according to the instructions on the packet (less one minute). When the pasta is ready, drain it, and cool it under cold water. Set aside. (Apologies to Italians who may shudder at this, but the cold water stops the pasta from cooking further...)
  2. Chop the garlic.
  3. If you are using mussels and prawns, scrub the mussels to clean the shells and devein the prawns. You can shell the prawns or leave their shells on, whichever you prefer.
  4. Heat up some light olive oil in the large pot (around 1 - 2 Tbsp) and lightly fry the chopped garlic on low heat, until the garlic is soft and fragrant, but not brown or burnt. Add the seafood (except the clam meat) in batches and fry in the garlic oil until cooked. Remove the seafood from the pot. This is to stop the seafood from over-cooking.
  5. Add the butter to the pot. Turn the heat up to medium. Add the clam meat and fry (the clam meat I buy are small bits of clam, therefore I do not cook them in the above step, as they would be too difficult to scoop up). 
  6. Loosen the pasta with a little water if it has stuck together, and pour the pasta into the pot. Mix well to coat the pasta in butter. You can use butter or light olive oil here, or a mixture of both. This is one of the rare times I add butter to pasta dishes as it really improves on the taste.
  7. Gently mix the pasta and seafood. Season with sea salt and freshly ground black pepper. 
Tips: If you like your pasta spicy, add a few drops of chilli oil (optional). This may sound odd, but it is like adding Tabasco sauce to pasta, which I find tangy and strange. Chilli oil, however, is perfect. The chilli oil I use is not the one which contains sediments of chilli inside, it, but a clear oil, like this: 

Hot Smoked Salmon Soba Bento

soba salad
This is a very easy dish to make, and a great way of combining western and Japanese food. Hot smoked salmon is mixed into cooked soba noodles that have been coated with sesame oil and tsuyu (soba dipping sauce). Also mixed in are some stir-fried snow peas and chinese mushrooms.

Continue reading...


Hot Smoked Salmon Soba Salad
(serves 2)
120g cha soba (soba flavoured with green tea) or normal soba
60g snow peas, cut into 2
6-8 chinese or shitake mushrooms, sliced
100g hot smoked salmon
sesame oil
soba dipping sauce (ready-made is fine)
  1. Boil some water in a small saucepan. Cook soba for a few minutes. Once it is just cooked and still a little firm, remove and rinse well under cold running water. Set aside.
  2. Lightly fry snow peas and mushrooms with 1 tsp sesame oil. Set aside to cool.
  3. Flake the hot smoked salmon into chunks.
  4. Return the soba to the pot. Add 1 tsp of sesame oil and 2 - 3 Tbsp soba dipping sauce and stir gently to coat the soba. 
  5. Add the cooled snow peas, mushrooms, and flakes of salmon, and stir lightly to combine. 
Back

Friday, October 3, 2008

Teriyaki Cod Bento

cod bento
I love grilled teriyaki cod (gindara) and will often order it in Japanese restaurants. So it was only a matter of time before it found its way into a bento...

Bento contents: rice with furikake, tamagoyaki, rainbow sweet n spicy peppers, grilled teriyaki cod, and a kiwi fruit.

After using my black bento box quite often, I found myself thinking this blue box (my old favourite) is now looking a bit too garish. Maybe it is because the food in this bento is already quite colourful...hmm... and I realised that the little fish food pick looks like the ghost of the cod fish shouting "Don't eat me!". It was not intentional, really...

fish pick
Continue reading...

Rainbow Sweet n Spicy Peppers
Despite the name, this dish is not spicy. I used green Japanese shishito peppers, which are 3 inch long, sweet-hot peppers. They are only slightly hotter than sweet peppers (capsicum), and not as spicy as chilli peppers. 
1 small red onion
1 clove garlic
1 yellow sweet pepper (capsicum)
1 red sweet pepper (capsicum)
8 - 10 shishito peppers, deseeded
1 tsp light olive oil
1 tsp sesame oil
sea salt
  1. Slice up the onion, sweet peppers (capsicum) and shishito peppers.
  2. Finely chop the garlic.
  3. Add the oils in a pot, and fry the onion and garlic for a few minutes.
  4. Add the rest of the peppers and fry until soft.
  5. Sprinkle a little sea salt over the peppers for added flavour.
Tip: The colours in this dish look amazing right after they are just fried. However, after a day in the fridge, the colours fade (especially the green of the shishito peppers). For best colour effect, fry and pack directly in your bento.


Teriyaki Cod
Grilling or pan-frying fish is really very easy. The most important part is not to overcook the fish.
2 small cod fillets
teriyaki sauce (pre-bought, or make your own by mixing 2 Tbsp soya sauce, 1.5 Tbsp mirin, 1.5 Tbsp sake and 1 Tbsp sugar together)
  1. Marinade the cod fillets in teriyaki sauce for 10 - 15 minutes.
  2. Grill the cod for 1 - 2 minutes, or pan-fry the cod until just cooked. (The fish will continue to cook a little) 

Tips: Some ways to check if fish is cooked - press the fish down lightly (the flesh should feel firmer when cooked); insert a fork into the fish to see if the fish meat "flakes"; note the change of colour in the cross-section of the fish as you cook it. The colour of the fish will change from a translucent jelly colour to a matte colour (this method works well with salmon fillets). 

It is fine (and more tasty) to leave salmon fillets slightly raw in the middle, but please ensure your salmon is from a good quality source if you plan on doing this.

Back

Wednesday, October 1, 2008

Mussels - Moules Marinières

mussels
I've been wanting to cook mussels for some time, and I finally got around to it last night. City Super sometimes has 1kg packs of live Australian mussels which are pre-scrubbed (fabulous), so it was really very simple to make. 

I decided to make the classic French Moules Marinières. It turned out well - the mussels were juicy and very fresh. We soaked up the gravy (which was a tad salty, but still delicious) with a small loaf of hearth bread that was baked with bits of camembert cheese inside (a wonderful crusty savoury loaf, not the horrible sweet bread you find all over Asia).

Continue reading...


Moules Marinières
(for a 1kg pot of mussels)

1 kg live mussels
2 shallots
6 cloves garlic
200ml white wine
40g butter
2 Tbsp light olive oil
freshly ground black pepper
2 bay leaves
fresh parsley (I left this out as I didn't have any on hand)

  1. Finely chop the garlic and shallots.
  2. Wash and scrub the mussels under cold running tap water. I found it handy to use a pair of scissors to cut away any byssal threads (mussel beards) that hang out of the mussel.
  3. In a deep, heavy based pot, add the olive oil and half of the butter. Cook the garlic and shallots on low heat until they are soft and fragrant. Make sure the garlic does not burn.
  4. Add the white wine, bay leaves and freshly ground black pepper. 
  5. When the liquid comes to a boil, pour in the mussels and put the lid on the pot. Shake the pot gently to distribute the mussels.
  6. After a minute and a half, open the lid and start scooping out the mussels that have opened up into a serving bowl. This may sound tedious, but you really don't want them to overcook.
  7. Continue scooping out the opened mussels and gently stir the remaining mussels in the hot liquid until they open. Turn the heat down to medium if it is taking you a long time to scoop.
  8. After all the mussels have been removed from the pot, turn up the heat to high and add the remaining butter and parsley (optional). When the liquid is bubbling, pour it over the mussels and serve with hot, crusty bread.
Tips:
Use a large slotted cooking spoon to scoop the mussels out quickly.
Add a sprinkle of chilli flakes to make the liquid a little spicy.


Back

Sunday, September 28, 2008

Grilled Prawn Mentaiko Pasta

prawn mentaiko pasta
Yet another pasta. I was trying to use up leftover mentaiko pasta, so I just grilled some prawns and added them on top. I found these enormous tiger prawns from the supermarket (City Super). They were - huge! Compare the size with the other smaller prawns (and the "smaller" prawns are normal medium prawns, too, not shrimps!).

This dish is probably not good to eat very often for those watching their cholesterol... 


Monday, September 22, 2008

Mentaiko Spaghetti Bento

mentaiko bento1
I don't often put spaghetti in a bento as the thought of cold spaghetti is not that appealing (unlike spiral pasta, which is fine cold as it is like a pasta salad) but today I made an exception... I had leftover mentaiko (cod roe) spaghetti from last night's dinner, and I couldn't let it go to waste.

It wasn't too bad cold. There was enough oil coating the pasta to keep it from sticking together, and if you like eating mentaiko, you won't mind it at room temperature. If you really dislike the thought of room temperature pasta and have access to a microwave,  you can also pack it into a microwaveable bento and zap it for a minute before eating. (Add a few drops of water before microwaving or the pasta will dry out.)

I was also thrilled because I could use one of my new bento sets that arrived in the mail on Saturday! The cute apple container has chinese pear, strawberries and kiwi fruit inside.

Mentaiko spaghetti is a popular Japanese-style fusion pasta dish in Japan. Click here for my mentaiko spaghetti recipe.

mentaiko bento2

Mentaiko Spaghetti #2

mentaiko spaghetti

The Ode to Hokkaido Weekend concluded on Sunday night with my 2nd attempt at Mentaiko Spaghetti - a Japanese-style fusion pasta. (Ok, so this dish is not really Hokkaido-specific, but it still fits my Japanese food theme...)

I actually measured out the ingredients this time, so I could write up a proper recipe. I'd written out rough instructions before, but I'm trying to be a little more exact, so here's a proper recipe for Mentaiko (or tarako) spaghetti (Mentaiko is marinated pollock roe, and Tarako is salted roe, usually from pollock):

Mentaiko/Tarako Spaghetti
(Serves 2)

250g thin spaghetti
130g (or 2 sacks) Alaskan or walleye pollock (cod fish) roe
20g butter
2 tsp light olive oil
2 tsp rice wine vinegar
4 tsp lemon juice
1 tsp Japanese mayonnaise (I use Kewpie brand)
sea salt and freshly ground black pepper
chilli oil (optional)
shredded nori (seaweed)


roe sacksHere's what the roe looks like in its sacks.

1. Gently slice open the cod roe sacks and scoop out the cod roe. I slit open one end and use the back of a spoon to squeeze the roe out of the sack (as if you are squeezing out the filling from a sausage).


scooped roe
Here's the squeezed out roe (on top) and the empty membrane sacks (bottom).


2. Cook the spaghetti according to the timing on the packet instructions, less 1 minute. Drain, then pour back into the pot. 

3. Add the butter, and melt it using the heat from the spaghetti. Add the light olive oil (or other oil) and mix to coat the spaghetti. I add a mix of butter and oil, so it is slightly healthier, but if you like, you can just add more butter and no oil. 

4. Add the cod roe and mix. If your spaghetti is getting cold, you can do this on low heat.

5. Add the mayonnaise, rice wine vinegar, lemon juice, then a dash of salt and pepper. If you like your pasta spicy, sprinkle in a few drops of chilli oil. 

6. Mix well together, then taste. Add more seasoning if necessary.

7. Serve immediately, sprinkled with some shredded nori (seaweed).

Tip: If the pasta is drying out, add a bit of olive oil and/or water (not too much water, just a splash).

Monday, September 8, 2008

Easy Tuna Spaghetti Aglio e Olio

aglio olio
"Aglio e olio" means "garlic and oil" in Italian, and it is my favourite pasta "sauce". I find Italian restaurants in my area seem to feature a lot of tomato and cream based sauces, and their aglio e olio dishes are usually plain without much meat (not suitable for a carnivore like me). 

This recipe is adapted from the very first pasta I used to make during my Uni years. It is really simple to prepare, and I'd recommend it for days when you feel a little lazy or don't have much time to cook. For those people who don't like preparing something elaborate just for themselves or for two people, this is also the perfect dish. You can also make it all in just one pot (less washing up)!

When I started making tuna pasta in Uni, I used to buy cans of flavoured tuna (John West sundried tomato tuna was the best) and mix it with spaghetti. As I only had a microwave and kettle to use at the time, I couldn't do much more. Since then, the recipe has become a little more complex than just opening a can of tuna and adding it in, but essentially, that's all there is to it...

Continue reading...

Here's how to make it:

Easy Tuna Spaghetti Aglio e Olio
(Serves 2)

250g thin spaghetti
1 whole bulb garlic, chopped
2 cans tuna (tuna in oil works best, but try to find tuna in olive oil, or else go for tuna in springwater)
light olive oil
sea salt
black pepper
red pepper flakes (optional)
rocket or spinach leaves (optional)
  1. Cook the spaghetti in salted water according to the cooking time on the packet, less one minute. When ready, cool under running tap water, drain and set aside.
  2. Chop garlic. In a large pot (you can use the same one you boiled the spaghetti in), heat up around 3 Tbsp of olive oil on low heat. 
  3. Add the garlic, and fry gently until the garlic is fragrant and just turning a light golden colour (be careful not to burn it). If you like your pasta a little spicy, shake some red pepper flakes into the oil as well. 
  4. Turn up the heat to medium and add the spaghetti. Fry the spaghetti with the garlic oil, then add the tuna. Mix well. Turn the heat down to low. 
  5. Season with sea salt and freshly ground black pepper and more red pepper flakes, to taste. Stir in some washed rocket or spinach leaves at the end, if desired. Serve immediately.
Tip:
For even more spice, stir a few drops of chilli oil into the pasta before you eat it. This may sound odd, but it really tastes good. It's like adding tabasco sauce into pasta (without the sour vinegar taste of tabasco).

Update: Another variation to this recipe - Add a squirt (around 1 Tbsp) of tomato paste into the spaghetti during Step 4 and mix well. You don't want to add too much, as the addition of the tomato is only for a hint of added flavour, and not for turning the dish into a tomato-based pasta.

Back

Thursday, September 4, 2008

Grilled Mackerel Bento

mackerel bento
Today's bento was a little fishy...with grilled mackerel, tamagoyaki (fried egg), rice and shredded cabbage. I included a creamy sesame dressing to eat with the cabbage, and a citrus soy dressing to put on the mackerel - it really needed it because it was a little too fishy.. Mackerel is quite a fishy fish, and you could smell it when I opened the lid. Picking out the bones was also not such a fun experience, and I suspect I may not pack it into too many future bentos...

mackerel bento 1 layer
This is the same bento, except packed into a single-layered bento box (and without additional seaweed on the rice). This was the original bento, but I wasn't too happy with how it was looking, so I swapped it to a 2-tier bento box. 

Which layout do you prefer?

Tuesday, August 26, 2008

Crab Croquette and Pineapple Salsa

crab bento
The 3rd bento of the "One Week of Pineapple" series! Presenting a crab croquette and pineapple salsa bento... Actually, I couldn't decide if the crab was a crab cake or crab croquette, but as I added mashed potatoes, it is more like a croquette. As it is only lightly pan-fried, it is healthier than the usual deep fried croquette. The pineapple salsa is made with pineapple and cucumber in a thai- style dressing. This dressing is the basis of a lot of Thai salads, and is very versatile.

Update: My One Week of Pineapple bento series only lasted 3 days...I ran out of bento friendly pineapple ideas - ie. I didn't really want to eat cold red duck pineapple curry and my other idea of a pineapple baked ham disappeared after I couldn't find any gammon ham in the supermarket to bake...

Continue reading...


Pan-fried Crab Croquette
Adjust quantities according to how many crab croquettes you wish to make. This is the rough estimate for 2 large crab croquettes.
4 small baby potatoes, or 2 medium sized potatoes
100-150g fresh crab meat or good quality canned crab meat (I used Phillips brand)
1/3 onion
around 50g milk or water
golden breadcrumbs
salt & pepper
dash cayenne pepper/paprika (optional)
squeeze lime or lemon juice
  1. Peel and cut the potatoes into smaller chunks. Boil in a saucepan until soft (around 10 - 15 mins). Drain away the water and mash, adding a little milk or water to soften the mash. Set aside to cool.
  2. Chop 1/3 onion finely. In a small non-stick frying pan, heat up a little oil and fry the onion until translucent. 
  3. Add the crab meat and fry on low heat. Add salt and pepper and a dash of cayenne pepper/paprika (optional). Squeeze a little lime or lemon juice on top. If you are making the pineapple salsa as well, you can also add a bit of the salsa dressing here.
  4. Add the crab mixture with the mashed potatoes and stir well to combine. Season to taste with more salt and pepper. 
  5. Pour some golden breadcrumbs onto a small plate. Scoop the crab mixture to form two round ovals, and coat with the breadcrumbs. 
  6. Heat up a little oil in the small frying pan, and lightly pan-fry the crab croquettes until golden. 
  7. Remove, cool, and pack into your bento. (You can also put the croquette on top of some shredded lettuce, as in the photo)
Decoration Tip:
Turn the crab croquette into a crab decoration by adding baby carrots for legs and crab claws, and dig two holes for eyes. Cut out a little triangle from the end of two baby carrots for crab claws, and cut three baby carrots into half lengthwise for the legs.

Pineapple Salsa (with Thai-style dressing)
Cucumber, cut into small cubes
Pineapple, cut into small cubes (fresh or canned pineapple, drained of their syrup)
For the Thai-style dressing (adjust quantities according to how much fruit and vegetables you have):
1/2 Tbsp white sugar
1 Tbsp Thai fish sauce
juice of 1 small lime
1/3 red chilli, deseeded and finely chopped
  1. Mix all the above ingredients for the dressing, then add to the cucumber and pineapple.
  2. Add more sugar, fish sauce, lime juice to taste.
  3. Leave in the fridge for 10 mins - overnight.
This dressing is very versatile and can be used for many Thai salads. It contains the basis of Thai cooking, with its 4 tastes - sweet, sour, salty, and spicy. I've added less sugar in this version as the pineapple is already quite sweet.

Back

Wednesday, August 20, 2008

Spicy Sausage & Prawn Spaghetti

pasta
One way of getting a head start on your bento preparation is to chop up or set aside some extra ingredients when preparing dinner the night before. This may mean your dinner ends up being similar to your lunch, but if you like what you make, that shouldn't matter too much! An example of this is last night's dinner and today's bento. Dinner was a Spicy Sausage & Prawn Spaghetti, and lunch a Sausage & Capsicum Spiral Pasta.

Continue reading...

My favourite dish to cook is pasta! It can be as simple or as complex to prepare as you wish, it's hearty and satisfying, and there's a lot of room for improvisation. I have a lot of favourite variations, but this is the version I make when I want to prepare some pasta in a hurry, or when I'm at the supermarket and there are no good cuts of meat left (which unfortunately, happens more often than I'd like!). I also only use one large pot, which cuts down on washing up.

Here are some rough directions for the Spicy Sausage & Prawn Spaghetti. As with most of my recipes, I don't follow exact proportions - more sausage added just means more filling on top, and more or less garlic/chilli makes the pasta more or less garlicky/spicy! Just adjust according to your own preference.

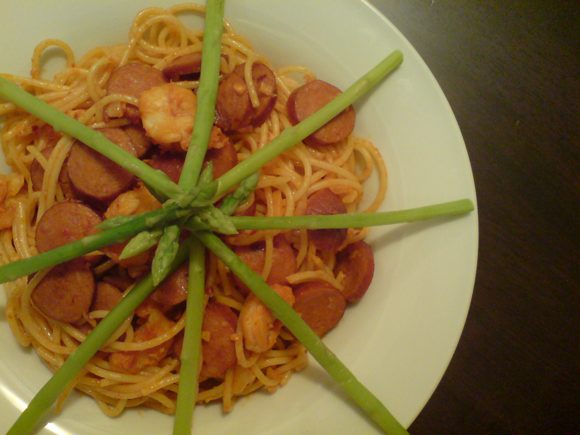
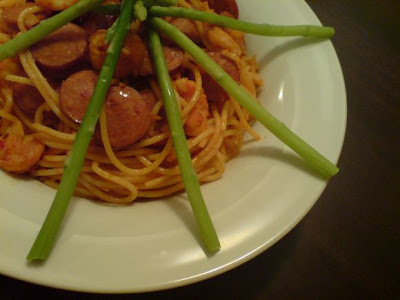
Spicy Sausage & Prawn Pasta

Spaghetti (for 2 portions) - you can substitute spaghetti for another type of pasta, but I have a fondness for spaghetti. I find a thinner pasta works better, as there is not much sauce in this recipe to coat a thicker pasta properly.

1 whole bulb garlic (or less, according to how much you like garlic)
light olive oil
sprinkle of red chilli flakes
3 -4 sausages (I currently use a brand called Johnsonville's Hot Links, but you could substitute with sausages like cabana, or any other of your choice)
10 prawns (cut into half length-wise)
1 - 2 Tbsp tomato paste
chilli oil (optional)
salt & freshly ground black pepper to taste

Boil water in a large pot. When the water is boiling, add the pasta and cook according to the packet's instructions, less one minute. Add salt to the water and stir every now and again.

Meanwhile, chop the garlic and slice the sausage and prawns. (If you are making extra for a bento, chop up extra garlic and sausage at this point.)

When the pasta is cooked, drain and rinse under cold water to stop the pasta cooking. Set aside.

Heat up some olive oil in the same pot as before, and on low heat, lightly fry the garlic until fragrant and slightly golden. Add the sausage, a sprinkle of chilli flakes and a dash of chilli oil (optional). Turn up the heat a little and fry, then add the prawns. When the prawns are cooked, pour the pasta into the pot over the toppings and mix together. (You may need to loosen up the pasta with some water first before adding it.) Add some tomato paste and mix. Add salt, freshly ground black pepper, and more chilli, to taste. 

Serve immediately with a side salad or steamed asparagus.

pasta

Back

Thursday, August 7, 2008

mentaiko/tarako spaghetti

pasta
My 1st attempt at making mentaiko spaghetti, and I'm very happy because it turned out better than expected! Actually, upon reflection, I bought tarako (salted pollock roe) so it was tarako spaghetti, not mentaiko (spicy pollock roe). I was a little concerned YH may not like it, as he's not tried it before, and it could be a little fishy I suppose, although how could anyone not like cod roe?! But YH loved it - he was even hoping for seconds, and was really really sad there wasn't any! I'd taken his do-not-cook-too-much-pasta to heart, so we only had one bowl each. Actually the serving portion was just right, and left us looking forward to eating it again soon.

Update: see attempt #2 for a more precise recipe.

Continue reading...

I read about 4-5 different recipes for mentaiko pasta that I found online to get an idea of how to make it, then headed off to the kitchen. I didn't use proper measurements, but just estimated according to the amount of pasta and seasoned to taste. The different recipes I'd read varied as to what to add - so I just sort of picked the items that I thought would work best.

The lemon juice I added at the end was a bit of an inspiration, because the pasta was tasting quite fishy - I needed something sour to cut through the fishiness of the roe, and the vinegar I'd previously added wasn't doing the job (and I didn't want to add too much vinegar as it would overpower the pasta), so I think the lemon juice worked well. In the end, the tastes combined really well and were quite complex. Not too fishy, not too sour, not too salty - just a nice balance of everything, and the roe added a lovely texture to the spaghetti. I'd bought cream in advance, thinking I needed to add it, but I'm glad I didn't, as it was definitely rich enough with the butter and roe. I think cream would have been overkill... I usually use olive oil for pasta instead of butter, but this time, I think it really needed the butter to add to the taste, as it didn't have any garlic/onion in it.

Mentaiko/Tarako Spaghetti

thin spaghetti (for 2 people) (I used Barilla Spaghetti no.5 - which is a thin spaghetti, as opposed to say San Remo Spaghetti no.5 which is much thicker)
2 sacks cod fish roe (mentaiko or tarako)
butter (around 30 - 40g?)
Japanese mayonnaise (I used Kewpie brand)
rice wine vinegar
soy sauce
sea salt
lemon juice
chicken stock powder
shredded nori (seaweed)

  1. Cook the spaghetti according to the packet instructions. Set aside.
  2. Cut open cod roe sacks, scoop out the cod roe.
  3. Melt butter in pot. Add cod roe, mix.
  4. Over low heat, add spaghetti, mix to coat spaghetti in roe.
  5. Season to taste, according to how much pasta you have. Add bit of mayonnaise, splash of rice wine vinegar, pinch sea salt, dash soy sauce, few squirts of lemon juice, sprinkle of chicken stock powder. Taste. Add more lemon juice, salt if necessary. If the pasta is drying out, add a bit of olive oil and/or water (not too much water, just a splash).
  6. Serve immediately, sprinkled with some shredded nori.

Back