Showing posts with label chicken. Show all posts

Wednesday, July 8, 2009

Chicken Salad

chicken salad
Ever been asked in a survey what dish you would pick if you could only eat one thing for the rest of your life? Well, if I had to choose, it would be chicken salad. There's something about cold chicken and raw vegetables that just work so well together. 

With the summer heat truly upon us in Hong Kong right now, many a night I feel like something cool and refreshing. It may seem too light a meal, eating salad for dinner, but if you add enough goodies inside it, it makes for quite a filling dish.

There are endless variations to the chicken salad, but my favourite is a mixture of vegetables, potato and chicken without (egads!) any dressing. Firstly, I'm not too fond of mayonnaise or any other dressing overpowering the salad, and secondly, I'm always trying to cut down on the calorie intake. Plus, if your veggies and chicken are fresh, the natural taste of the dish is really all you need. And if you must, put some dressing on a side dish and mix a little as you go along, rather than pouring it all in at the start...

My favourite chicken salad combo right now is:

Shreddded chicken (roast chicken gives the salad more flavour, but you can also poach or panfry some chicken), lettuce, baby spinach leaves, roma tomatoes, baby potatoes (microwaved or boiled until soft and melting), sliced green peppers (capsicums), mixed together with a healthy dose of freshly ground black pepper. Yum!

To make the salad more filling, you could also add some spiral/shell pasta, or some corn...

Sunday, June 21, 2009

Baked Chicken Breast with Tomato n Cheese

tomato chicken
This dish (although it looks like a gluggy mess in the photo) is fast becoming a favourite with me because it is so easy to make. It is a little like chicken parmigiana, but unlike chicken parmigiana, which is first breaded, fried and then baked, this dish is just baked - which means you throw all the ingredients into an oven-safe dish, and plonk it into the oven. Done!

Chicken breast works well in this dish - because it is baked in the tomato liquid, the chicken remains juicy and does not dry out.

Method:
Preheat your oven to 200 degrees C.
Place a raw chicken breast into a shallow medium size oven-proof dish and season with a little salt and pepper. Open a 400g can of chopped tomatoes in their natural juices (I use Waitrose brand) and pour over the chicken. Top the chicken with some shredded cheese (I use a mix of parmesan and cheddar cheese, you can also use mozarella). Bake the chicken for 30 - 40mins until the chicken is cooked (the juices will run clear). 

(If you happen to have a convection oven, you can decrease the cooking time by using a combination bake and microwave function)

Serve with vegetables and pasta or potatoes. Shorter pasta such as spiral, macaroni or ravioli works well because you can coat the pasta with the excess tomato and cheese sauce.

Tip: For this dish, I like to buy ready-made pasta like ravioli stuffed with roasted vegetables. It's a slightly more expensive alternative, though...but a nice treat...

Thursday, May 7, 2009

Paprika Chicken & Avocado Sandwich

chicken sandwich
This is one of my favourite sandwiches. It's great in a bento lunch, easy to make, and healthy, too. The chicken tenderloin is marinated with a little soya sauce and paprika, then grilled. I use my George Foreman grill for this, but you can also panfry it if you prefer. The meat is then shredded, and added to a multi grain nut bread, along with slices of avocado and tomato. I find the nuttiness of the bread matches very well with the buttery avocado and paprika chicken. There is no need to butter the bread as the avocado already provides the sandwich with a moist buttery taste.

Accompany the sandwich with some raw carrot sticks and hummus dip.

Tip: When packing sandwiches in your bento lunch, a handy way to keep the sandwich together and your hands clean when eating it is to wrap the sandwich with baking paper/parchment paper. Then cut the wrapped sandwich in half, paper and all, with a sharp knife (a serrated bread knife works well). 

Thursday, April 9, 2009

Teriyaki Chicken Mushroom Rice

chicken mushroom rice

This one pot, one dish meal was created out of a need to prepare something hot and satisfying with a minimal amount of preparation and cooking. All you need to do is cut and marinate the chicken and mushrooms, and dump them with the rice into a rice cooker. The rice cooker takes care of the cooking, leaving you free for other things. Simply serve it up when the rice is cooked, with a side of greens if you must, or on its own (I figure mushrooms are vegetables, too!). Japanese or Korean pickles (eg. takana - mustard greens) work very well with this dish too.

The rice is great for bento as well, so you can pack up any leftovers for lunch the next day.

Continue reading for the recipe...


Teriyaki Chicken Mushroom Rice
(serves 2)

150 - 200g boneless chicken thigh meat
10 - 12 chinese or shitake mushrooms
240g long grain white rice (uncooked)
240ml water
1 - 2 cm piece ginger
5 Tbsp soya sauce
3 Tbsp sake
3 Tbsp mirin
2 Tbsp sugar
dash pepper

1. Mix the soya sauce, sake, mirin, sugar and pepper together in a medium sized bowl. Peel the ginger skin (with a spoon) and slice the ginger into thin strips. Add to the marinade.

2. Trim the excess fat from the chicken meat and cut into generous bite-size chunks (around 1.5 inches). Slice the mushrooms. Add the chicken and mushrooms to the marinade and mix well. Set aside for around 5 minutes as you prepare the rice.

3. Add the uncooked rice into the inner pot of your rice cooker, and wash the rice under cold running water until the liquid is clear. Drain, then using the same cup in which you measured out the rice, add an equal amount of cold water. (Your rice cooker usually comes with a measuring cup. For me, 240g rice equals to 1.5 cups of my rice cooker cup. I then use the same cup to measure an equal amount of water, ie. 1.5 cups).

4. Pour the chicken and mushrooms, along with the marinade over the rice, and switch your rice cooker on (use the setting you normally would to steam plain white rice). 

5. When the rice cooker has completed cooking the rice, let it sit covered for a few minutes, before opening the rice cooker. Stir the chicken, mushrooms and rice together well to distribute the sauce evenly. Scoop the rice into bowls and serve with green vegetables, and/or Japanese pickles. 

Tip: Refrigerate any leftovers in a bowl, covered with plastic wrap, and pack it in a bento container for lunch the next day. The rice can be eaten at room temperature, but you could pack it in a thermos, or microwave-safe bento.

Back

Sunday, March 15, 2009

Roasted Chicken & Sausages with Sage & Onion

roast chick and sausages
I got this recipe from Nigella Lawson's book Feast, and wanted to share it here as I love the flavours in this dish, yet it is very simple to make. (by the way, I highly recommend many of the other recipes in that book, too...) The mustard, lemon, Worcestershire sauce, sage and onion marinade blend really well together and adds a little more zest and flavour to plain roast chicken.

This dish is perfect to make when inviting family or friends over for Sunday brunch, as the oven does all the cooking, allowing you time to prepare some side dishes. Serve with mashed potatoes, pasta salads, tomato ketchup spaghetti and salads/vegetables.

Continue reading...


Roasted Chicken & Sausages with Sage & Onion
(from Nigella Lawson's book
Feast)
(Serves 6)
1 large onion (I prefer red onions, but brown onions are also fine)
125 ml olive oil
2 tsp English mustard
1 Tbsp dried sage
black pepper
1 lemon
1 Tbsp Worcestershire sauce

2 kg chicken, jointed into 10 pieces (or else just buy a variety of chicken pieces, with their bones in)
12 sausages (thick English and Italian style sausages work well)
2 Tbsp chopped sage leaves (I don't usually have these on hand, and resort to the dried variety)
1. Peel and cut the onion into 8 pieces, and put it into a large freezer bag. Add the olive oil, mustard, dried sage, pepper and Worcestershire sauce. Wash and cut the lemon into 8 wedges, then squeeze the lemon juice into the freezer bag, and add the squeezed husks as well.

2. Mix the marinade together, then add the chicken pieces, and mix everything together until well combined. Marinate in the fridge overnight, or up to 2 days (check the expiry date of your chicken). If you do not have time, you can also marinate the chicken for a couple of hours at room temperature (this is not recommended if you live in a very warm climate).

3. Preheat the oven to 200 degrees C and allow the chicken and sausages to come to room temperature. Arrange the chicken, skin-side up, together with the marinade (including the onion and lemon wedges) in a roasting tin. Place the sausages around the chicken pieces. Sprinkle with fresh sage. Roast for 1 hour and 15 minutes, turning the sausages over halfway to brown them evenly.

Tip: I find that I get a lot of liquid at the bottom of the pan, so after roasting, I scoop the meat and onions into a separate serving dish, leaving behind the lemon wedges and excess liquid.

Back

Sunday, January 11, 2009

Chinese Rice Congee

porridge
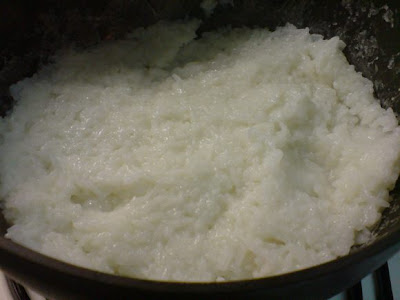
Rice congee, or rice porridge, is a very popular dish in Asia. It is often eaten for breakfast, supper, or as a substitute for rice, and there are many different styles - thick, thin, plain, or boiled with other ingredients. My favourite style is the traditional Cantonese style of congee, where the rice has been boiled a long time and has broken down into a very smooth, medium-thick liquid. 

Although congee is available all over Hong Kong, I still like to make it at home (for dinner). It's the laziness speaking again, but I usually follow my mother's recipe and make chicken congee, which is basically just boiling a roast chicken, rice and water together until the rice and chicken are both soft and tender. If you have a large rice cooker, making congee is a snap. However it is also easy to make in a large pot, and if you like the rice in your congee smooth and broken down as I do, I discovered a quick and easy method of making smooth congee without having to boil it for hours.

Continue reading...


(Chicken) Rice Congee
(makes a large pot, enough for 4+ servings)
240g rice
half roast chicken (with or without the skin)
water
chicken stock (optional)
spring onions and ginger (optional, as garnish)
1. In a medium-sized saucepan, add the rice and some cold water. Swirl the rice around the pot with your hand to "wash" it. Pour away the water and repeat, until the water runs clear. Drain, then add 2 cups cold water.

2. Cover the saucepan and bring the rice and water to a boil. When it is boiling, remove the lid and allow the rice and water to continue boiling on medium high heat. Stir the rice frequently with a plastic ladle.

3. When you see most of the liquid has been evaporated or absorbed by the rice, stir and mash the rice with the ladle. This aids the rice in breaking down faster. When most of the liquid has disappeared, stir another 1/2 cup of cold water into the rice.

porridge2

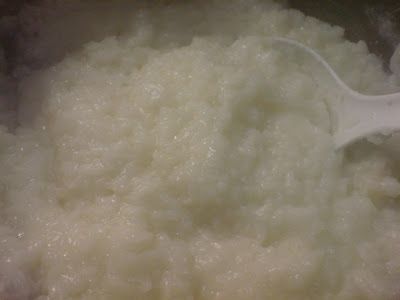
4. Continue to stir and mash, and add another 1/2 cup cold water into the rice. Continue mashing the rice with the ladle until it is soft and the grains have broken down.

porridge3

5. Once the rice is soft and mushy, add more water and stir until you reach the consistency of congee you like - this may be thick, or thinner, according to your preference. Add the roast chicken. You may need to transfer everything to a larger pot at this stage. If you are making plain congee, boil the congee for a bit longer, then season as per Step 7.

6. Boil the rice and chicken until the chicken is tender. The rice will thicken slightly again, so add a little more water if necessary. Pick out the chicken bones before serving (or if you are lazy like me, and not feeding this congee to children, you can leave them in!)

7. Taste and season with white pepper, salt, and some chicken stock (if required). Sprinkle some chopped spring onions and ginger on top before serving (optional).

Optional: If you have some chicken/turkey/pork bones lying around (!), you can use this as stock for additional flavour. Put the bones in another pot, cover them with water and boil. Keep the stock liquid boiling as you boil the rice, and add the stock liquid to the rice instead of the plain water.

Tip: Instead of chicken, you can also add fish fillets, or minced pork.

Back

Tuesday, December 2, 2008

Spicy Chicken & Cabbage Salad Bento

chicken cabbage salad bento
I had leftover roast chicken and cabbage sitting in the fridge, so I decided to make a Vietnamese/Thai-style chicken and cabbage salad for today's bento. A good thing about salads like this is that it is relatively healthy, as it doesn't include fattening/creamy salad dressing. Yet another good point about this bento is that it can all be prepared the night before.

Accompanying the bento are two little apples from Japan that I found in the local supermarket. The packet of apples were labelled, "Hime Ringo" (Princess Apple) which I thought was quite sweet. They were literally sweet as well, although a little mushy. There's also a little container of crushed peanuts to pour over the salad just before eating.

Continue reading for the Spicy Chicken & Cabbage Salad...


Spicy Chicken & Cabbage Salad
(serves 2)
1/4 roast chicken, teased into strips (or any leftover grilled chicken/boiled chicken you have on hand)
2 cups cabbage, finely shredded
1 medium carrot, shredded
1 small bundle glass noodles (optional - I added this to make the salad a little more filling)
few drops sesame oil (optional)
2 Tbsp fish sauce
2 Tbsp lemon juice
2 tsp sugar
1 red chilli, finely chopped (or few drops chilli oil, if you don't have fresh chilli on hand)
red pepper flakes & sliced green chilli (optional, for garnish)
  1. If you are using glass noodles, add the noodles into boiled water. Stir and leave to soak until the noodles are soft. Drain, then mix a few drops of sesame oil into the noodles. With a pair of scissors, cut the noodles roughly into smaller pieces.
  2. Add the chicken, shredded cabbage and carrot with the noodles and combine well.
  3. Mix the fish sauce, lemon juice, sugar and chilli together, then pour into the salad and toss.
  4. Taste, and add more seasoning if necessary.
  5. Garnish with some red pepper flakes or thinly sliced green chilli.

Back

Monday, December 1, 2008

Wrapped Up Over the Weekend

apple and wrap bento
I had a lot of soft flour tortillas as well lamb and grilled chicken leftover in the fridge, so I used them to make more wraps for an impromptu picnic on Sunday. Inside the wraps are lamb/chicken, with homemade spicy tomato sauce, roasted red and yellow peppers, tahini, and baby spinach leaves. I was in a hurry and using my rather large collapsible bento boxes from Muji, so I ended up sticking a whole apple into the bento. It's fun to slice fruit up into little bits for bento, but sometimes it is also nice to just bite into a whole, juicy apple... 

We headed up to Pinewood Battery again, and played some frisbee in the park, before setting out our picnic mat to eat lunch. After lunch, we snacked on senbei crackers, listened to some music from YH's phone, and enjoyed the warmth of the sun. The weather is starting to turn cold here, so the bright sun on our backs was actually welcome (for a change).

senbei in park

Wednesday, October 15, 2008

Chicken Avocado Wraps

wrap bento
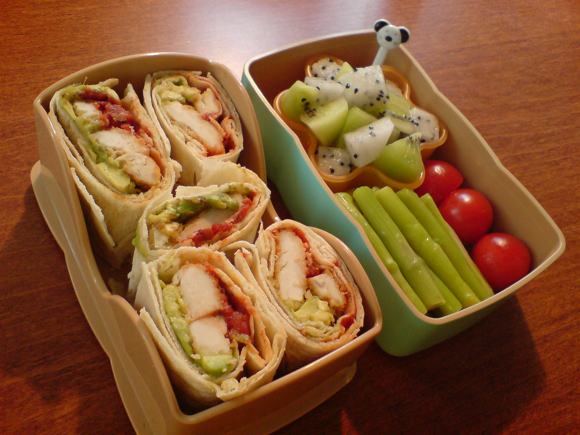
Just a simple bento lunch today. I decided to make some wraps - flour tortillas filled with chicken schnitzel, homemade spicy tomato sauce and avocado. Wraps are a little like western sushi rolls - you stick the filling inside, roll 'em up and slice. As the chicken had been sitting with the avocado and tomato, it was no longer crunchy, but it was still tasty. The avocado and spicy tomato were a nice complement to the chicken as well as a form of guacamole and salsa to match the tortillas.

The second layer of the bento contained cut kiwi fruit and dragon fruit, as well as some asparagus and cherry tomatoes (for colour).

Thursday, October 9, 2008

Teriyaki Chicken Meatball Bento

teriyaki chicken meatballs bento

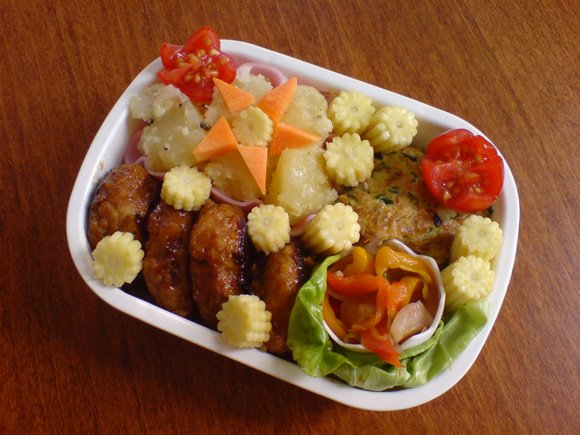
Another version of teriyaki chicken - this time, in a meatball. Meatballs are great bento fillers, and are very handy to have as part of your bento freezer stash. Make up a batch to freeze, so you'll always have a little something ready on days you need to make a bento in a hurry.

Also in the bento: potato salad, rainbow sweet n spicy peppers, zucchini fritters, baby corn and cherry tomato flowers.

Continue reading...


Teriyaki Chicken Meatballs
(makes around 11 small meatballs)
150g chicken mince
7 Tbsp breadcrumbs
2 Tbsp teriyaki sauce (pre-bought, or make your own; see below)
1 large egg
light olive oil/cooking oil

extra teriyaki sauce (for glazing)
  1. Mix the chicken mince, breadcrumbs, 2 Tbsp teriyaki sauce and egg together.
  2. Heat up a little olive oil/cooking oil in a small frying pan on medium heat.
  3. Scoop little balls of mince mixture into the frying pan. Fry on both sides until cooked.
  4. Pour a little extra teriyaki sauce in the small frying pan. Turn the heat to medium low. When the sauce bubbles, add the meatballs, and stir to coat them in the teriyaki sauce.
Tips: For a quick and easy way of forming the meatballs, use a small ice-cream scoop.

If you are making the meatballs to freeze, after Step 3, remove the meatballs. Let them cool a little before packing into freezer safe bags. 

When you want to use them, defrost them in the microwave or in a small frying pan (with the lid on) over low heat until warmed through. Then turn the heat up a little, and add some teriyaki sauce to glaze the meatballs as per Step 4. (I got this defrosting tip from Just Bento).

Teriyaki Sauce
4 Tbsp soya sauce
3 Tbsp mirin
3 Tbsp sake
2 Tbsp sugar
Mix the above ingredients together and pour into a small frying pan. Boil until the liquid reduces into a thick sauce.
Back

Monday, October 6, 2008

Teriyaki Chicken Bento in 2 styles

Here's an example of how you can use similar ingredients to create two different bento looks - the cute and the more serious...

teriyaki chicken bento1
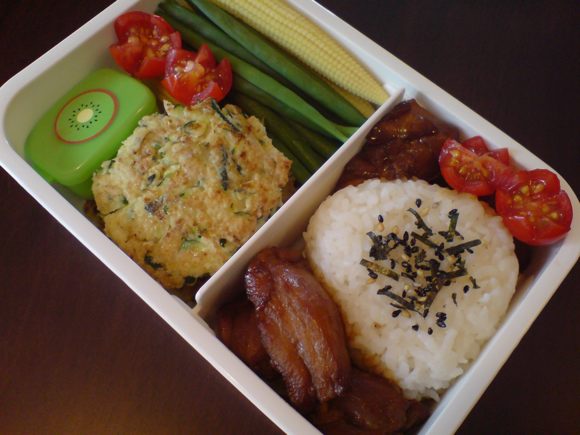
Firstly, the more serious-looking bento contains teriyaki chicken, zucchini fritters, along with a plain rice onigiri, blanched haricot beans, cherry tomatoes and baby corn. The little sauce container has some tomato sauce for dipping the zucchini fritters.

Now, taking those ingredients (and substituting the haricot beans for some rainbow sweet n spicy peppers, we have the second bento:
teriyaki chicken bento2

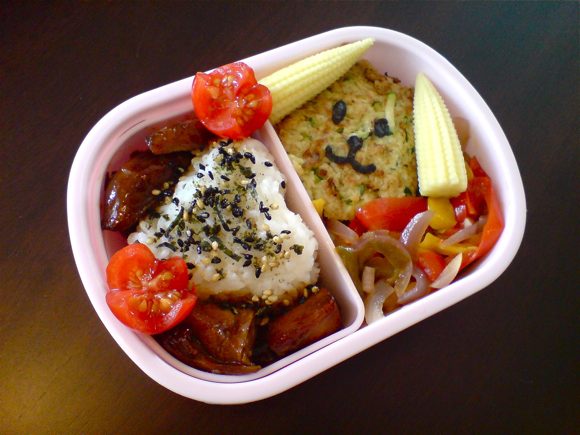
The plain rice onigiri has been moulded into a heart, and the fritters have turned into a dog, with the help of a nori (seaweed) face and baby corn ears. (There is a lack of green here, as I ran out of haricot beans, and had to use sweet peppers instead.)

This is another reason why I love to make bentos - there are endless design possibilities :)

Teriyaki Chicken

teriyaki
Teriyaki is a Japanese method of cooking involving food broiled/grilled (yaki) in a sweet soya sauce (tare). In Japan, fish such as salmon, mackerel or cod are often cooked this way. 

Teriyaki chicken is a favourite bento food item. It's saltiness lends itself to being eaten with plain rice, and it tastes great cold, too. One problem I find with preparing food for bento in advance is the re-heating before the bento is packed. The additional heating tends to overcook small bento-sized chicken pieces, especially for breast meat. So with that in mind, I tried to find a way of preparing this dish so the meat stays as juicy as possible, even with the re-heating. 

Continue reading...

Teriyaki Chicken
I use chicken thighs, as breast meat tends to cook too quickly and dry out. Of course you can use breast meat if you like. 
300g boneless chicken thighs (skin on or off)
4 Tbsp soya sauce
3 Tbsp mirin
3 Tbsp sake
2 Tbsp sugar
light olive oil/other cooking oil
If you are eating the teriyaki chicken straight away, or are packing it directly into your bento:

  1. Trim the fat off the chicken thighs and poke holes into the thighs with a fork. This allows the marinade to enter the meat more quickly.
  2. Mix the remaining ingredients together in a bowl, and add the raw chicken thighs. Marinade for a short while (5 mins is fine) as you are getting everything else ready.
  3. Coat the base of a large frying pan with a little oil, and heat the pan on medium heat.
  4. Lift up the chicken pieces and try to drain off as much marinade as you can, before adding the chicken to the hot pan.
  5. Fry the chicken on both sides until just cooked (around 2 - 3 minutes).
  6. Remove the chicken and set it aside.
  7. Turn up the heat to medium high, and pour the marinade into the pan. Boil until the marinade bubbles and thickens.
  8. Slice the chicken into smaller pieces, add back into the marinade and mix to glaze and coat the chicken (on low heat).
  9. Serve immediately, or cool down and pack into your bento.
If you wish to prepare this dish ahead and keep it in the fridge for your bento the next day:

Version 1 (This takes slightly less time, but the chicken may be a little more cooked)
  • Follow steps 1 to 7 (above).
  • Then pour the marinade into a small bowl. Cover the marinade and plate of chicken (uncut) with plastic wrap and keep it in the fridge.
  • The next morning, heat up the piece of chicken in a small frying pan. Remove and cut into smaller pieces. Heat up the marinade in the pan, turn the heat off, and stir in the chicken pieces. Cool a little, then pack into your bento. 
Version 2 (Takes a little longer, but is the best way to keep the chicken juicy)
  • The night before, prepare the teriyaki sauce by mixing the soya sauce, mirin, sake and sugar together. Heat up a frying pan and boil the sauce until it thickens. 
  • Pour into a small bowl, cover and refrigerate.
  • The next morning, poke holes into the raw chicken with a fork, then cut up the raw chicken meat into smaller pieces. 
  • Add a little of the marinade into the frying pan, and fry the chicken until cooked. Set aside.
  • Heat up the remaining marinade in the pan until bubbling, add the chicken pieces and mix.
  • Cool a little before packing into your bento.

Tip: You can also use the teriyaki sauce to coat meatballs and grill/panfry cod or salmon fillets.


Back

Sunday, October 5, 2008

Grilled Cajun Chicken Pita Bento

pita bento
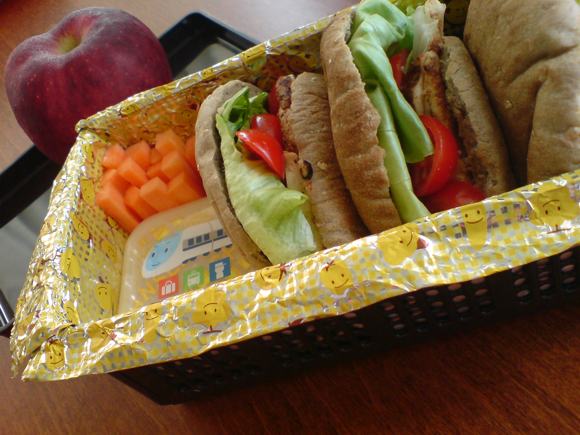
On the weekend we headed out to eat a bento lunch in the park, and I got the chance to use my collapsible bento boxes from Muji, which I bought thinking they would be useful for hiking or travel. We've neither hiked nor travelled since their purchase, but they were equally useful for our impromptu picnic.

Collapsible bentos are great because the boxes are (usually!) light and compact when folded, so you can carry them around (or complete your hike) with ease after you've eaten. Since they tend to have holes in them, they lend well to sandwiches, which are dry. I prefer to line the base and sides with foil, so the food won't leak and dirt won't get in. You can also use baking paper or a piece of paper towel as a disposable lining.

This bento contains grilled cajun chicken mini whole wheat pita sandwiches, with carrot sticks and hummus in a little sauce container for dipping. I was a little pressed for time, so for fruit/dessert we had an apple (uncut - saves carrying around another container!)

closed boxes

Continue reading...

Grilled Cajun Chicken Mini Pita Sandwiches
(makes 6-8 mini pita sandwiches)
200g chicken fillets
Cajun spice mix (Pre-bought or make your own by mixing together paprika, cayenne pepper, pepper, and salt)
6 - 8 pieces of mini pita bread (whole wheat or white)
butter lettuce, washed
tomatoes, sliced
hummus
  1. Liberally coat the chicken fillets with the Cajun spice mix. 
  2. Grill or pan-fry the chicken until cooked (around 3 minutes). The juices should run clear when they are done.
  3. Set aside to cool a little, then cut the fillets diagonally into 1cm slices. (Cut them diagonally across the grain of the meat, so that it is easier to eat)
  4. Set aside to cool.

    grilled chicken

  5. Lightly toast or microwave the pita bread. Split them 3/4 way open. 
  6. Spread one side with hummus.
  7. Fill pita with chicken, lettuce and tomatoes. Add some freshly ground pepper to taste.
Back

Monday, September 29, 2008

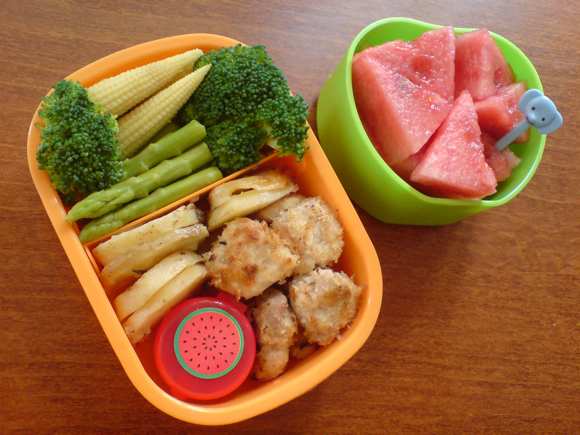
Homemade Chicken Nuggets Bento

chicken nugget bento
I love chicken nuggets. Can't help it - little morsels of fried battered chicken, dipped in sauce - who can resist? The one thing that often holds me back is the suspicion that the chicken in the nugget contains less chicken and more ...?...

I've seen some organic frozen chicken nuggets in the supermarket, but they are very pricey. So, I decided to make some of my own - I don't know why I never thought of it before, since chicken nuggets are just bits of breaded chicken.

I know the classic breadcrumb steps are flour, egg, breadcrumb (or a variation of that) but I have often wondered what it would taste like without the egg...or flour...and just breadcrumb. Call me curious or lazy, whichever works! Since I was down to my last two eggs, and I needed those for later, I decided to try it out. So... I just cut up some chicken thighs into chunks, seasoned it with a little salt and pepper and rolled it in some panko breadcrumbs. I used thigh meat instead of breast as chicken breast tends to get dry when overcooked, and I planned to re-heat the nuggets the next morning. Using a little oil, I pan-fried them until golden and cooked.

Result: They were still tender after being re-heated, but the crumbs weren't that crispy. They still tasted good, though! Next time I will try it with the eggs and flour...

Also in the bento - a little tub of tomato sauce, roasted rosemary potato slices (from last night's dinner), broccoli, baby corn and asparagus. And watermelon triangles for dessert.

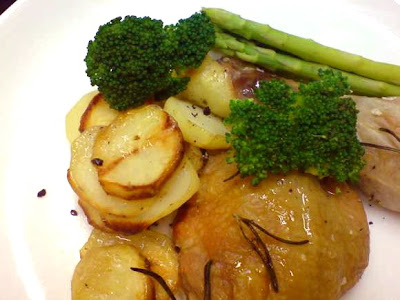
Roast Chicken Pieces & Potatoes

roast chicken
I love to roast a whole chicken in the oven, but we invariably stuff ourselves when I do... so sometimes I prefer to just roast a few chicken thighs and drumsticks instead. If you are pressed for time, as I was last night, slice up the potatoes (and microwave them) before roasting to speed up the cooking time. 

Actually, even for whole potatoes, I recommend microwaving them first before roasting them - I find it is really effective to give you soft, melt-in-your-mouth roast potatoes (and it's energy efficient, too)!

Continue reading...


Roast Chicken Pieces & Potatoes

Chicken thighs and drumsticks (with bones left in)
Potatoes (I used new potatoes, but ordinary sized ones are fine)
Sea salt & freshly ground black pepper
Light olive oil
Rosemary leaves (fresh is preferable)
  1. Peel and slice the potatoes. If you are using new potatoes, you can keep the skins on, but I prefer to peel them.
  2. Cover and microwave the sliced potatoes with a little water on HIGH for 6 - 8 minutes. (If you have an oven-proof and microwave-proof dish, use this for the potatoes).
  3. Pre-heat the oven to 200 degrees C/400 degrees F).
  4. In an oven-proof dish, place the microwaved potatoes and raw chicken pieces. 
  5. Coat chicken and potatoes with a little olive oil, rosemary leaves, and sprinkle of sea salt and black pepper. Mix well.
  6. Roast for 40 - 45 minutes, or until the chicken is golden brown and cooked through (the juices be clear, with no trace of pinkness).
  7. Serve with steamed/boiled vegetables.
Tips:
If your oven has a grill, you can grill the chicken for the last 5 minutes to brown it further.
If you have a convection oven, you can speed up the cooking time further by using the microwave+roasting function.

chicken dinner

Back

Friday, August 22, 2008

Pineapple Orange Chicken & "Duck" Bento

duck bento
To make this bento-making a little more fun and challenging, the next series of bentos will be entitled "One Week of Pineapple".

Here is #1 of the series - Pineapple Orange Chicken & "Duck" Bento.

The bento contains braised chicken thighs in a tangy, slightly sweet sauce, potato and corn salad, and a cabbage, carrot and corn coleslaw.

Continue reading...

Pineapple rarely appears in meals I cook or eat, apart from the ol' Hawaiian Pizza, so I decided to select it for my new themed series.

The first pineapple recipe featured is actually one of my favourite ways of cooking chicken (yes, this contradicts my earlier statement!). I discovered this recipe on one of those free supermarket recipe brochures many years ago, and it works really well. The original version braises boned chicken thighs, but for this bento version, I've used deboned chicken thighs for a faster cooking time. The sauce is also made first, so the chicken doesn't overcook.

Pineapple Orange Chicken

2 deboned chicken thighs
around 150g canned pineapple, including the juice (I had a 300g can of pineapple. I used half the pineapple, but all the juice from the can)
around 100ml orange juice
around 100ml water
2 tsps soya sauce
1 small piece cinammon bark
freshly ground black pepper

Heat up a saucepan on medium heat, and add the pineapple, pineapple juice, orange juice, soya sauce, cinammon bark and some black pepper. Keep the mixture at a steady boil to reduce the liquids. Stir the mixture every now and again. Add around 100ml water when the mix starts to dry up, and continue until the mixture has been reduced and is quite thick.

In a separate frying pan, add a little bit of oil, and pan fry the whole chicken thighs until brown (it need not be totally cooked through at this stage). Add the chicken to the bubbling sauce mixture, and mix over medium heat. Ensure the chicken is well coated in the sauce and remove from the heat to cool once fully cooked through (the juices should run clear without any trace of red/pinkness). I find the meat is tender enough to be cut into smaller pieces with the spatula I use to fry the chicken, but you may prefer to cut it up into pieces after removing it from the saucepan.

Cool a little before putting the chicken into the bento. This chicken is good accompanied with potatoes or rice.

Mashed Potato & Corn Salad
Peel 2-3 potatoes, dice them into smaller pieces, then boil in water until soft. Drain, then mash the potatoes with a little water (if dry). Add around 4 Tbsp corn kernels, 1 -2 Tbsp mayonnaise (add more or less according to taste), as well as some freshly ground pepper and dash of salt. Mix well, and season further with mayonnaise, pepper, salt if needed. Set aside to cool.

Mr Duck

Using two tablespoons, scoop up some mashed potato & corn salad and shape it roughly into a ball. Place the potato ball into the bento, and use the back of the spoons to shape the head and smooth the potato.

Peel part of a carrot, and slice down vertically to create 3-4 mm thick slices. Cut out a duck-shaped beak from this slice. Arrange on top of the potato head and use two corn kernels for eyes. Cut out two small circles of nori (seaweed) and place them over the corn kernel eyes. Using a fork or chopstick, make streaks in the potato to make a feathery pattern.

Salad
The salad used in this bento was shredded cabbage and carrot. Pack some additional mayonnaise in a squeeze bottle for a simple coleslaw, or just eat it plain. I also added some boiled baby corn for added sweetness and decoration value.

I found that the sweetness of the cabbage and carrot needed no further dressing. In addition, if you eat it with mouthfuls of the potato salad, the taste of the mayonnaise in the potato provides the vegetables with a sufficient mayonnaise taste.

duck bento


Back

Thursday, August 21, 2008

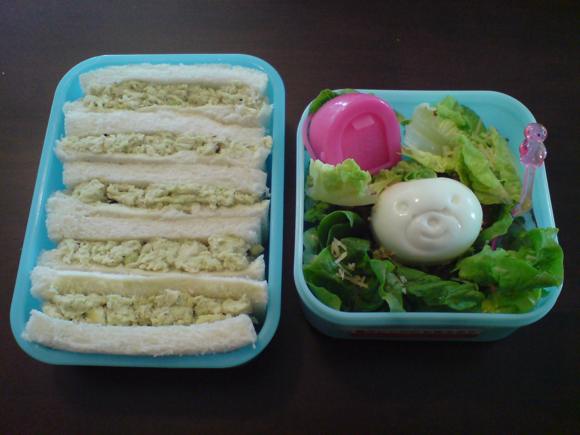
Chicken Avocado Sandwich & Caesar Salad Bento

chicken avocado bento
Today's bento is a sandwich and salad, to get away from the rice and noodles we've been having. I love chicken & avocado sandwiches, but they can be a bit more fiddly to put together especially if you don't have much time for preparation. Here is my quick and easy version. It's also another great way to use up leftover chicken...

Continue reading...


Instead of spending time teasing the chicken meat into strips, or slicing up the avocado, I just throw them both into a food processor and blend them together. True, the result is a slightly odd mushy green paste, but if you can eat guacamole (avocado dip), you won't mind this!

Quick Chicken & Avocado Sandwiches
(makes 4 -5 sandwiches)

Cooked chicken (Grill or poach the chicken. I used about 8-10 small chicken fillets, which I grilled for around 3 minutes until cooked. I prepared this the night before so I had even less to do in the morning. You can also use any leftover roasted, grilled, steamed, etc. chicken you have on hand.) 
1 ripened avocado
lemon juice
freshly ground black pepper
8 - 10 slices sandwich bread
  1. Put the cooked chicken in a food processor and process a little. Add a little bit of water if the mixture gets too dry. 
  2. Peel the avocado, remove the seed and add to the chicken (there's no need to slice up the avocado, you can add it in big chunks). 
  3. Squeeze a little lemon juice into the mixture and process until the chicken and avocado are well blended. You can process it as smoothly as you like, or leave little chunks in the mix. 
  4. Taste, and add more lemon juice if needed. You can also add some mayonnaise into the mix, but I prefer to leave it out.
  5. Remove the crusts from the bread (optional) and scoop the blended chicken avocado mix onto the slices of sandwich bread and spread. You can also butter the bread you like, but again, I prefer not to. I find the avocado is buttery enough on its own, plus it's a little more healthy without the butter. 
  6. Cut the sandwich into pieces and pack them into the bento. If you will be leaving your bento out in warm weather for some time, remember to add a few ice packs to keep it cool.

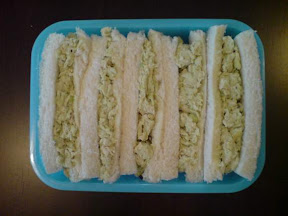
sandwich

You can also grill the sandwich if eating lunch at home or for a tasty snack.

toasted sandwich

Simple Caesar Salad

For an easy Caesar salad, I put some ripped up cos lettuce, bacon bits, parmesan cheese and a hard-boiled egg into a container, as well as some Caesar salad dressing in a squeeze container. Go for freshly fried bacon bits and freshly grated parmesan cheese if you like, but bottled bacon bits (made from real bacon, not the fake bacon) and pre-shredded parmesan aren't too bad, either. (I don't mean the parmesan you shake out of a can, though!). To make the hard boiled egg a little more exciting, I used my egg shapers. My egg wasn't large enough, so the bear turned out ear-less. How-to use egg shapers

Back

Wednesday, August 20, 2008

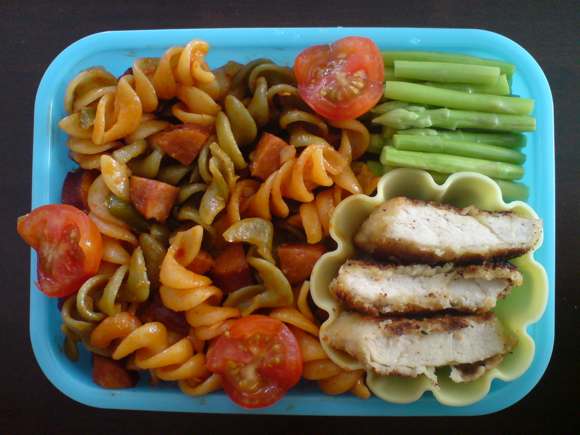
Spiral Pasta Bento with Chicken Schnitzel

pasta bento
Today's bento uses several ingredients from last night's dinner. This helps a lot in preparation time and with a few adjustments, can be made to taste a little different, so it's not exactly like eating two identical meals in a row! 

Continue reading...


Spiral Pasta Bento with Chicken Schnitzel
As I was preparing for dinner the previous night, I cut up extra garlic and sausage, as well as one green capsicum. I used that to make a similar pasta to the night before (click here for the rough directions) except I replaced the prawns with chopped green capsicum and the spaghetti with tri-coloured spiral pasta. Add extra tomato paste to coat the pasta well, and a little more salt, as the flavours will fade when eaten unheated.

If you are making the pasta the night before, undercook it slightly so it doesn't overcook when you reheat it the next morning (reheating the pasta the microwave is fine, but add some water to it first). 

To make the chicken schnitzel, I used 100g of chicken tenderloin, seasoned with a little salt and pepper, and coated with flour, then egg, then breadcrumbs. You can keep it like this in the fridge, covered with plastic wrap, and pan-fry it in the morning. (My method of making schnitzel is really a chicken version of tonkatsu.)

To complete the bento, I used the steamed asparagus from the night before and some cherry tomatoes, but any side salad would also be good.

Back