![]()
![]()
![]() Try before you buy. Download any Adobe product for a free 30 day trial.
Try before you buy. Download any Adobe product for a free 30 day trial.
![]() See our Photoshop CS4 Tutorials Page for free Photoshop 11 video clips.
See our Photoshop CS4 Tutorials Page for free Photoshop 11 video clips.
![]() Buy. Download. Create. Get Photoshop CS5 now at the Adobe Store.
Buy. Download. Create. Get Photoshop CS5 now at the Adobe Store.
![]()
![]()
Adobe Photoshop CS3 Tutorial - HDR - High Dynamic Range
by Mark Galer
Contrary to popular opinion – what you see is not what you always get. You may be able to see the detail in those dark shadows and bright highlights when the sun is shining – but can your CCD or CMOS sensor? Contrast in a scene is often a photographer’s worst enemy. Contrast is a sneak thief that steals away the detail in the highlights or shadows (sometimes both).
A wedding photographer will deal with the problem by using fill-flash to lower the subject contrast; commercial photographers diffuse their own light source or use additional fill lighting and check for missing detail using the ‘Histogram’. Sometimes, however, there is not enough fill light to resolve the problem, so the photographer has to resort to taking multiple exposures (bracket the exposures) and then merge detail from each in a new composite image.
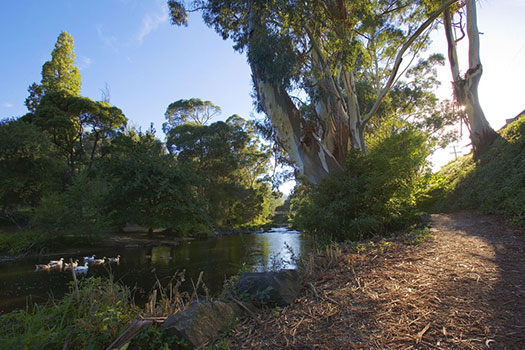

Photoshop’s Merge to HDR (High Dynamic Range) automated feature has been improved for CS3, but it is still not able to merge exposures where subjects have moved between the separate exposures. The technique in this tutorial (taken from the new Photoshop CS3: Essential Skills book) shows you how to resolve this problem. This technique also offers superior midtone contrast than Photoshop’s merge to HDR automated feature.
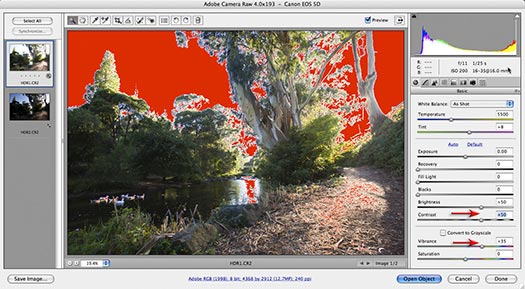
STEP 1
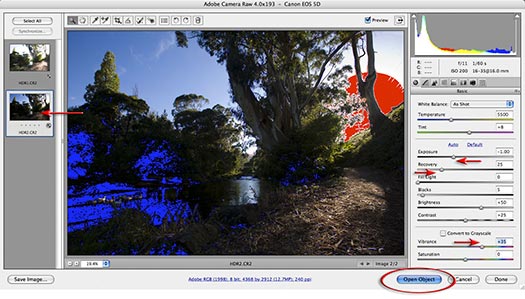
Open two different exposures of the same scene in Adobe Camera RAW. Click on the lighter image thumbnail and optimize the shadow detail (pay no attention to the highlights that will clip).
STEP 2
Click on the darker thumbnail and this time optimize the highlight detail. Click on Select All in the top left-hand corner of the ACR dialog box and while holding down the Shift key click on the Open Objects button. The two images will now open as Smart Objects.
STEP 3
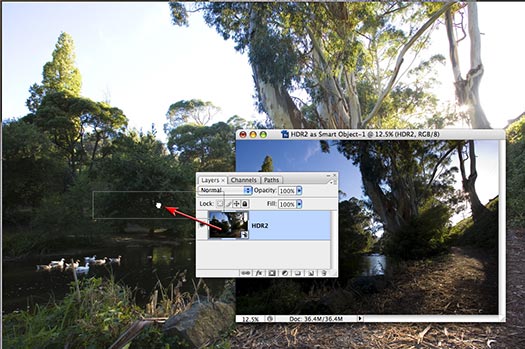
Select the ‘Move tool’ in the Tools palette and drag the dark underexposed image into the window of the lighter overexposed image (alternatively just drag the thumbnail from the Layers palette with any tool selected). Holding down the Shift key as you let go of the image will align the two layers (but not necessarily the two images).
STEP 4
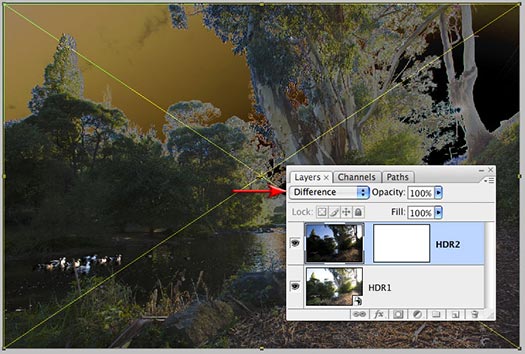
In the Layers palette set the blend mode of the top layer to ‘Difference’ to check the alignment of the two images. If they align no white edges will be apparent (usually the case if the tripod was sturdy and the two exposures were made via an auto timer feature or cable release). If the layers are not perfectly aligned you may need to nudge the layers into alignment using Free Transform as the new Auto-Align Layers command does not work with two Smart Object layers.
STEP 5
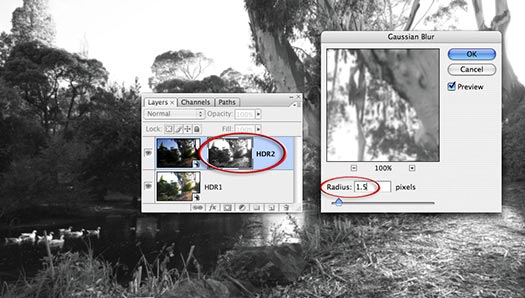
Click on the Add layer mask icon in the Layers palette. Switch off the visibility of this layer by clicking on the eye icon next to the layer thumbnail. Choose ‘All’ from the Select menu (Ctrl/Command+A) and then choose Copy Merged from the Edit menu (Shift+Ctrl/Command+C). Hold down the Alt/Option key and click on the layer thumbnail. The image window should appear white as the layer mask is empty. Now choose ‘Paste’ from the Edit menu (Ctrl/Command+V). Apply a 1.5-pixel Gaussian Blur (Filter > Blur > Gaussian Blur) to this mask before. Alt/Command+click to return to the normal view.
STEP 6
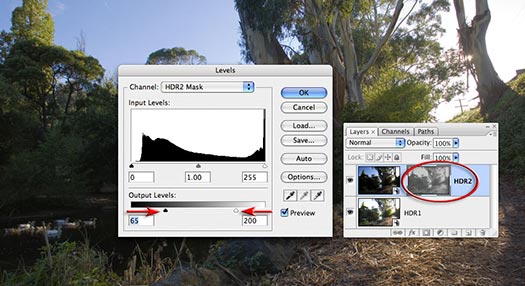
It is important to recreate the expanded contrast of the original scene otherwise the image will look slightly surreal if the overall contrast is low. The first technique to expand the contrast is to select the Layer mask and apply a Levels adjustment (Ctrl/Command+L). Drag in the Output sliders (directly beneath the Shadow and Highlight sliders) until the final contrast appears high but not clipped (lowering the contrast of the mask increases the contrast of the final image).
STEP 7
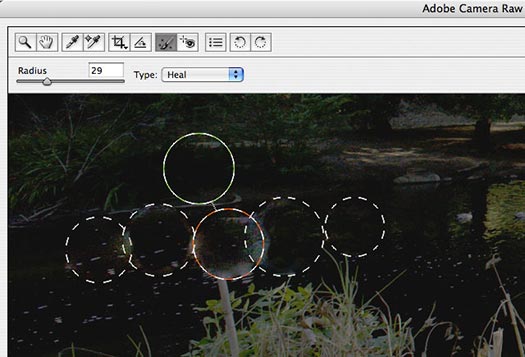
Anything that moves in the time difference that it takes to make the two exposures will create a ghost image of itself. Any ghosting can be removed using the new Retouch tool in Adobe Camera Raw. Double-click the layer thumbnail of the top layer, or smart object, in the Layers palette to open the image in the ACR dialog box. Use the Retouch Tool in the ACR dialog box to remove any object that has moved between the two exposures. If the heal area becomes contaminated with pixels from adjacent pixels of a very different color or tone, switch from Heal to Clone in the Type options. Select OK to apply the changes.
STEP 8
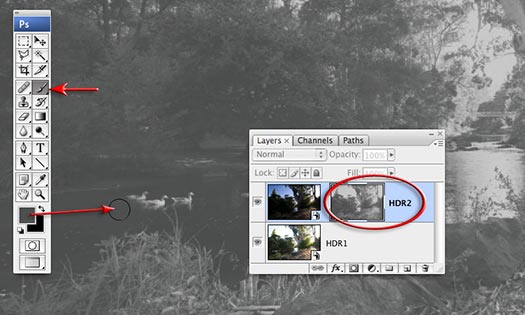
As we have already created a mask the ghost image is also present in the layer mask as well as the smart object. Hold down the Alt/Option key and click on the layer mask thumbnail. Select the Brush Tool and hold down the Alt/Option key and click on a tone next to the objects to be removed. Paint over any areas of the image where ghosting was occurring using a soft-edged brush. Click on the Image thumbnail to return to the normal view. The ghosts will now be gone.
STEP 9
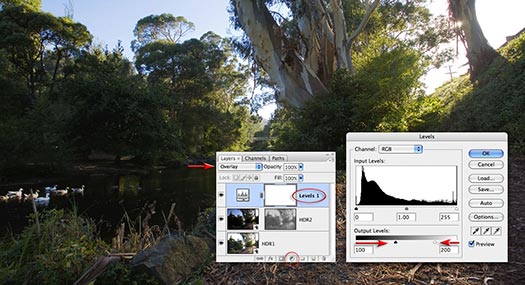
From the Create new fill or adjustment layer menu in the Layers palette hold down the Alt/Option key and select a Levels adjustment layer. From the new Layer dialog box select the Overlay or Soft Light mode. In the Levels dialog box drag the two output sliders towards the center of the gray ramp to limit the increase in contrast to just the midtones (levels 100 to 200).
STEP 10
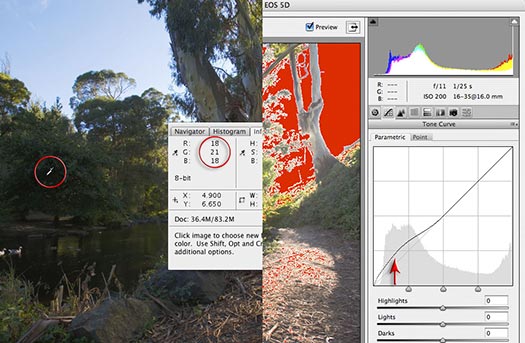
Open the Info palette and look at the RGB values when the mouse cursor is positioned over the dark shadow tones in the image window. If they are too dark to print to a typical output device (below level 15), you can double-click the bottom Smart Object to reopen the ACR dialog box. In the Tone Curve tab raise the shadow values as required. Select OK to apply the changes.
STEP 11
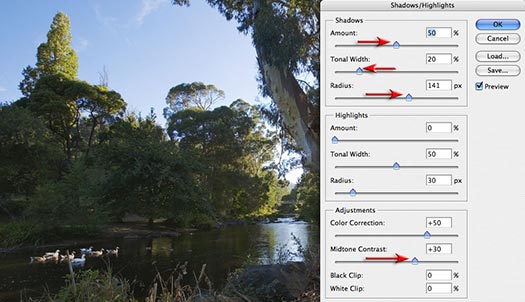
One way of controlling luminance and contrast in the shadows is to apply a Shadow/Highlight adjustment to the base Smart Object (Image > Adjustments > Shadow/Highlight). Both the Midtone contrast slider and the Radius slider in the Shadows section can be used to control the localized contrast in the shadows. Select OK to apply this adjustment as a smart filter to the smart object.
STEP 12
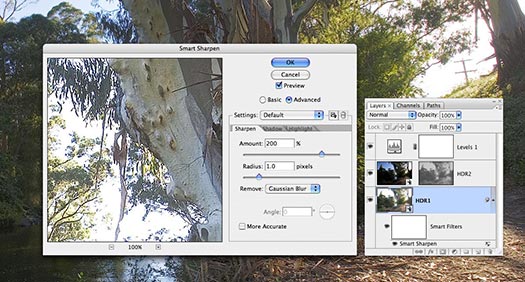
Complete the project by adding a Smart Sharpen filter to the same Smart Object, as this is where the bulk of the fine detail resides in this composite image. Select OK to apply the changes. Applying a sharpen filter to this smart object (a camera Raw file) instead of a rasterized layer (created by merging the visible elements to a new layer) means that we have deferred applying any ‘destructive’ changes to the image data in this file. The automated HDR feature would have to process the data to achieve the same result and the ducks would not be happy.

![]()
Topaz Adjust - HDR Photoshop Plugin - 15% Discount Code
 Simply follow this special link and enter PHOTOSHOPSUPPORT during checkout for an instant 15% discount on Topaz Adjust.
Topaz Adjust takes exposure, detail and color control to new heights. The intelligent exposure detection not only corrects both underexposure and overexposure, but it also has the ability to create HDR-like images using just a single exposure. The artistic HDR-like effects created by Adjust reveal image detail while adding a dynamic pop to the image.
Use the tools in Topaz Adjust to easily reveal highlights, shadows and image detail without having to create bracketed exposures that require merging. This single-image workflow offered by Adjust enables users to easily achieve the popular HDR look through a simplified and intuitive workflow.
Simply follow this special link and enter PHOTOSHOPSUPPORT during checkout for an instant 15% discount on Topaz Adjust.
Topaz Adjust revives intensity levels, vibrancy and detail from direct light and dark shadow areas. Users can also adjust the Adaptive Exposure to create more extreme image effects. Topaz Adjust offers a variety of dynamic image treatments ranging from soft to hard sharpening, low to hyper-saturation, high contrast and over-sharpened looking effects.
Topaz Adjust 3 Released
Topaz Adjust 3 offers intuitive adaptive exposure adjustments for correction and enhancement of images, and has powerful and highly controllable detail enhancement capabilities.
The fully-featured Presets architecture makes it easy to take full advantage of the creative power that Topaz Adjust puts in your hands. Applying a preset to your image is as simple as clicking the preview. The extensive collection of included presets range from mild adjustments to deep enhancements, all of which can serve to jump-start any photo enhancement.
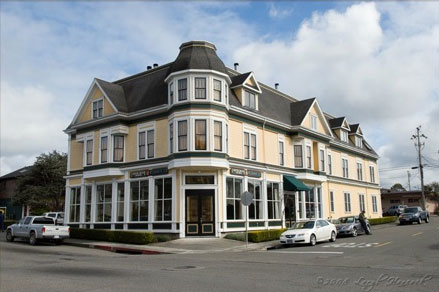
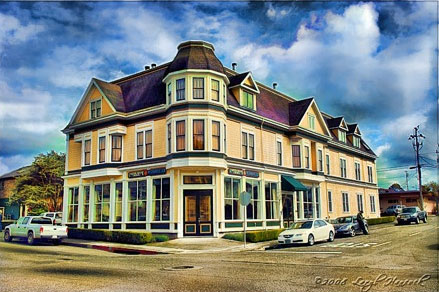
In addition to the included default presets, Topaz Adjust also gives the option to save your own individual presets and share them with your friends. Many online Topaz communities also pass around widely-used custom presets.
The Exposure tab enables simple, elegant, and stunning light adjustments in every single photo. And you can take your image's colors across the spectrum of faint to fantastical with the unique Color tab.
Never shoot a bland photo again. Turn decent photos good, good photos great, and great photos extraordinary with the one-of-a-kind features included in this versatile plug-in.
- Topaz Adjust supports both 8-bit and 16-bit RGB color modes.
- Topaz Adjust is fully compatible with the latest Photoshop versions on both Mac and Windows. Topaz Adjust is also fully compatible with Windows 64-bit Photoshop CS4.
- Topaz Adjust is a smart filter and supports non-destructive editing by using Photoshop smart objects.
- Topaz Adjust is completely optimized for computers with multiple CPUs for faster processing.
Exclusive 15% Discount On Topaz Adjust
Simply follow this special link and enter our discount code PHOTOSHOPSUPPORT during the checkout process for an instant 15% discount on Topaz Adjust.
![]()
Photoshop CS5 & Photoshop CS5 Extended - Best Deals From Adobe
 Adobe Photoshop CS5 delivers breakthrough capabilities to help you create images with impact. Refine your
images with reengineered photography tools for removing noise, adding grain, and creating high dynamic
range (HDR) images. Get precise results when making complex selections. Remove any image element and
see the space fill in almost magically. Paint with naturally textured brushstrokes and realistic color blends. Learn more about Photoshop CS5.
Adobe Photoshop CS5 Extended software helps you create the ultimate images
for print, the web, and video. Enjoy all the state-of-the-art editing, compositing,
and painting capabilities in industry-standard Photoshop CS5, and experience
fast performance thanks to cross-platform 64-bit support. Also create 3D extrusions
for logos, artwork, and motion graphics; edit 3D objects with advanced tools; and create and enhance motion-based content. Learn more about Photoshop CS5 Extended.
Find CS5 upgrade options and Creative Suite 5 deals at the Adobe Store. See CS5 pricing in UK currency at the Adobe UK Store. Visit the Adobe Special Offers page to find the latest deals. Save 80% on Adobe Student Editions. Try before you buy — download a free Photoshop CS5 trial.
 Adobe Creative Suite 5 Design Premium
Adobe Creative Suite 5 Design Premium software gives you fresh new creative tools, along
with the ability to deliver ideas faster in print and create interactive content without writing
code. Plus Design Premium integrates with Adobe CS Live online services to maximize
your design time by streamlining critical nondesign tasks.
Adobe Creative Suite 5 Design Premium combines Adobe InDesign CS5, Photoshop CS5 Extended, Illustrator CS5, Flash CS5 Professional, Dreamweaver CS5, Fireworks CS5, and Acrobat Pro with additional tools and services. Download a free CS5 Design Premium 30 day trial.
Photoshop CS5 Tutorials & CS5 Resources
See our Photoshop CS5 Resource Center for Free Photoshop CS5 Tutorials, and the Free Photoshop CS5 Trial Download. See our Photoshop CS4 Resource Center for Free Photoshop CS4 Tutorials.
![]()
Get Topaz Adjust As Part Of The Topaz Plugins Bundle And Save
 Enter our exclusive discount coupon code PHOTOSHOPSUPPORT during the checkout process at Topaz Labs for an instant 15% discount on any Topaz product, including bundles and upgrades.
Topaz Labs Photoshop plug-ins are specifically designed to expand a photographer's creative toolbox by harnessing powerful image technology developments. Photographers everywhere are now taking advantage of the creative exposure effects, artistic simplification, unique edge manipulation, and top-of-the-line noise reduction offered in Topaz products. The Topaz Photoshop Plugins Bundle is a super powerful Photoshop plugins package that includes the following Topaz products:
Topaz Adjust
Deliver stunning and dynamic images with this uniquely powerful plug-in that features HDR-like abilities and enhances exposure, color and detail.
 Topaz Detail
A three-level detail adjustment plug-in that specializes in micro-contrast enhancements and sharpening with no artifacts.
Topaz ReMask
The fastest and most effective masking and extraction program with one-click mask refining.
Topaz DeNoise
Highest-quality noise reduction plug-in that removes the most noise and color noise while preserving the most image detail.
Topaz Simplify
Provides creative simplification, art effects, and line accentuation for easy one-of-a-kind art.
Topaz Clean
Take control of the detail depth of your images with extensive smoothing, texture control and edge enhancement tools.
Topaz DeJPEG
Drastically improves the quality of web images and other compressed photos.
Learn more about the Topaz Photoshop Plugins Bundle. Download a free trial version.
![]()
Photoshop CS4 Book - Photoshop CS4 Essential Skills - By Mark Galer And Philip Andrews
 Brimming with beautiful pictures, Photoshop CS4 Essential Skills guides you through a project-based, progressive curriculum so that you can build all the essential skills to enhance photographs creatively and professionally with Photoshop CS4. If you are an aspiring professional or a student learning photography, digital imaging, or design graphics, you'll be amazed at the stunning results you can achieve. A DVD is included free.
The Essential Skills Photography Series from Focal Press uniquely offers a structured learning experience for photographers of all ages, with both the underlying theory and loads of invaluable 'how to' and real-life practice projects - all from the most talented photography practitioners/educators in the world.
Read 2 free sample chapters:
Skin Retouching Tips In Photoshop CS4
Transforming Smart Objects In Photoshop CS4
Find More Adobe Photoshop Books at Amazon.com
Find all the latest bestselling Photoshop books at discount prices at Amazon.com.
![]()
Photoshop CS3 Book - CS3 Essential Skills - By Mark Galer And Philip Andrews
 Brimming with beautiful pictures, Photoshop CS3 Essential Skills guides you through a project-based, progressive curriculum so that you can build all the essential skills to enhance photographs creatively and professionally with Photoshop CS3. If you are an aspiring professional, enthusiastic amateur photographer, or a student learning photography, digital imaging, art and design, or design graphics, you'll be amazed at the stunning results you can achieve. A DVD is included free.
The Essential Skills Photography Series from Focal Press uniquely offers a structured learning experience for photographers of all ages, with both the underlying theory and loads of invaluable 'how to' and real-life practice projects - all from the most talented photography practitioners/educators in the world.
Read 2 free sample chapters:
![]() Adjusting Exposure in Adobe Camera Raw CS3
Adjusting Exposure in Adobe Camera Raw CS3
![]() Photoshop CS3 Tutorial High Dynamic Range
Photoshop CS3 Tutorial High Dynamic Range
Special book offer - save 24%
![]() Photoshop CS3: Essential Skills (Amazon.com - $28.08 - save 24%)
Photoshop CS3: Essential Skills (Amazon.com - $28.08 - save 24%)
![]()
Photoshop CS2 Book - Photoshop CS2: Essential Skills - By Mark Galer And Philip Andrews
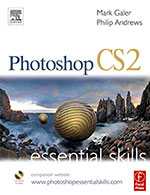 An inspirational and user-friendly guide to creative image editing, Photoshop CS2: Essential Skills provides direction for photographers and designers alike who have ventured into the realm of the 'digital darkroom.' The book offers a progressive curriculum to guide you through Photoshop with a series of clear, step-by-step projects designed to place knowledge into a practical context.
Whether you simply want to retouch an image, create a glamour makeover or create a highly sophisticated montage - this book will give you the essential skills to complete the work to a professional standard.
Read 2 free sample chapters:
![]() How To Sharpen An Image In Photoshop — Advanced Sharpening Techniques
How To Sharpen An Image In Photoshop — Advanced Sharpening Techniques
![]() Working With Shadows In Photoshop - Advanced Shadow Techniques
Working With Shadows In Photoshop - Advanced Shadow Techniques
Special book offer - save 37%
![]() Photoshop CS2: Essential Skills (Amazon.com - $20.76 - save 37%)
Photoshop CS2: Essential Skills (Amazon.com - $20.76 - save 37%)
![]()
![]()
![]() The Photoshop Blog offers the latest Photoshop and Digital Photography news and software updates, tips and tutorials, and random thoughts from graphic artist, digital photographer and Photoshop expert Jennifer Apple. Also includes Photoshop CS3 news!
The Photoshop Blog offers the latest Photoshop and Digital Photography news and software updates, tips and tutorials, and random thoughts from graphic artist, digital photographer and Photoshop expert Jennifer Apple. Also includes Photoshop CS3 news!
![]()


