
1. Introduction
Matter is a connectivity protocol that brings exciting opportunities for the development of smart devices. In this codelab, you'll build your first Matter device using resources from the Matter SDK.
To learn about Matter, visit the Google Home Developer Center or the Connectivity Standards Alliance website.
What you'll learn
- How to set up a Matter build environment
- How to build a virtual Matter device that runs on your computer
- How to commission and control the virtual Matter device with Google Home
What you'll need
- A hub, which is any Google Nest device that supports Matter, such as the Nest Hub (2nd generation).
- A Linux machine running the X11 windowing system.
- Docker.
- Git.
- Basic knowledge of Linux.
- Note that the assumed shell for all commands in this codelab is BASH.
2. Set up your environment
Check your hardware
Windows and macOS computers are not supported by this Docker installation. You may manually install and build Matter on macOS.
Also, these instructions assume that your Linux machine is running the X11 windowing system. If your Linux machine runs Wayland, make sure that X.Org is also installed.
Set up development environment
- Install Docker Engine (do not use Docker Desktop).
- Clone the Matter SDK, note the commit we are using in the following.
git clone https://github.com/project-chip/connectedhomeip.git
cd connectedhomeip
git show
commit f2f3d0eb03ba5bea32b22f19982c402a8c1c9063
- Run a build container using the SDK's public CI images, and execute the newly built virtual device from within this container. Locate the image to use matching our version of the SDK like this:
buildimage=$(grep chip-build .github/workflows/chef.yaml | head -n 1 | awk '{print $2}')
echo $buildimage
If you are using the same commit, you should seeghcr.io/project-chip/chip-build:66First, forward xhost ports so we can later use UI applications:xhost local:1000
Next, start the container with appropriate resources forwarded from the host (our SDK checkout, networking, and display/comms resources).docker run -it --ipc=host --net=host -e DISPLAY --name matter-container --mount source=$(pwd),target=/workspace,type=bind --workdir="/workspace" $buildimage /bin/bash
Let's understand the docker command and the options we passed to it:
xhost local:1000allows the X Window System to receive connections from the local host on port 1000, thus allowing a graphic user interface to be used.docker run … imageruns the given image, pulling it from the Docker registry if necessary.--ipc=hostallows Docker to share the interprocess communication namespace with your host machine.--net=hostallows Docker to use the host's network stack inside the container, which is required in order for it pass mDNS traffic from the host to the container, and to share the host X11 display.-e DISPLAYexports$DISPLAYto the host, providing access to your system graphic interface. This is required to run the ZAP tool when editing Matter clusters.-itruns Docker with an interactive terminal (tty), instead of as a background process.--mountmounts the SDK we previously checked out into the container.--workdirsets the working directory at launch to our mounted SDK directory.
Optionally you may run a second terminal session instance:
user@host> docker exec -it matter-container /bin/bash
$
Stop and start the Matter Docker container
Whenever you run a docker run command, you'll create a new container with the specified image. When you do this, your old data, which was saved on a previous container instance, will be lost. Sometimes this is what you want to happen, because it allows you to start with a fresh installation. But there are times when you'd prefer to save your work and environment configuration between sessions.
For this reason, after creating your container, you may stop the container to prevent losing your work.
user@host> docker stop matter-container
When you are ready to run again, start the container and open a terminal window:
user@host> docker start matter-container
user@host> docker exec -it matter-container /bin/bash
You may open additional terminal sessions to your container with:
user@host> docker exec -it matter-container /bin/bash
Or start a root session using:
user@host> docker exec -u 0 -it matter-container /bin/bash
Initial Matter setup
Initialize the SDK
Initialize the Matter SDK. This operation will take several minutes to complete.
source scripts/bootstrap.sh
python3 scripts/checkout_submodules.py --shallow --platform linux
Your Matter SDK is now initialized. To reinitialize the environment quickly in the future, run:
sudo docker exec -it  matter-container /bin/bash
source ./scripts/activate.sh
Share files between the host and container
Earlier, we accessed the files on your host machine from within the container using a bind mount. You may also write files to the mounted directory from within the container for access from the host.
In general, use bind mounts by running your container with the additional argument --mount source=$(pwd),target=/workspace,type=bind to mount your current working directory into the container at /workspace.
user@host> docker run -it --ipc=host --net=host -e DISPLAY --name matter-container --mount source=$(pwd),target=/workspace,type=bind us-docker.pkg.dev/nest-matter/docker-repo/virtual-device-image:latest
The container user's permissions on the mounted directory must be managed in the host.
Obtain the container user's group ID from within the container.
$ id
uid=1000(matter) gid=1000(matter) groups=1000(matter)
Open another terminal session on the container host and set the working directory to the directory mounted by the container.
Recursively set the group for files in the mounted directory to the container user's group.
user@host> sudo chgrp -R 1000 .
Grant your desired permissions in the directory to the group. This example gives the container user's group read, write, and execute permissions on all files in the mounted directory.
user@host> sudo chmod -R g+rwx .
Note that these commands do not impact the permission of new files created by the host user. Remember to update permissions of new files created in the host as needed.
You may add your host user to the container user's group to inherit permissions on files created by the container user.
user@host> currentuser=$(whoami)
user@host> sudo usermod -a -G 1000 $currentuser
3. Google Home Developer Console
The Google Home Developer Console is the web application where you manage your Matter integrations with Google Home.
Any Matter device that has passed Connectivity Standards Alliance (Alliance) Matter certification works in the Google Home ecosystem. Devices under development that have not been certified can be commissioned in the Google Home ecosystem under certain conditions - see Pairing restrictions for more information.
Create a developer project
Begin by going to the Google Home Developer Console:
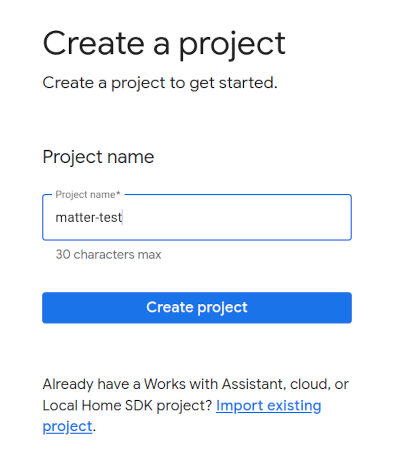
- Click Create project.
- Enter a unique project name and then click Create project.
- Click + Add integration, which takes you to the Matter resources screen, where you can view Matter development documentation and read about some tools.
- When you're ready to continue, click Next: Develop, which displays the Matter checklist page.
- Click Next: Setup
- On the Setup page, enter your Product name.
- Click Select device type and select the device type from the drop-down menu (in this case,
Light). - In Vendor ID (VID), select Test VID, and select 0xFFF1 from the Test VID drop-down menu. In Product ID (PID), enter 0x8000 and click Save & continue, and then click Save in the following page. Use these exact VID/PID values, later codelab steps depend on them.

- Now you'll see your integration under Matter integrations.
- Reboot your hub to ensure that it receives the most recent Matter integration project configuration. If you have to change the VID or PID later, you'll also need to reboot after saving the project for the change to take effect. See Restart Google Nest or Google Wifi devices for step-by-step reboot instructions.
4. Build a device
All the examples in Matter are found in the examples folder in the Github repository. There are several samples available, but our focus on this codelab is on Chef.
Chef is both:
- A sample app that provides a terminal interface, wrapping features also found on the
examples/shellapp. - A script that embraces the principle of convention-over-configuration to encapsulate several of the common tasks necessary for developing a Matter-enabled device.
Navigate to the Chef example folder and make your first Matter build:
$ cd examples/chef
$ ./chef.py -zbr -d rootnode_dimmablelight_bCwGYSDpoe -t linux
Chef has a few options that can be viewed by running chef.py -h. The options we're using here are:
-d: defines the device type to be used. In this case, we are creating a lighting app with on/off and level controls.-z: invokes the ZAP tool to generate the source files that implement the device type. That is, based on your pick of lighting, ZAP will automatically create code to be incorporated into the build that defines the light (the Data Model) and how it interacts with other devices (the Interaction Model).-b: builds.-r: [optional] enables the RPC server on the virtual Matter device so that other components (such as the GUI) can communicate with the device to to set and retrieve Data Model Attributes.-t linux: target platform. The support platforms arelinux,nrfconnectandesp32. You may run./chef.py -hto see all available commands and supported target platforms.linuxis used for virtual Matter devices.
Run the device
Matter uses TCP/UDP port 5540, so if you have a firewall running in your computer, either shut it down, or allow incoming TCP/UDP connections on port 5540.
Run the virtual device in the container with:
$ ./linux/out/rootnode_dimmablelight_bCwGYSDpoe
   [1648589956496] [14264:16538181] CHIP: [DL] _Init]
...
[1648562026.946882][433632:433632] CHIP:SVR: SetupQRCode: [MT:Y3.13Y2N00KA0648G00]
[1648562026.946893][433632:433632] CHIP:SVR: Copy/paste the below URL in a browser to see the QR Code:
[1648562026.946901][433632:433632] CHIP:SVR: https://project-chip.github.io/connectedhomeip/qrcode.html?data=MT%3AY3.13Y2N00KA0648G00
[1648562026.946915][433632:433632] CHIP:SVR: Manual pairing code: [34970112332]
Leave your device running. Now we'll turn our attention to the Google Home App so we can commission your device into the Google Home.
Stop the device
If you need to stop the device, you can quit the program with CTRL+C. If the app does not exit, you may need to use CTRL+\ as well.
The credentials for your virtual device are stored in the /tmp/ directory, in files starting with chip prefix.
If you want to repeat the entire commissioning process from the beginning, you'll have to delete those files by running the following command:
$ rm /tmp/chip*
5. Commission the device
Note: This step will only succeed if you have already set up your project in the Google Home Developer Console.
Nest Hub
A hub is required to commission your device on the Matter fabric. This is a Google Nest device, such as the Nest Hub (2nd generation), that supports Matter and which will serve as both a Border Router for Thread-enabled devices and as a local fulfillment path for routing Smart Home intents.
Refer to this list to see which hubs support Matter.
Before starting the commissioning process, check to make sure that:
- Your hub is paired with the same Google account you used to sign in on the Google Home Console.
- Your hub is on the same Wi-Fi network as the computer you are using to run your Virtual Matter Device.
- Your hub is in the same structure you are using on your Google Home App. (The "house" in the Google Home Graph represents your structure).
Get a QR Code
The commissioning process needs Matter onboarding information provided through a QR code. Examine the Matter application's console output which will contain a link for the QR code relevant to commissioning.
Perform the commission operation
- Open the Google Home app.
- Tap the + in the upper-left corner.
- Tap Set up device.
- Tap New device.
- Select your home and tap Next.
- The Google Home app scans for your device. If prompted with the message "Matter Device found...", tap ‘Yes'. Otherwise, tap Set up a different device, then select Matter device from the list of devices.
- Point your camera at your device's QR code or the website-generated QR code.
- Continue the pairing process as indicated in the Google Home app flow.
Once you complete these steps, the Matter virtual device should be successfully commissioned, and should appear as a new icon in your Google Home App.

Troubleshooting
Commissioning fails with "Connectivity problem" or "Could not contact Google" error messages
- Make sure you have created a project with the correct VID/PID combination in the Google Home Console and you don't have other projects using the same VID/PID combination.
Commissioning fails after "Scanning your device" for a long period
- Confirm your computer's firewall is off and that you're running the virtual device.
- Disconnect any physical network interfaces (Ethernet) to ensure that your computer using Wi-Fi exclusively.
6. Control the device
Once your Matter-enabled device is successfully commissioned and appears in the Google Home app as a light bulb, you may test the control of the device by different methods:
- Using Google Assistant.
- Using the Google Home app.
Google Assistant
Use Google Assistant on your phone or hub to toggle the device state from voice commands, such as saying "Hey Google, toggle my lights".
See the Control smart home devices with voice commands section of Control smart home devices added to the Google Home app for more examples of commands.
Google Home app
You may tap the On and Off labels next to the bulb icon shown on the Google Home App.
See the Control devices with the Google Home app section of Control smart home devices added to the Google Home app for more information.
7. Congratulations!
You've successfully created your first Matter device. Awesome!
In this codelab you learned how to:
- Install a Matter development environment.
- Build and run a Matter virtual device.
- Commission and control your virtual device from Google Home.
To learn more about Matter, explore these references:
- Matter Primer on the Google Home Developer Center, where you'll learn the basics of Matter concepts.
- Matter Specification, Matter Device Library and Matter Application Cluster Library, published by the Connectivity Standards Alliance.
- Matter GitHub repository.