Castle of Doom
First, grapple onto the hook right above you to bring down a chandelier of sorts. Then, build the broken pieces together to form a purple placeholder. Take the three boxes of items around you and stack them on one another to have the floor collapse. A Minikit will then pop out for you to collect.

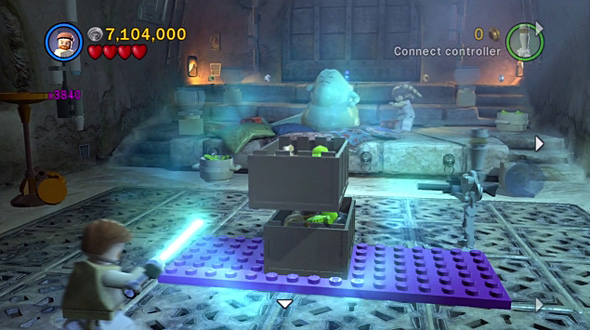
Show your dislike of Jabba's philosophies by attacking him until he burps out all of the pieces of a Minikit. Build the pieces together to earn Minikit #2.


Head to the south wall of the area and blow up each of the silver entrees. Then, hop on each of the buttons on the tables to collect the third Minikit.


In front of the malfunctioning blast door is a somewhat large silver-plated object. Blow it up with your Rocket Clone and build the pieces together to form a probe. There are four more of these to build throughout the level, and you'll have to use either your Rocket Clone or your Minigun Clone to reveal them.


In the cafeteria, use your Minigun Clone to destroy the golden gate on the right-side wall. Build with the pieces that fall out and you'll find you've made a purple placeholder. Take the hamburger pieces and place them on this new placeholder instead of the one on the left. From the top, double jump with Jar Jar and you'll be within reach of Minikit #5.

When you enter the next area, there will be a total of five red lights on the ceiling you need to destroy. Note that you'll need to destroy not just the light, but the stem that it's hanging from. Make sure to get the one on the left of the large ship and you'll acquire the sixth Minikit.


When you head outside, use your Rocket Clone to destroy the giant silver lock on the vehicle to your right and Minikit #7 will pop out.


In the rest of the level, there will be a total of 10 longhorn skulls to destroy. After destroying all ten, you'll be rewarded with a Minikit.
After hopping on to the rooftop, make your way through the crawl-hole on the left. Minikit #9 is on the right.


When you're outside in the last area, head north to interact with the R2 console. An old-fashioned car will be given to you, and you'll be tasked with riding over every button that popped up. This is a particularly challenging one because of camera issues, but you'll need to hit all of the buttons within an unspecified time limit.


Grand Theft Auto IV: The Ballad of Gay Tony Cheats
Grand Theft Auto: Episodes from Liberty City Cheats
The Elder Scrolls V: Skyrim Cheats
Saints Row: The Third Cheats
Grand Theft Auto IV: The Lost and Damned Cheats
Red Dead Redemption Cheats
Call of Duty: Black Ops Cheats
Assassin's Creed III Cheats
Minecraft (Xbox 360 Edition) Cheats
Call of Duty: Black Ops II Cheats
NDS
Professor Layton and the Last Specter
X360
Forza Motorsport 4
Wii
Rune Factory: Tides of Destiny
NDS
Harvest Moon: The Tale of Two Towns
PS3
Dark Souls
PC
Dark Souls (Prepare to Die Edition)
X360
Warhammer 40,000: Space Marine
Web
War Commander
PS3
Ultimate Marvel Vs. Capcom 3
X360
Trials Evolution
|
LEGO Star Wars III: Th... at IGN
LEGO Star Wars III: Th... at GameSpy
LEGO Star Wars III: Th... at TeamXbox
LEGO Star Wars III: Th... at GameStats
|