Hi there! And welcome to Craft Goodies. I'm thrilled that you've stopped by and hope you find something here that makes your visit a great one...
Showing posts with label baskets. Show all posts

Tuesday, July 5, 2011

Watermelon Picnic Basket Tutorial

*This is the project I shared over at Running with Glitter last week. It's SUPER simple! Requires very few tools and it's just cute. Hope you enjoy it! 
 Summer means picnic season and every good picnic needs a great basket to pack your goodies in, so, let's make one.


You can grab (almost) everything you'll need at your local craft store, I found mine at Hobby Lobby.
You'll need:
2 rectangle shaped wood plaques
 3/8 inch dowel
and 9 5-gallon paint stir sticks
 (you can buy these at Walmart for .28 cents each or ask at your local hardware store)


You'll need to cut your dowel and paint sticks down to size. I cut mine at 10.5 inches long.
You'll also need to drill a hole into the top of each wood plaque for the handle. Use a 3/8 inch bit and drill all the way through the plaque about an inch down from the top center edge.

Next you'll assemble the basket...
Either nail or glue 3 paint sticks onto each of the bottom and two sides of the rectangle plaques.


Almost done! Add a bit of wood glue to the inside of each of the holes that you drilled and then slide the dowel into place.


Guess what? Basket's done! Now on to the fun part...decorating!

You can either paint the watermelon slices onto the plaques or decoupage paper onto the ends like I did. Just trace out the plaque onto your paper, round off the bottom edges, distress if you like, and adhere into place.

Add a few black buttons for seeds, some ribbon if you like and your super cute picnic basket is ready to go! Just pack her full of your favorite picnic goodies and you'll be the envy of the park.


 Enjoy your summer and happy crafting!

Tuesday, May 10, 2011

Wood You Like to Craft? the Craft Goodies way...May Project!

Guess what? It's linky party time at Wood You Like to Craft!!!
Were you inspired by Candace and Nicole's toolbox planter?
Or maybe Krystal's...
How about Melinda's?

Or maybe even one of mine?
If so, be sure to jump on over to Crafty Sisters and share, share, share!
You have until this Friday to link up.
Prizes will be announced on Sunday as well as a sneak peak of my June project.
(you can find the party rules on the post)
Until then, here's my post with the two version's of the toolbox I shared...

Hey all you fantastically crafty people out there!
It's Wendy from Craft Goodies here for a little WYLTC? action.
I'm having so much fun with this group-it's become one of my favorite excuses to create something.
I do have to agree with Krystal, this is causing me to push my creative side a bit harder than usual but the results are so satisfying. I feel like I have my own little team of inspirational guru's to play with.

I love this week, it's kind of like opening a new present every day.
While we get a sneak peak of the main project ahead of time, we don't see each others versions until they post during the reveal week.
 It is so fun to see what we've each done with someone else's idea.
My (second) version of Candace and Nicole's toolbox planter looks a bit like this...

...teal might be the color of the week?

I really had a hard time with this.
Not because the design was difficult, but because the more I thought about how to alter the original, the more I realized  I really liked the original!
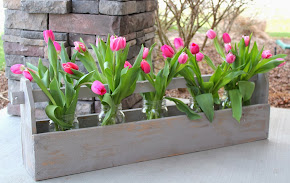
{The tulips totally put me over the top! My faves!}
 I originally made one really similar to Candace and Nicole's to use as a centerpiece for a church dinner...
it was a big hit!

I opted for a shorter and wider rectangle to accommodate the potted plant I was using, the dowel handle, and a slatted bottom. The wood I used is a 1x6 that I found lost and alone in a field, I loved it immediately. It was beat up, cracked and aged by the sun, in other words perfect for the theme of our dinner.
I had to work the ends a bit as I only had the one piece of wood, kind of like wood "cut and paste".
But I like it! And it now has a permanent place on my front porch.

The second box came about from an after-ball games dinner at Sonic.
 Have you ever really checked out the drink carriers? Total inspiration!


I used a pine 1x6 and 1x12 for the sides, center handle, and dividers,
and 1/4 inch MDF for the bottom piece.
I started by cutting and sanding all the pieces then I nailed and glued the box together. Re-sanded a bit, added a little putty to the corners, sanded again and then got to painting.
I used Val-spar Mediterranean Blue (Lowe's).
Then I beat it up a bit with a flat-head screwdriver and the power sander.
Wiped it clean, applied the stencils, painted in the stencils with Krylon Gloss Black, sanded one last time, then applied a layer of dark walnut stain and a sealer.
WHEW-toolbox done!


I knew I wanted this to be an "Art Toolbox" that my girls could keep in their room so I gave them each a side of the box, designated by the monogram, and filled it up with markers, crayons, paper, pencils and such. They love it!


I obviously LOVE this month's project. So much fun and (clearly) many uses at my house. Just might find myself building a few more...
Candace, Nicole, thanks for a great starting place!
Happy Crafting!


Tuesday, May 3, 2011

Tuesday Treats featuring...what I'm up to!

Sorry for the late post,
I've spent most of the day trying to recover from registering my little munchkin for kindergarten!
 UGH! Why do they have to grow up?
To make it worse, she lost her first two teeth too! Yeah, not just one but TWO.
 
The 2nd one fell out while she was changing into her jammas, amid the shock and awe we failed to finish putting on her jammas, hence the topless picture.
I also had to (finish) my post for Wood You Like to Craft? because it's that time again.
This month's project is being hosted by Candace and Nicole from
 Crafty Sisters...
Toolbox Planter
 
it's a GREAT beginner project if you're wanting to jump on board the WYLTC? band wagon.
 Coming up with a way to alter it was hard because I just really like it the way it is,
I'm a sucker for tulips!
You can see what I did tomorrow...
 
And speaking of those Crafty Sisters, they completely inspired my Easter baskets this year...
 

As I was putting these together, I think lightening seriously struck!
 How great would these be for a teacher appreciation/year end teacher gift? 
Okay, so not with the bunny, but how about with this...


...or maybe this...


These are actually my preschool diploma albums.
 (I'll share those with you too)
 But I'm thinking they would make some pretty cute baskets.
So that's where I'm at, working on putting the tutorial and patterns together...wish me luck, hopefully they'll be up tomorrow!

Happy Crafting!
***Enter to win your choice of vinyl decor from The Market by Poppies at Play! Click HERE for details***

Wednesday, April 13, 2011

Grapevine Easter Basket Tutorial...

Hey guess what, it's Thursday!
I  got a bit consumed by an order yesterday and pretty much missed the entire day...whoops!
 
I'll  make an attempt to make up for it with 3 posts today!
What? THREE?
 Oh, yes you read that right. Pretty sure that's a personal best for me, so let's get on with it.
Here we go with post numero uno...


Kinda cute huh? I'm so loving it, and it was super easy to make.
Cute not just for Easter but for the entire spring season, and ya, I'm thinking it'll make a come back in the fall.

Let's get you one made.
 Here's what you'll need:

Little note here, the basket pictured above used 2 six foot grapevine garlands and craft/floral wire,
flower stems and sheer ribbon.
That's it. 


When I went to get 2 more garlands to make this tutorial, they didn't have any!
 Ugh, what to do?
I ended  up buying four grapevine wreathes instead.
 Three the same size and the fourth the next size bigger.
I used the remaining piece of garland I had for the handle, if needed, get another of the larger wreathes to cut for a handle.


Make the base by wiring the smaller wreathes together.


Start with two, tie off in at least three places being sure the wire twists are inside and the ends are tucked into the wreath.
I went up and through the wreathes so that the wire didn't show on the outside of the basket.


**If you're using the garlands, shape the vine into a circle the size you want and wire together.
Make another circle layer and wire that one to the first.
Keep going in that manner (form a circle, wire it into place) until your base is as tall as you'd like.


Once all three wreathes are wired together, add the larger wreath to the top and wire into place.
(Somehow I managed to not take a picture of  that part, sorry)
**If you're using the garland, cut any remaining vine from the basket base. Wire together a seperate circle just larger than the base, add on more layer, wire it together then cut any remaining vine off.
Wire the larger circle to the top of the smaller circle base.
 
From there you're going to make the handle.


Cut the last wreath so that you remove about 1/3 of it.
(You need some twigs to sit down in the basket, if you cut it in half your handle will be very short.)
Sit the cut wreath into the basket vertically and wire the handle into place.
**For the garland, cut a piece of vine the length you wish and wire each end into place. I doubled mine just so it was a bit thicker.
And you're done. 
Your basket is ready to be filled.


You can place a vase down inside the basket and add some fresh flowers or go with the Easter thing and add some painted plastic (or real) eggs...


Can't you just see it full of fall leaves and acorns too?
So  quick and easy, make a bunch!

Happy Crafting... 


Visit thecsiproject.com
This week's theme is Easter, come and play along with your Easter themed projects!
Related Posts Plugin for WordPress, Blogger...