Showing posts with label guest posts. Show all posts

Tuesday, December 20, 2011

How'd You Like to Spend Christmas on Bainbridge Island?

You can!  Well, kinda.
It's a Pink & Red  Cookie Christmas over at Blooming on Bainbridge today!

You all have to come over to my friend Teresa's fun, joyful, happy blog!!!  She's a southern belle living life to it's fullest in the NorthWest.  I'm guest posting today with a full step-by-step tutorial of these cookies!  Come visit!  We have cookies.....

Saturday, November 6, 2010

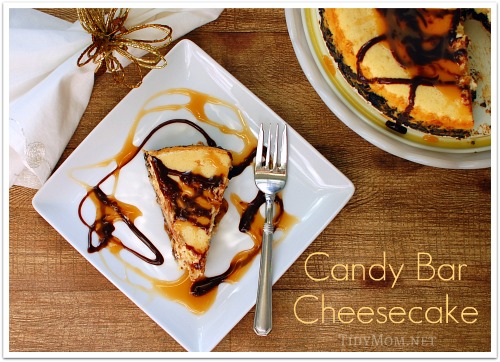
Candy Bar Cheesecake, Oh My! (A Guest Post from TidyMom)

You guys remember Cheryl, right? Cheryl blogs about food, family, photos, crafts and keeping at tidy home at TidyMom. (Yes, she does it all.) I'm lucky enough to call her a real friend and even got to visit her in St. Louis over the summer.
Well, Cheryl is sharing a Candy Bar Cheesecake with us today. A perfect excuse to use up that extra Halloween candy....or to buy some 1/2 price!


Hi there!!! I'm Cheryl from TidyMom, where I share my passion for good easy recipes, photography and any thing creative!

Bridget is my cookie idol! If it wasn't for her, I don't think I ever would have tried working with royal icing.

Bridget and I have many things in common, especially our love of BAKING! Baked goods can turn a frown upside down. They can make a bad day better or simply remind people that you're thinking about them.

I would bake every day if my hips didn't get so ugly about it!

If your house is like mine, you have an over abundance of those tiny little tempting candy bars all over your house (my 14 year old likes to hide her trick-or-treat booty). So I have the perfect solution to use up many of them all at one........I think if you eat 20 mini candy bars in a cheesecake, the calories are the equivalent to just one candy bar.....I THINK........but don't quote me on that! HA!

So here we go........grab your aprons! This was my first time making a cheesecake! It was so easy and fun I can't wait to make more!

Candy Bar Cheesecake

Candy Bar Cheesecake

recipe from Betty Crocker.com

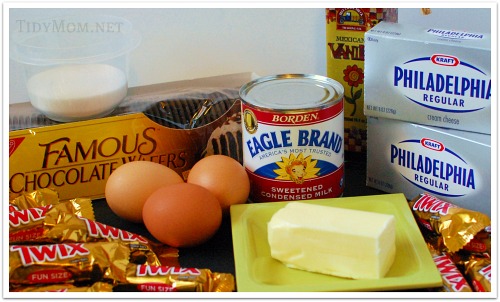
Ingredients:
1-1/2 cups crushed chocolate wafer cookies (about 25 cookies)
1/3 cup sugar
1/3 cup butter, melted
2 packages (8 oz each) cream cheese, softened
1 can (14 oz) sweetened condensed milk (not evaporated)
3 eggs
2 teaspoons vanilla
20 Twix bars (fun-size) candy (or your favorite candy bar), unwrapped, cut into quarters (about 2 cups)
Cheesecake ingredients

Directions:
  1. Heat oven to 300°F. Spray 9-inch springform pan with cooking spray. To minimize cracking, place shallow pan half full of hot water on lower oven rack.
  2. In medium bowl, mix cookie crumbs, sugar and butter. Press into bottom of pan.
  3. Open candy bars and cut each one into 3-4 pieces, set aside.
  4. In large bowl, beat cream cheese and sweetened condensed milk with electric mixer until smooth. Beat in eggs, one at a time, just until blended. Stir in vanilla and candy bars. Pour over crust.
  5. Bake 40 to 50 minutes or until edge of cheesecake is set at least 2 inches from edge of pan but center of cheesecake still jiggles slightly when moved. Run small metal spatula around edge of pan to loosen cheesecake. Turn oven off; open door at least 4 inches. Let cheesecake remain in oven 30 minutes. Cool in pan on cooling rack 30 minutes. Refrigerate at least 6 hours or overnight.
  6. Just before serving, run small metal spatula around edge of pan; carefully remove side of pan. Drizzle with Chocolate Syrup and Caramel Syrup or topping. Cover and refrigerate any remaining cheesecake.
Enjoy!!

Thanks Bridget, for inviting me over! I hope you all will come visit me for more fun at TidyMom.net!


PS- I'm having a Love The Pie party on Nov 15 - get your pie recipes ready to link up and share.....there will be prizes and lots of FUN!

See you there!!

Thursday, September 9, 2010

Guest Post from my 10-year-old Neighbor :) *Mini Pecan Pies*

You guys may remember I live next door to a real-life blogger and all-around wonderful person, Kristen from We Are THAT Family. Her precious 10-year-old daughter is guest posting here today.

One day, she mentioned that she loves cooking shows and LOVES Paula Deen & Rachael Ray. So, I loaned her my Paula Deen's Lady & Sons Cookbook.

I kid you not, two hours later she was on my doorstep with warm snickerdoodles. You guys, I got a little teary-eyed.

Here she is...my super sweet in every way, 10-year-old neighbor...

Hey Yall!
I'm Wearethatfamily's  oldest daughter!
 
My wonderful neighbor Bridget and I both love to cook. I made a yummy dessert (Mini Pecan Pies) from a Paula Deen cook book she let me borrow.

I served it  at my mom's jewelry party and it was a huge hit! They tasted just like real pecan pies!

Here's the recipe so you can make it too:

Mini Pecan Pies crust

8 tablespoons butter
1 cup all purpose flour
1 3-ounce package of cream cheese

Preheat your oven to 325.  Soften the cream cheese and butter in the microwave
and then blend it well. Now stir in the flour until you have a dough like mixture.

Let your dough chill for an hour.

While your dough is chilling, use this recipe to make the filling for your pies.

Mini Pecan Pies filling

1 egg
 3/4 c. brown sugar
1 tablespoon of butter
1 teaspoon of vanilla
a dash of salt 
2 thirds of a cup of pecans

First beat your egg, sugar, vanilla, and salt until  it's smooth.  Once your 
dough is chilled,  roll  it into pecan size balls and squish them in the cupcake tins to cover the bottom. Pour your filling in the tins and top with pecans.

Bake for 25 minutes and enjoy!  They will make about twenty four!
I hope yours taste as good as mine did!

Isn't she adorable?!? I was lucky enough to sample a few, ok SEVERAL, of these and they were delicious!

Thank you, sweet neighbor, for guest posting at Bake at 350! I hope you'll come back soon!!!

Sunday, March 28, 2010

Guest Post from Sweetopia : Marbling Cookies


I have *such* a treat for you guys today! This is the very first guest post on Bake at 350 and I am so, so happy to introduce you to Marian. Marian's blog is called Sweetopia and I'm not exaggerating when I say it is a cookie wonderland! I literally cried the first time I saw it. You'll love it, too! {Just WAIT until you see the little owl below!}

Thank you, Marian, for guest posting today! We are so lucky to have you here!


Hi! I'm Marian.


I'm really thrilled and honored to be here as a guest contributor for Bridget's website! Every time I visit I'm inspired by her eye-candy cookies and baked goods of all kinds! Hopefully you'll like the sweets I'm sharing today.


If you've tried cookies like these before you know how simple they are to make, and if you haven't, you're about to find out just how easy they are to create.

It's called marbling or swirling, which is basically when one or more colors of icing are applied to a base coat of icing, and then a toothpick, cake tester, pin or skewer is dragged through the icing to create a marbled or swirly effect.

Each combination of colors creates another look.


Just by changing the way you set up your lines and drag the toothpick, completely different designs emerge.

You can incorporate the swirled icing into your design, like these feathered cookie friends:


If you'd like to try the swirling effect, the most important thing for your success is the consistency of the icing. Bridget has some great points about that here, and my cookie decorating tutorial goes over some tips and the 10-second rule here.


Once you have your cookies baked and icing made, it's time to begin by piping your outline. I like to use a piping bag fitted with a coupler and #2 tip.

Fill or flood your cookie with royal icing right away. You could leave the outline to set to create a solid dam, but you'll be able to see the border when the icing dries.


Once you've filled the whole cookie in, shake it gently left to right on your work surface, to help smooth the icing out.


Add your second (or more), layers or colors of icing. Work as quickly as you can before the icing sets.


Take a toothpick, pin, skewer or dough tester (hey, whatever works!), and drag it through the icing. In this case I drew S-like shapes. The image below shows which direction I dragged the toothpick in.


Finish off the edges with dots or another design of your choice and you're done!


The hearts are made by piping dots and dragging the toothpick through the center of each dot.


Let your cookies dry, package and ribbon.


Simple, easy, fun and impressive!


If you have any questions or comments come visit me over at Sweetopia for more information or to contact me directly.


A big thanks to Bridget, cookie decorator extraordinaire, for having me as her guest blogger!


Happy marbling!

xo,

Marian