Showing posts with label foil. Show all posts

Wednesday, May 7, 2014

Father's Day Dynamite Candy Roll Craft


This candy TNT craft idea for Father's Day is really dynamite. decorate a toilet paper roll to look like dynamite. Fill with Dad's favorite candy and cap off with aluminum foil and a pipe cleaner fuse. Follow the link below for more.

I {Heart} Crafty Things

Monday, February 18, 2013

Foil Painted Easter Eggs Craft

I love this idea of painting foil covered egg shapes and then scraping off a pattern. The result is so shiny and colorful. This site has some really great craft ideas. Follow the link for the tutorial on this and more.

Kids Craft Weekly

Friday, January 4, 2013

Valentine's Day Foil Hearts Preschool Craft


This Valentine's Day foil heart craft is great fun for preschoolers and small children. Decorate a foil heart with tissue paper and other sparkly things. Visit this great craft site for more details.

Ponderings from the Kitchen

Sunday, June 17, 2012

4th of July Liberty Bell Cup Craft


This is a simple and great looking 4th of July Liberty Bell craft ready to ring in Independence Day. It's made from a paper cup and a toilet paper roll.

Materials:
  •  toilet paper roll
  • paper cup
  • marker
  • sharp pencil
  • long pipe cleaner
  • jingle bell
  • Glue

Directions:

  1. Cover the paper cup in aluminum foil inside and out.
  2. Poke 2 holes in the bottom of the paper cup with a sharp pencil. Poke 2 holes each on either side of the toilet paper roll, so you have 2 holes on the top and bottom.
  3. Fold a long pipe cleaner and insert through the top of the toilet paper roll, through the bottom and then into the paper cup. You can use the loop at the top to hang up your bell.
  4. Twist the ends of the pipe cleaner together inside the cup. Add a little glue between the cup and toilet paper roll to secure.
  5. Tie a jingle bell to the bottom of the pipe cleaner.
  6. Use a marker to write, "Liberty" on the toilet paper roll and draw the crack on the side of the bell.
  7. Hang up your 4th of July Liberty Bell craft for Independence Day.

Source: Preschool Panda

Saturday, June 2, 2012

Rain Stick Music Craft 2

Making a Native American rain stick craft is a great musical idea. It 's not only fun, but helps teach kids about other cultures. Authentic rain sticks have little spines inside that slow and change the sound of the beans as they fall down. The basic construction of a kids rain stick is the same, using a paper towel roll or other cardboard tube, but I'm offering a few different variations. The difference is what you put on the inside. You can choose the one that is best for you.

Variation 2:

This rain stick is really original idea and is much easier alternative to placing toothpicks inside. Use a spiral of aluminum foil to affect the sound of the falling beans.

Materials:

  • paper towel roll or cardboard tube
  • colorful tissue paper
  • aluminum foil
  • dowel rod
  • wax paper
  • dry beans, rice, or corn
  • glue
  • rubber bands
  • scissors

Directions:

  1. Take a long piece of aluminum foil and roll it into a long tube.
  2. Wrap the aluminum foil tube around a dowel rod to make a spiral shape and remove from the rod.
  3. Add a little glue around one end of the paper towel roll and wrap a square of wax paper around the end and secure with a rubber band.
  4. Cut to length and put the spiral inside the paper towel roll.
  5. Place dry beans inside the tube.
  6. Wrap and secure the other end.
  7. Cut tissue paper into squares.
  8. Spread glue around the tube and stick the squares all over, cover completely.
  9. Tie a little tissue twine around each end.
  10. Turn your stick and bring the rain
Source: Craft Jr.

Thursday, May 24, 2012

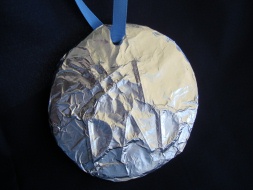
Father's Day #1 DAD Olympic Medal Craft

Dad will feel like an Olympic winner when he wears this Father's Day #1 DAD Medal craft.

Materials:

  • old cereal box or cardboard
  • drinking glass for circle template
  • pipe cleaners
  • scissors
  • glue
  • aluminum foil or gold foil
  • hole punch
  • ribbon

Directions:

  1. Use a glass to trace a circle on cardboard like an old cereal box and cut out.
  2. Cut pieces of pipe cleaner and glue them on the circle to spell, #1 DAD. Allow to dry.
  3. Wrap foil around the circle. press your fingers over the pipe cleaners to make them stand out.
  4. Punch a hole at the top. Lace a ribbon through and tie for a necklace.


Source: Busy Bee Kids Crafts

Saturday, May 12, 2012

Pirate Sword Cardboard Craft

Here's a simple, pirate sword craft made from cardboard and aluminum foil. Great for a Halloween party costume or prop for your play. It's easy to make and so much more satisfying than a store bought sword.

Materials:

  • cardboard
  • pencil
  • strong scissors or knife
  • paint (optional)
  • glitter
  • glue

Directions:

  1. Draw your sword with handle on a large piece of cardboard and cut out. There are 2 example swords pictured. If there is a label, you might want to tear that off at least the handle part if you plan to paint.
  2. Paint the handle on both sides. Red, brown, or gold are good choices. Allow to dry.
  3. Apply a little bit of glue to the blade and wrap with a large piece of aluminum foil. Actually, you don't need glue, but it will make the foil more secure.
  4. Add a few dabs of glue onto the handle and sprinkle on glitter to simulate gold or jewels. Allow to dry.
  5. Don't forget to make a pirate hat to go along with your sword. Maybe an eye patch, too.
 Source: Life Simplified


Friday, March 23, 2012

Father's Day Saw Card Craft

Dad Will never forget this Father's Day saw card craft with the message, "To the greatest Dad I ever saw.

Materials:

  • sheet of card stock
  • saw template
  • scissors
  • aluminum foil
  • tempura paints
  • permanent felt tip marker(sharpie)
  • glue

Directions:

  1. Print out trace the saw template onto the card stock or draw your own.
  2. Tape card stock onto a window and trace the saw shape onto the other side.
  3. Color the handle brown on both sides.
  4. Color the saw blade blue, grey, or brown on one side only.
  5. Place glue all over the inside of the blank saw side and lay a sheet of aluminum foil, shiny side up. Smooth out.
  6. Cut out the inside of the handle and the saw blade.
  7. Alternatively, instead of coloring, you could glue foil on the other side of the saw blade and trim off the excess.
  8. Write, "To The Greatest Dad I ever SAW" on one side with the permanent marker.
  9. Fold in the middle and write, "Happy Father's Day on the other side.
Source: That Artist Woman

Sunday, February 12, 2012

Aluminum Foil Face Mirror Craft

Here's a fun and easy idea to make a face mirror using aluminum foil. It's good to follow a lesson about the face, "myself", shapes, or even after reading Snow White.

Material:

  • old cereal box
  • aluminum foil
  • stars, flowers, or hearts cut or punched from reflective paper
  • glue
  • scissors
  • tape
  • craft stick

Directions:

  1. Trace a circle, diamond, or other basic shape on the back of an old cereal box and cut out.
  2. Cover 1 side of the shape with glue and cover with a sheet of aluminum foil. Cut off or fold down the excess.
  3. Decorate the front by gluing on pretty foil shapes like hearts, stars, and flowers.
  4. Tape a craft stick to the back for a handle.
  5. If desired, print out a message like "My Mirror" and glue on the front. (optional)


Tuesday, January 3, 2012

Icicle Bulletn Board Craft

Here's a simple way to make an icicle border trim for your bulletin board.

Materials:

  • 2 pieces of 12" x 9" white tissue paper
  • 1 piece of 12" x 9" aluminum foil
  • glitter
  • soft pencil
  • scissors
  • glue

Directions:

  1. Lay one piece of tissue paper on a desk, then a layer of aluminum foil, then the other piece of white tissue paper on top. Line up the edges.
  2. Use a soft pencil, to carefully draw a row of jagged icicles across the top tissue paper.
  3. Cut out the icicles through all three layers.
  4. Pull the bottom 2 layers down a little so they can be seen hanging just below the top layer of tissue paper.
  5. Glue the three layers in position and allow to dry.
  6. Dab glue on the tips of the icicles and add glitter.
  7. Repeat and display on the bulletin board.

Friday, December 16, 2011

Silver Christmas Aluminum Foil Scene Craft

This craft has a cool silvery effect. Good for a winter or Christmas scene.

Materials:

  • heavy-duty aluminum foil sheet, about 5"x8"
  • sheet of dark blue construction paper, about 9"x6"
  • silver marker
  • soft pencil
  • black paint and paintbrushes
  • paper towels
  • newspaper
  • glue

Directions:

  1. Fold several sheets of newspaper to make a padded work surface.
  2. Place the sheet of aluminum foil o the newspaper and draw a Christmas tree or other wintry scene with a soft pencil, pressing gently into the foil.
  3. Lightly brush black paint onto the foil.
  4. Dab and wipe off the excess paint with a damp paper towel. Allow to dry.
  5. Glue the foil picture onto a piece of dark blue construction paper.
  6. Use a silver marker to decorate the border of the construction paper with little silver dots or stars.

Submit your craft! Do you have a great craft tutorial or idea you want to share and reach a wider audience? Visit my Submit page and my new, easy-to-use submission form.

Related Posts Plugin for WordPress, Blogger...