SPEC_sipInfrastructure2011 User's Guide
Revision Date: Feb 7th, 2011
Table of Contents
Requirements
These instructions assume that you are familiar with the following:
- Server and Network configuration
- Installing and Using Open Source Software
- Installing a Java Virtual Machine (JVM) and running Java programs
The SPECsip_Infrastructure2011 kit is distributed as an InstallAnywhere installer and contains the following components:
-
Faban Harness
- a benchmark infrastructure, controller and configuration interface
-
SIPp
- an open source load generator which runs on each client system
- specsip.jar - Java source code based on Faban framework to execute the benchmark
- SIPp binaries pre-built for Solaris and Linux on the x86 machine architecture, which are the load driver programs to drive the SIP work load
- SIPp, OpenSSL and GNU Scientific Library source code distributed for GPL compliance, from the SIPp binaries were built
- The results.pl script for post-processing of run data, run rule validation, and report generation
- Assorted "readme" and "install" documentation files to help explain how do setup, configure, and run specific components. Please review these files; most have been included as appendixes to the document for your convenience.
Additional Software Requirements:
- Curses development libraries/headers
- Java - J2SE 1.6.0 or newer JVM (for running the installer and test harness)
- Perl 5.8.n or newer (for running results scripts)
Hardware Requirements:
- SUT: A system (hardware and software) configured as a SIP server. It runs a SIP application, which needs to be programmed or configured to process the call and device scenarios described in the design document. Its user database should be preloaded with user names, passwords and the SIP domain (
spec.org) as described in the design document. Alternatively, the SUT may use an authentication protocol (e.g., LDAP, RADIUS, DIAMETER) to acquire user authentication information from an authentication server. In that case, the authentication server needs to have the users and their credentials populated. Currently the only credential used in the benchmark is the user password. SPEC SIP committee provides a reference server configuration (which is not part of benchmark distribution) to help companies to try out the benchmark.
- Client(s): One or more client systems to act as load drivers for the benchmark; The SUT cannot be a client system. Current supported client types are Linux on x86/x64, Solaris on x64, and Solaris on Sparc.
- Master: A system configured to act as the master controller for the clients, which can be one of the client systems, or a separate system; the SUT cannot be the harness master. It is assumed that the master and clients share the same OS and instruction set architecture.
- Network: Clients must be able to connect to the SUT through a subnet A (data subnet); The Master and Clients must be able to connect through a separate subnet B (control subnet). The data subnet is used to convey the workload traffic. The control subnet is used to convey the control messages between master and clients. It is also used for master to push the configuration files to the clients to begin a benchmark run, and for master to retrieve statistics, error, and trace logs to the server. It is recommended that two subnets are different (for performance reasons) but not required.
- Virtualized environments: Virtualized environments have the same restrictions as you would expect. The Master and Clients can run on the same VM; the SUT cannot run on the same VM as the Master or any Client. The VMs must be able to communicate with each other over a virtual or real network.
Note 1: The minimal hardware requirements to run the benchmark is a SUT and a harness master which doubles as a harness client. However, a typical configuration will be the SUT, a harness master, and a few clients. Multiple clients are used to ensure clients are not the SIP processing bottleneck. Support FAQ lists "Watchdog Timeout" symptom when clients have become the bottleneck.
Setting Up The Test Environment
Running the SPECsip_Infrastructure2011 installer
To set up the benchmark, use the InstallAnywhere installer that contains all the components needed to run the benchmark (except the SIP server needed on the SUT). Currently the installer option only supports Solaris and Linux operating systems, that run on the x86/x64 architecture.
Installer Option
The installer may come from a CD or be downloaded from the SPEC SIP Infrastructure benchmark page.
- Save install.jar to a working directory (e.g., /tmp, or /root)
- From the working directory, launch the installer by running "java -jar installer.jar"
- Configure a destination directory for this installation (e.g, /home/specsip). This is where the installed programs will reside, and is referred as the Install Folder. The "trunk" subdirectory of the Install Folder will be remembered by the installer as the value of SPECSIP_ROOT environment variable (e.g., /home/specsip/trunk). Source code of the benchmark will be unpacked into the SPECSIP_ROOT subdirectory.
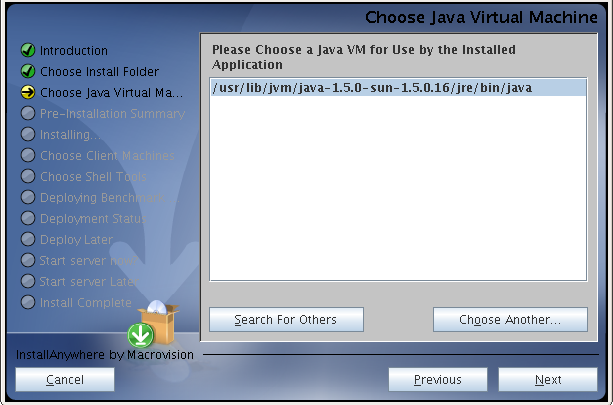
- Choose a Java VM to be used by the installer; select the real java program, not a symbolic link. In the xample below, the java program selected is /usr/lib/jvm/java-1.5.0-sun/jre/bin/java.
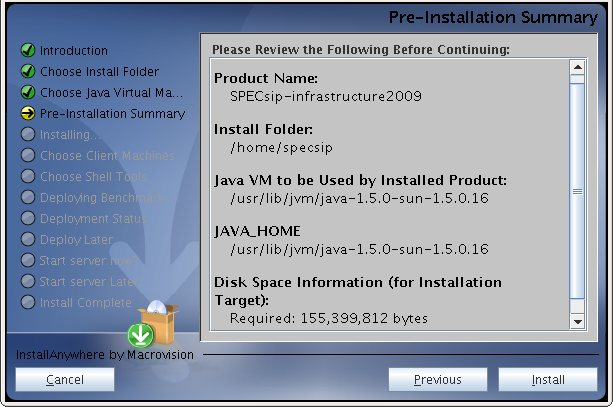
- Review the Pre-Installation summary to confirm the Install Folder and Java Home. Click the "install" button if everything is correct. Otherwise, go back to the previous step to set up.
- Installing ... files are being retrieved from the archive and saved to the Install Folder. During this step, a pre-built SIPp program will be extracted from the archive based on the architecture.
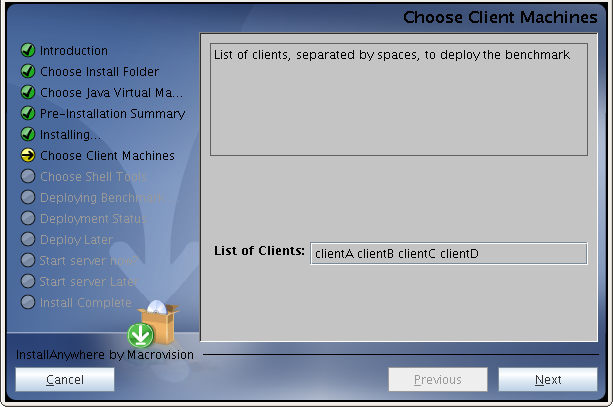
- List the clients where the load generator (SIPp) will be deployed. Note that it is required that the clients and the machine running installer are of the same instruction set architecture and OS so that a binary runnable on the installing machine can also be run on the clients. If there are no clients (meaning using the master itself is used for load generation), leave it blank. In the example below, four clients, clientA, clientB, clientC and clientD, are selected to deploy the benchmark.
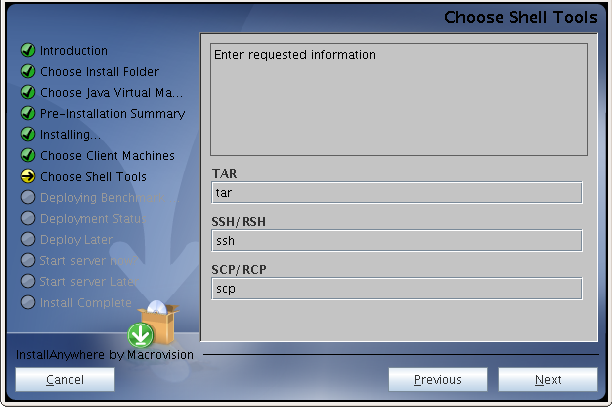
- Set up TAR, SSH and SCP environment variables for deploying the load generator. The default values for Solaris are gtar, rsh and rcp, respectively, while the default values for Linux are tar, ssh and scp, respectively. If any of these programs is not in the default PATH, you need to specify the full path such as /usr/sfw/bin/gtar.
- Confirm the environment variables. If correct, select OK. Otherwise, go back to the previous step to change. If OK is selected, the "setEnv.sh" script in the SPECSIP_ROOT directory is modified to record the aforementioned environment variables.
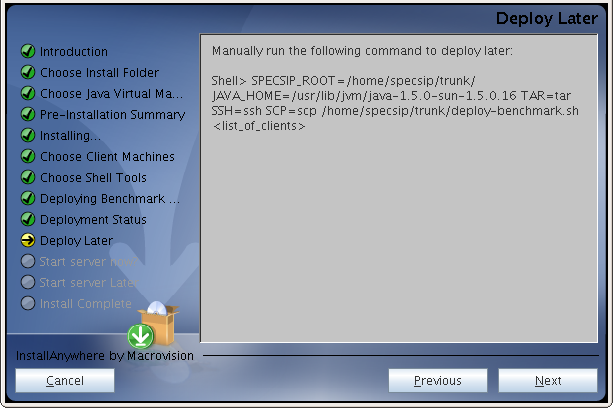
- If there is one or more clients configured, make a choice whether to deploy the benchmark now. If choosing now, the benchmark will run the deploy-benchmark.sh script to copy sipp and the Faban Agent to the client machines. For this copying to be successful, the clients should have been configured such that rsh (for Solaris) or ssh (for Linux) command does not prompt for a password. If choosing to deploy later, you may deploy the benchmark later by running the command displayed in the installer window. It is essentially a "/deploy-benchmark.sh" prefixed by environment variable settings and appended with the list of clients (clientA, clientB, clientC, clientD in the example earlier).
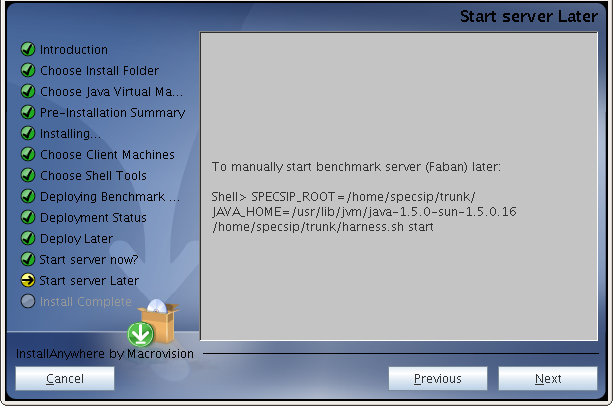
- Make a choice whether to launch the Faban server now. If launching now, the Faban master is started and listens to port 9980. If launching later, you may manually start Faban by running "harness.sh start" command from the SPECSIP_ROOT directory. An example of full command is shown in the example below.
- Congratulations! The benchmark installation is complete on the Faban master. If the benchmark was not deployed to the clients during the installation steps, be sure to run the deployment script to deploy the benchmark before running the benchmark.
- Later, when there is need to shut down Faban, run "./harness.sh stop" from the SPECSIP_ROOT folder. To restart Faban, run "./harness.sh start" again. Before restarting, it is good idea to point the browser to make sure Faban has been stopped first, since shutting down Faban takes some latency. If the Faban has been stopped, the browser should return a "page not available on the server" message. At this time, it is safe to restart Faban.
- If the installation or build is not successful, the Installer shows the error code and message. Please mail SPECsip committee (sipinf2011support@spec.org) the error code and message for the committee to help resolve the issue.
SUT Setup
- Start the SIP server on the SUT. The benchmark tests SIP running over the UDP protocol. Take note of the UDP port(s) that the server listens to. Typically, the UDP port is 5060.
- Add SIP domain (also known as security realm)
spec.org.
- Populate the SIP server with subscriber database. The benchmark tests if N subscribers can be sustained, subject to quality-of-service requirements. Before testing the hypothesis that N subscribers can be sustained, users from number 1 to N need to be in the database. The user name and password for user 1 (resp., 2, 3, ... and so on) are user00000001 (resp., user00000002, user00000003, ... ) and password00000001 (resp., password00000002, password00000003, ...).
- Configure the SIP server to accepts calls for the above users in the domain
spec.org.
- Configure the SIP server to authenticate all transactions. Important!
Client Setup
A client is the machine which hosts the load generator. The benchmark requires one or more clients. Each client also hosts a Faban agent to communicate with the Faban master. It is critical to plan your client need for running the benchmark such that client capacity does not become bottleneck. A system based on 4-core Xeon processor typically can drive the workload to about 0.5M Supported Subscribers. If the intended benchmark performance number is higher, multiple clients will be required. Here are the requirements for setting up the clients.
- Configure the benchmark clients to allow automatic login via rsh or ssh, usually using a ".rhosts" file or using SSH key exchange. More information is available at the Faban
Installation Guide
.
- During the installation phase, a directory, which is same as the SPECSIP_ROOT directory on the master, will be created. The installation script will use remote shell, specified by the SSH environment variable, to create the directory. For example, if SPECSIP_ROOT is /home/specsip/trunk on the harness master, the same /home/specsip/trunk directory is created on each client.
- Also during the installation phase, two modules will be deployed to the clients. One is the SIPp load generator. The other is the Faban agent. The modules will be copied from the harness master to the clients using the remote file copying facility specified in the SCP environmental variable. The SIPp executable is directly copied. And the faban agent is archived in faban-agent.tar.gz, which needs to be uncompressed and unarchived at each client, using the facility specified in the TAR environment variable.
Network Setup
The benchmark requires network connectivity between the harness master, harness clients, and the SUT. While not required, we recommend for performance reasons to use two separate physical networks: one for control traffic between the master and the clients, and another for data traffic between the clients and the SUT.
- The clients and SUT should be set up such that they can send each other SIP packets using IP addresses or host names. If host names are used, the /etc/hosts file (or equivalent) on each system need to be properly configured so that the SUT can reach each client using the client host name, and the client can reach the SUT using the SUT host name. In some cases you may need to configure /etc/nsswitch so that the host name lookup is through the host files not NIS.
- The harness master and clients should be set up so that rsh (or ssh) commands issued by the master will execute automatically and not be prompted for a password. By default, Faban uses rsh for Solaris, and ssh for Linux, for the master and client communication.
Running SPECsip_Infrastructure2011
Once the Harness Master, Harness Clients and SUT have been configured and networked, start the Harness Master:
- On the Harness Master, execute harness.sh. This requires that you have your JAVA_HOME environment variable set properly.
# <SPECSIP_ROOT directory>/harness.sh start
- If harness.sh starts successfully, it will show on stdout the host name and port its web user interface listens to, for example, <hostname>:9980. Point a web browser at the Harness Master, port 9980
http://<hostname>:9980/
- The browser should now show a SPECsip_Infrastructure2011 administration web page. The web page has a header and two frames. The left frame is for managing the benchmark runs, and the right frame is for configuring, monitoring and reading result from a run. It has four tabs: System Information, Benchmark Configuration, Workload Configuration, and Debug Setting.
Control Frame
The benchmark control panel located on the left frame of the UI allows one to manage the benchmark runs.
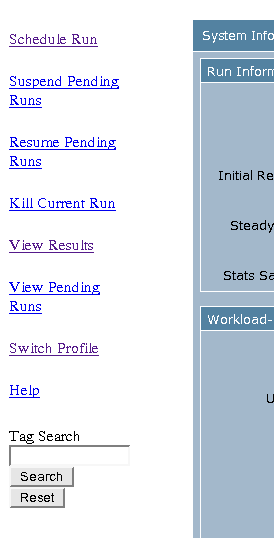
- Schedule Run: configure and kick off new benchmark run; if there is a run ongoing, the new run is put into a queue.
- Suspend Pending Runs: suspend the benchmark runs that are in the queue.
- Resume Pending Runs: resume execution of benchmark runs that are suspended.
- Kill Current Run: kill the ongoing run.
- View Results: view the table of benchmark results (current and past runs).
- View Pending Runs: view the list of runs that are suspended. There is an option to kill the suspended runs.
- Switch Profile: switch or create a new profile; a profile stores parameters; upon scheduling a run of the same profiles, the stored parameters are pre-filled on the UI so one only needs to make the necessary changes for the next run, and these changes will be stored. Each profile can be entered a list of tags to be used for tag search later (see Tag Search below).
- Help: brings up Faban
documentation page
.
- Tag Search: use the entered tag to search the run results with the matching tag.
When the harness is used for the first time, or when one selects Switch Profile, a profile configuration page is brought up. One can select an existing profile from the pull-down menu on the right, or create a new profile by filling in the profile name in the space on the left. One can also enter one or multiple tags, which can be used to search run results later.
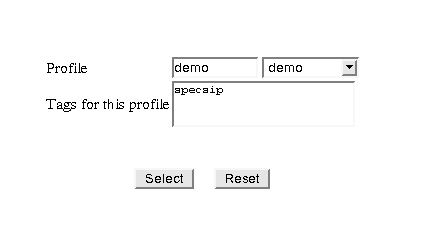 When using the same rig to test multiple SUT systems, it is handy to create a profile for each SUT so the configuration can be saved for the SUT. Upon switching the SUT, the previous configuration for it can be brought up promptly without re-entering the configuration parameters.
System Information
This tab contains information required for benchmark disclosure, and the Java run time environment to run the benchmark harness.
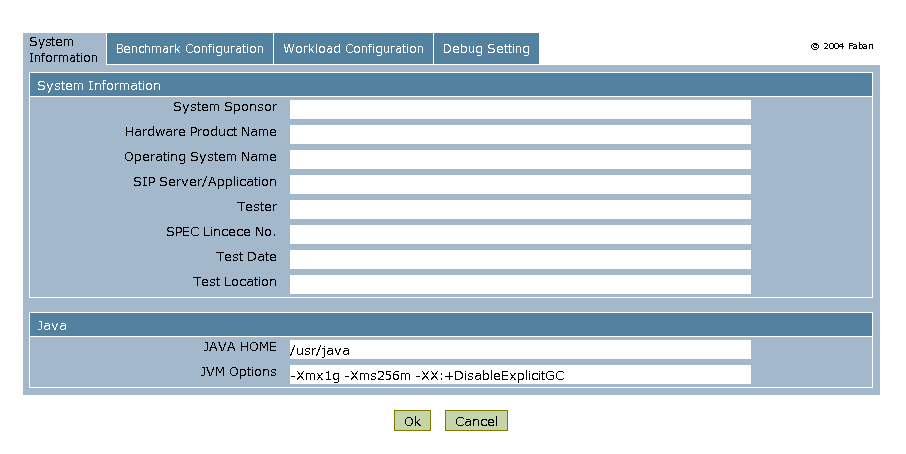
- System information disclosure as required by SPEC policy and SPECsip-infrastructure Run Rules
- System Sponsor: name of the company or organization who sponsors the test
- Hardware Product Name: name of the hardware system under test (SUT).
- Operating System Name: operating system and version running on the SUT.
- SIP Server/Application: SIP application name and version running on the SUT.
- Tester: name of the person or organization who runs the test.
- SPEC Lincece No.: SPEC license number that enables the person or organization to run the test.
- Test Date: Date of the testing
- Test Location: City or site where the test is run.
- The Java Section
- JAVA HOME: specifies where JDK or JVM is located, default value is /usr/java.
- JVM Options: specifies the options passed to JVM, for running Faban; default is -Xmx1g -Xms256m -XX:+DisableExplicitGC.
Benchmark Configuration
The Benchmark Configuration tab consists of four sections: Java, Run, Clients, and SUT.
- The Run Section
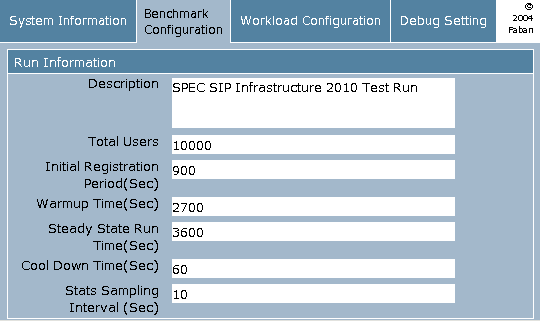
- Description: describes this benchmark run.
- Total Users: number of SIP subscribers simulated by the load generators.
- Initial Registration_Period: the number of seconds to populate the user location information, before the first call is initiated. The initial registration is necessary so that when sipp starts making calls, the SIP server knows how to route the calls to the destinations.
- Warmup Time: the number of seconds to run before collecting the traffic statistics. All three scenarios (UAC, UAS and UDE) will be exercised and full traffic load (as dictated by Total Users) will be generated. The purpose of the warmup time is to allow some time for the system to get into steady state.
- Steady State Run Time: the normal benchmark run, where statistics will be collected and based to generate benchmark report.
- Cool Down Time: in a multiple client situation, allow the last client to exit Steady State Run while other clients still maintain traffic load because the clocks on all the clients may not perfectly synchronized.
- Stats Sampling Interval: the sampling interval where benchmark statistics are collected; default is 10 seconds.
- The Clients Section
- The client configuration is critical in scaling up the workload and needs to be planned carefully. From experience, a modern 4-core x86/x64 based client system is able to sustain driving the load of 0.5 million subscribers. To test the benchmark for higher Supported Subscribers, more clients need to be used. For 2-socket/8-core systems, it is possible to run two instances of a client on a single machine but one needs to make sure network is not the performance bottleneck.
- Each client needs to run a Faban agent along with a number of SIPp processes for REG, UAC, UAS and UDE scenarios. These processes are brought up when Faban master launches a run, and killed when the run terminates (at the end of the Ramp Down period). During the Initial Registration stage, only the REG scenario is being run so there should be only one SIPp process. REG is essentially the UDE scenario run to populate the SIP server with registration information before the test begins. During the Ramp Up, Steady State, and Ramp Down periods, three SIPp processes are present to execute the UAC, UAS and UDE scenarios.
- A recommended configuration for each client is a physical network interface connecting to the data subnet and a separate interface connecting to the control subnet so that the two types of traffic will not interfere each other. Also, to ensure the three scenarios can be fully executed, not interfered by the other scenarios, it is recommended that the data interface is configured with multiple logical interfaces so that each SIPp process uses its own dedicated logical interface. In both Linux and Solaris, logical interfaces can be created by the ifconfig command.
- In the description below, we will use a running example where there are two clients, with their control interfaces (the interfaces connecting to the control subnet) named hostA and hostB, respectively. Machine hostA has three logical interfaces 10.10.0.1, 10.10.0.2 and 10.10.0.3 for the data connection. Similarly, hostB has three logical interfaces 10.10.0.4, 10.10.0.5 and 10.10.0.6 for connecting to the data subnet.
- We will proceed now to describe the Clients configuration section with the help of running example.
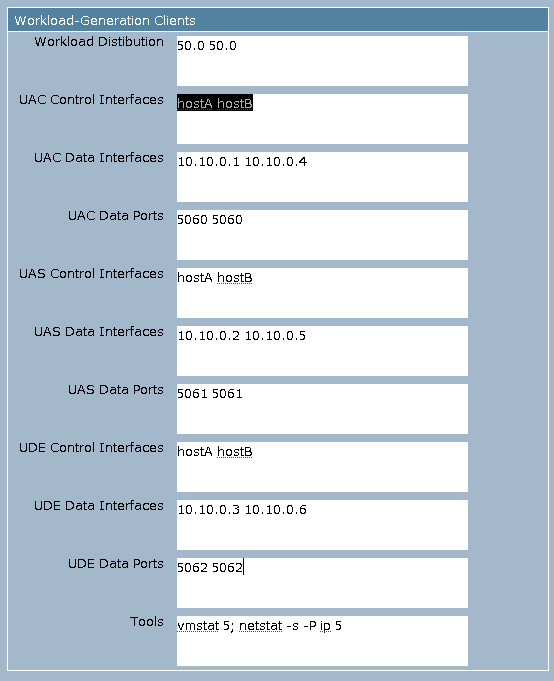
- Workload Distribution: how the workload is distributed to the clients, specified as a sequence of numbers separated by a single space. The number of elements in the sequence should equal the number clients, and the sum of the numbers should equal 100. Decimal points are allowed in the numbers. Default value for the workload distribution is 100, corresponding to the case of a single client. For the running example of two clients hostA and hostB, we should specify "50.0 50.0" in the Workload Distribution.
- UAC Control Interfaces: the list of network interfaces (host names or IP addresses) for the clients to receive commands from the harness master, separated by a single space. For our two-client example, the UAC Control Interfaces are specified as "hostA hostB".
- UAC Data Interfaces: the list of network interfaces (host names or IP addresses) for the clients to send/receive SIP traffic to/from the SUT, separated by a single space. For our example, "10.10.0.1 10.10.0.4" is specified for the UAC interface.
- UAC Data Ports: the list of UDP ports for the UAC clients to receive SIP traffic, separated by a single space. For our 2-client example, UAC Data Ports are specified as "5060 5060".
- UAS Control Interfaces: the list of network interfaces (host names or IP addresses) for the clients to receive commands from the harness master, separated by a single space. For our two-client example, the UAS Control Interfaces are specified as "hostA hostB".
- UAS Data Interfaces: the list network interfaces (host names or IP addresses) for the clients to send/receive SIP traffic to/from the SUT, separated by a single space. For our example, "10.10.0.2 10.10.0.5" is specified for the UAS Data Interfaces.
- UAS Data Ports: the list of UDP ports for the UAS clients to receive SIP traffic, separated by a single space. For our example, UAS Data Ports are specified as "5061 5061".
- UDE Control Interfaces: the list of network interfaces (host names or IP addresses) for the clients to receive commands from the harness master, separated by a single space. For our two-client example, the UDE Control Interfaces are specified as "hostA hostB".
- UDE Data Interfaces: the list network interfaces (host names or IP addresses) for the clients to send/receive SIP traffic to/from the SUT, separated by a single space. For our example, "10.10.0.3 10.10.0.6" is specified for the UDE Data Interfaces.
- UDE Data Ports: the list of UDP ports for the clients to send/receive SIP traffic to/from the SUT, separated by a single space. For our example, UDE Data Ports are specified as "5062 5062".
- Tools: the monitoring tool to be run on the clients; default is vmstat 5, which collect the cpu utilization and related info at a sampling period of 5 seconds. This is helpful in monitoring whether any client has become performance bottleneck.
- The SUT Section

- Server Data Interface: the IP address from which the SUT receives SIP traffic.
- Server Data Ports: the list of UDP ports from which the SIP server receives SIP traffic; default is "5060".
Typically, each client runs three instances of SIPp, corresponding to the three SIPp scenarios UAC, UAS and UDE. Therefore the data ports for the three instances need to be unique, such as 5060, 5061, and 5062.
Workload Configuration
The Workload Configuration tab consists of three sections: Traffic Profile, Traffic Parameters, and SIPp Scenario Configuration.
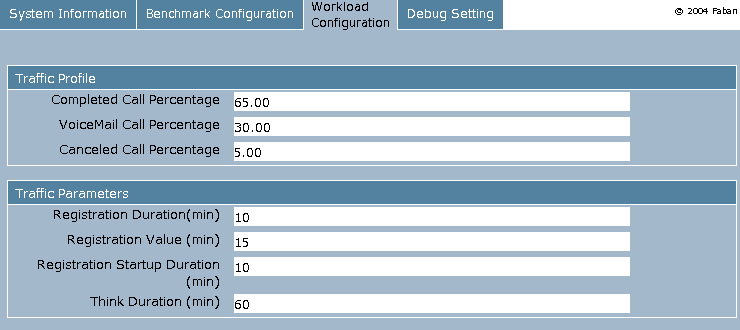
1. Traffic Profile
- Complete Call Percentage: percentage of calls that are complete.
- Voice Mail Call Percentage: percentage of calls that are routed to voice mails.
- Canceled Call Percentage: percentage of calls that are canceled calls.
2. Traffic Parameters
- Registration Duration: the interval between the registration made by a device and the subsequent registration made by the same device; default is 10 minutes.
- Expire Value: the Expire value in the registration SIP message.
- Registration Startup Duration: the length of the interval where devices make their first registration. Let T be the value, for each device it is equally likely to register at any time t in the [0,T] interval. Default value for T is 10 minutes.
- Think Duration: the average number of minutes between successive calls made by a subscriber; default is 60 minutes.
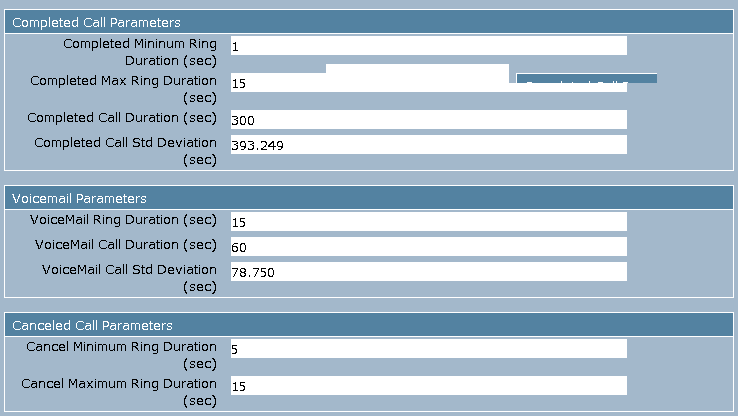
3. Completed Calls These are parameters used for controlling the scenario of Completed Calls. Leave them as default for a conforming benchmark run. Refer to the Design Document for details of these parameters.
- Completed Minimum Ring Duration
- Completed Maximum Ring Duration
- Completed Call Mean Duration
- Completed Call Std Deviation
4. Voice Mail Calls These are parameters used for controlling the scenario of Voice Mail Calls. Leave them as default for a conforming benchmark run. Refer to the Design Document for details of these parameters.
- Voice Mail Ring Duration
- Voice Mail Mean Duration
- Voice Mail Call Std Deviation
5. Canceled Calls These are parameters used for controlling the scenario of Completed Calls. Leave them as default for a conforming benchmark run. Refer to the Design Document for details of these parameters.
- Canceled Call Minimum Ring Duration
- Canceled Call Maximum Ring Duration
Debug Setting
The Debug Setting tab consists of the Parameters for Debugging, which allows one to configure Debug Trace Level. When debug log is generated, the logs can be located at in $SPECSIP_ROOT/working directory of each client. At the end of the run, these files are retrieved from the clients and saved in the run output directory.
- Trace Level none: normal benchmark run; no trace log is generated.
- Trace Level -trace_err: command line option -trace_err is passed to sipp, so that the error log is generated.

- Trace Level -trace_err -trace_shortmsg : command line option -trace_err and -trace_shortmsg are passed to sipp, so that the error and message logs are generated. The timing and SIP message information can be used for timing analysis to debug SUT performance and benchmark harness issues.

- Trace Level -trace_err -trace_msg : command line option -trace_err and -trace_msg are passed to sipp, so that the error and message logs are generated.

- Trace Level -trace_err -trace_calldebug : command line option -trace_err and -trace_calldebug are passed to sipp, so that the error and failed call debug messages are generated.
Note that when trace log is generated, the file size consumes disk space quickly. So be reminded to clean up the disk after debugging is done. Also, logging to disk may cause performance degradation on the clients.
Starting the Run
After you have finished the above steps, click "OK" at the bottom of any of the main tabs. This will start the run that you have configured, if none is currently running, or add them to the run queue if another run is in progress. The run will last for a period of time that is the sum of the warmup time, measurement period, and cool down time. During the run, statistics are gathered only during the measurement period.
Viewing Results
The Summary Result tab contains the following info.
- Run ID: the run ID dictated by Faban as mentioned above
- Concurrent Users: number of Supported Subscribers; this is the "work load" for this benchmark run. *TO DO - change the name to Supported Subscribers"
- Pass/Fail: where this run passes the Run Rule, call/transaction success ratio, and QoS requirements.
- Benchmark Start: benchmark starting time
- Benchmark End: benchmark ending time
- Calls Per Second (CPS): measured successful calls per second
- Registers Per Second (RPS): measured successful registrations per second
- Call Statistics: statistics related to SIP calls
- Call Mix: the ratio between Completed Calls, Voice Mail Calls, and Cancel Calls. This ratio is checked for benchmark conformance (see Run Rules).
- Transaction Statistics: statistics related to SIP transactions (INVITE, BYE, CANCEL and REGISTER).
- QoS Measurement: the measured QoS statistics, which are used to compare with Run Rules to determine pass or fail of the run.
- Run Period: the length of the steady state run, which is also compared against Run Rules.
- Registration: measured statistics related to registration.
- Secondary Metrics: measured SRD, SDD and RRD response times. These are for performance tuning and characterization. Same for the INVITE SRD, BYE SDD and REGISTER RRD distributions below.
- INVITE SRD Distribution
- BYE SDD Distribution
- REGISTER RRD Distribution
The Detailed Results tab contains plots to visualize the performance statistics gathered.
- Call Length
- Call Throughput
- Session Request Delay (SRD) (No Authentication)
- Session Request Delay (SRD) (With Authentication)
- Session Disconnect Delay (SDD) (No Authentication)
- Session Disconnect Delay (SDD) (With Authentication)
- UDE Registration Rate
- Registration Request Delay (RRD) (No Authentication)
- Registration Request Delay (RRD) (With Authentication)
After the Run
Sanity Checking the Benchmark Rig
If you have encountered problems, check the following items below or consult the Support FAQ.
- From the SUT, ping each client data interface to make sure the client can reach the SUT via the data subnet (Subnet A).
- From the Master, ping each client to make sure the Master can reach the client via the control subnet (Subnet B).
- From the Master, use rsh (Solaris) or ssh (Linux) to make sure that the access is permitted without prompting for a password.
- Try starting with a single client first. The client may be on the same host as the master, or on a separate host.
- Try a short, non-conforming run that consists of small number (e.g., 10000) of subscribers to sure all transactions are successful and calls pass through. (TO DO: attach a simple config screenshot)
- If transaction or call fails, consult the Faban Run Log for clue of what has gone wrong.
- If the Run Log does not provide enough insight, turn on trace log as mentioned in the previous section, and rerun the test. Review the trace logs (located in the benchmark output directory) to identify the issue.
- Also, using snoop (Solaris), tcpdump (Linux) or wireshark (Linux/Windows) to capture packets at the clients and SUT may provide further insight.
Collecting Results and Submitting to SPEC
Each benchmark is assigned by Faban a run ID in the form of specsip.[1-][A-Z]. For example, the run ID of the first run is specsip.1A, and second run, specsip.1B. At the end of run, the statistics and logs generated by SIPp on the clients are retrieved from the clients and stored in the $SPECSIP_ROOT/run/faban/output/ directory. For example, the output of the benchmark run specsip.1A is stored in $SPECSIP_ROOT/run/faban/output/specsip.1A. The statistics are parsed by a post-processing script and the results are shown in the Summary Result and Detailed Results tabs corresponding to this run ID. See Viewing Results section below for description of the results. To submit the benchmark result to SPEC, the submitter should tar and zip the output directory (e.g. $SPECSIP_ROOT/run/faban/output/specsip.1A mentioned above) and email the resulting .tar.gz (or .tgz) file to subsipinf2011@spec.org.
Optimizing Performance
- Always make sure the clients for generating workload is not the performance bottleneck. Check the CPU utilization and NIC statistics to make sure CPU is not overloaded and there is no packet drop at the interface. Note that SIPp is a single-threaded process so even if the client has multiple CPU cores, a particular CPU core may be the bottleneck.
- General system-level performance tuning: Consult your OS and SUT documentation to determine tuning to increase performance for your SUT and clients. Gather statistics from the benchmark, OS, and SUT to identify potential bottlenecks.
- The benchmark is an application benchmark (in contrast to a micro benchmark) so the bottleneck can be from many places in the system. It also depends on whether a database is used for authentication, or an authentication protocol is used. For running with a database, there are various caching, partitioning, and load sharing options to consider.
Third Party Sources
The SPECsip_Infrastructure2011 benchmark utilizes the following open source libraries and tools, for which source code and a copy of the license is included:
- SIPp, a free open source test tool / traffic generator for the SIP protocol, which is licensed under the General Public License (GPL) version 2. SIPp may be obtained from http:/sipp.sf.net.
- The OpenSSL library, a cryptographic toolkit which is licensed under a BSD-style license. OpenSSL may be obtained at http://www.openssl.org
- The GNU Scientific Library (GSL) version 1.9, which is licensed under the General Public License (GPL) version 2. GSL may be obtained from http://www.gnu.org/software/gsl/
- Faban, a framework for benchmark development and a benchmark harness licensed under Common Development and Distribution License (CDDL). Faban may be obtained from http://www.opensparc.net/sunsource/faban/www/.
Copyright © 2011 Standard Performance Evaluation Corporation. All rights reserved. Java® is a registered trademark of Sun Microsystems.


 When using the same rig to test multiple SUT systems, it is handy to create a profile for each SUT so the configuration can be saved for the SUT. Upon switching the SUT, the previous configuration for it can be brought up promptly without re-entering the configuration parameters.


