
A bookmark is used to mark a specific page in a book or magazine, allowing you to quickly return to that page at a later time. Bookmarks are typically made of paper or cardboard, but can also be made of other materials. Here’s our guide on how to make a bookmark.
In this article, we’ll discuss:
- How to Make a Bookmark Using Shutterstock Create
- A Guide to Common Bookmark Dimensions
- Different Types of Bookmarks
How to Make a Bookmark Using Shutterstock Create
Do you love reading books or magazines but often find it hard to keep track of where you left off? It’s a problem that many of us have faced for years. And, if you’ve ever had to resort to using scraps of paper or random objects as makeshift bookmarks, you’re not alone.
Bookmarks often feature colorful designs, quotes, or images, and can be personalized to suit individual tastes. People use bookmarks because they’re a practical and inexpensive way to keep your place while also adding a touch of personality and style to your reading experience.
If you don’t have graphic design skills, don’t worry. You can use online design tools to make your own bookmarks. Using Shutterstock Create, you can craft your own assets in minutes.
Here’s how to make a bookmark and DIY your design.
Prepare Your Canvas

In Create, select Custom Size and enter the dimensions for your bookmark design. The right size for your project will depend on the type of bookmark you choose to make.
Take the size you like the most and convert it from inches to pixels to get an idea of where to start.
Find a Starting Point
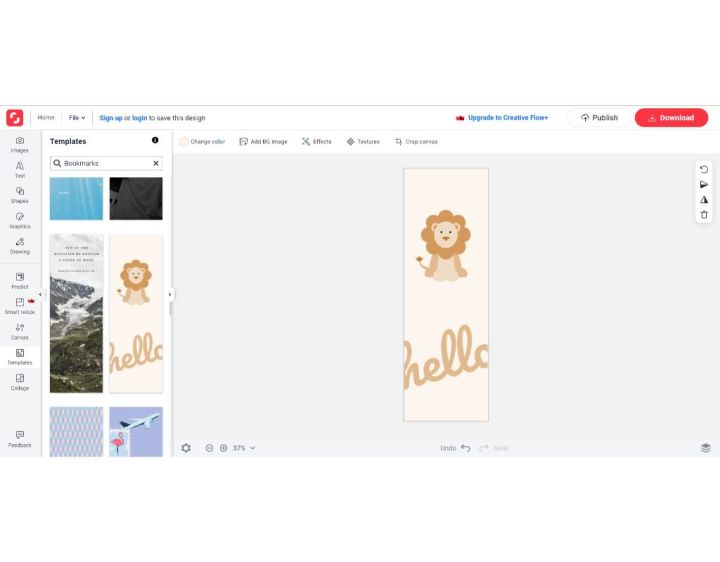
From here, search bookmark templates or continue on with a blank canvas. You’ll have access to thousands of fonts, graphics, textures, effects, and color combinations to pick from.
If you want to start with a bookmark template instead, simply click Templates then search and select one that meets your needs. No matter what you choose, you’ll have access to the same customization options.
Make Design Changes

Click on any element to make your adjustments and see what options are available to you in the toolbar on the left side of the editor.
Select Your Visuals

Update images or graphics to meet your needs by clicking Images or Graphics. From here, you can upload, browse through the photo library, or select from your catalog.
Download Your Bookmark

When you’re ready to download, click the Download button in the top-right corner and select your preferred format. From here, you can save the design to your system and prepare to print it out.
A Guide to Common Bookmark Dimensions

While bookmarks come in various sizes, there are some popular sizes that are commonly used for bookmarks.
Here are three examples:
1. Standard Bookmark
The most common size for bookmarks is approximately 2 inches wide x 7 inches tall. This size is just large enough to serve a purpose while leaving plenty of space for personality and design.
2. Small Bookmark
A smaller bookmark size can be around 1.5 inches wide x 5 inches tall. This size is good for thinner books or other print materials.
3. Large Bookmark
A larger bookmark can be around 2.5 inches wide x 9 inches tall. This size is often used for textbooks or larger books, and allows for more space to add notes or designs.
It’s important to note that these are common sizes, and bookmarks can be customized to any dimensions desired. The size of the bookmark can depend on the book you’ll use it in, as well as personal preference and design elements.
Different Types of Bookmarks

You may have a particular image that comes to mind when you think about what to use as a bookmark, but there are actually several different options to choose from.
Here’s a look at a variety of types of bookmarks for books:
- Paper or Cardboard Bookmarks: These are the most common type of bookmark and are thin cardboard or paper, often featuring designs or patterns.
- Metal Bookmarks: These bookmarks use thin sheets of metal, like brass, copper, or stainless steel, and can be engraved or etched with designs or text.
- Fabric or Leather Bookmarks: These bookmarks use a soft material. The fabric or leather can also be decorated with embroidery or appliqués.
- Magnetic Bookmarks: These bookmarks feature a magnet that holds them in place on the page, making them a popular option for thicker books or magazines.
- Tassel Bookmarks: This unique option features a tassel that hangs over the edge of the book, adding a decorative touch while also making it easy to find your place.
- Corner Bookmarks: The triangular shape of the corner bookmark allows it to securely grip the corner of the page, making it a practical and easy-to-use bookmark option.
Whether you want to figure out how to make a corner bookmark or try out a different type—the possibilities are endless.
Take the bookmark ideas from this post and create a bookmark you’ll look forward to using as you navigate through your next story.
How to Make a Bookmark FAQs
How do I make my own bookmarks?
Use Shutterstock Create to find the template you want for your bookmark. If you want to create your own bookmark from scratch, there are common bookmark sizes and dimensions to follow.
A standard bookmark is 2 inches wide x 7 inches tall, a small bookmark is 1.5 inches wide x 5 inches tall, and a large bookmark can be 2.5 inches wide x 9 inches tall.
These bookmark dimensions are suggestions. For DIY bookmarks, design them in whatever shape you want.
Can I use regular paper for my bookmarks?
Yes! Most bookmarks are made out of paper or cardboard. The only downside to regular paper is that it can be flimsy and get damaged easily.
You can make a bookmark out of anything as long as it’s thin enough to fit in between the pages of your book.
Want more reading inspiration or DIY book ideas? Check out these posts next:
- DIY Book Cover Design Ideas for Handmade Books
- 10 Creative Books Every Illustrator Should Explore
- 15 Photography Books to Read to Inspire Your Next Shoot
License these cover images via Prostock-studio.


