
Welcome, my friends, to another edition of Hobby 102, wherein us old coves share our hard-won wisdom with you young whippersnappers. This time, I’ll be giving you the breeze on airbrushing, crank up your compressor, let’s blow away the fog surrounding this extremely useful technique.
First, a little terminology and technical information on what exactly an airbrush is and does. An airbrush is, simply put, a device for applying paint to a surface without directly touching it. An airbrush functions by manipulating compressed air which is forced through a nozzle at high speed, the passage of this air causes a sharp dip in air pressure within the chamber of the airbrush. This dip in air pressure causes paint from the attached cup (or beaker if you’re using a siphon airbrush) to be pulled into the airbrush’s chamber and then be blasted through the nozzle, and as the paint is forced through the nozzle it becomes atomised into a very fine mist shot at whatever the airbrush is pointing at. The amount of paint allowed through the nozzle is controlled by means of a tapered metal needle attached by a chuck to a trigger mechanism that allows it to be withdrawn and manipulated to a very fine degree by the user’s finger.
Airbrushes are somewhat contentious in the tabletop painting space, with some considering using an airbrush to be somewhat akin to cheating. Sometimes painters will go to lengths to explain that their work is “all brush work, no airbrush” in kind of the same way that rock bands in the 1970s would brag that they didn’t use any synthesizers. So what? Oh wow, you’ve done some smooth blends there, and you didn’t use an airbrush! Why not? Would have been much quicker for a similar result. What matters is the final result, no-one cares how you did it. Please, forgive my hobbyhorsing. Those people are wrong, obviously, an airbrush is just a tool for artists, using one won’t automatically make your painting better, in fact, there’s a rather punishing learning curve when it comes to getting to grips with the techniques (and maintenance) involved.
I Just Bought An Airbrush – Now What?
When it comes to selecting an airbrush as a neophyte, my key piece of advice is that you should get a cheap airbrush at first. Why? Well, you almost certainly will break the first airbrush you buy, so it’s better for you if you don’t drop hundreds of smackers on that Iwata Hi-Line until you’re a bit more keyed-in to what’s what. Ideally you also want a compressor with a regulator that lets you change the air pressure, and that has a tank for storing compressed air so the thing isn’t running constantly.
The first thing to learn when airbrushing is priming your miniatures with it, in fact, a lot of hobbyists who buy an airbrush use it to prime and don’t bother to go any further than that. That’s totally legitimate as after the initial outlay priming with an airbrush is cheaper, practically independent of the vagaries of the weather, and less environmentally shady than using and throwing away rattlecans. With an airbrush you don’t need to worry whether the humidity outside is too high or too low or whether the air temperature is in the sweet spot, all you have to do is turn on the compressor, put your mask on (maybe crack a window too) and get priming. I’ve not used a rattlecan for five years now and I do not miss it one bit.
Priming with the airbrush is easy as pie, if you have something like Army Painter Warpaints Air primer (or any of the other airbrush primers) just squirt a bit in the cup of your airbrush, take aim, push the trigger down to start the air, then gradually pull the needle back. The primer should spurt out of the nozzle in a fine mist. If the primer looks to be flooding the model, either alter the distance to from brush to target, pull back a bit more gently on the trigger, or turn down your air pressure. Once you’ve coated the model and it’s drying, spray a burst of nothing but air through the brush and into a paper towel to dislodge any stubborn drips still clinging to the nozzle. Tada! You did it! Now, that wasn’t so hard was it.

Next, you’re going to need to flush out any of the primer that’s left over in the cup and paint chamber. To do this, get a squeezy bottle of clean tap water, fill up the cup approximately halfway. You can just dump it out onto a paper towel if you like, but I like to pinch the end of the airbrush with my fingers and then turn on the air. The air will go back up into the cup and paint chamber (backflow, you can also use this to mix paint inside your airbrush cup!) and bubble a lot, then you dump that onto a paper towel, the backflow will push any semi-dried up paint blobs out of the paint chamber and up into the cup where you can get rid of them. The very very last thing you want is for paint to dry and build up inside the chamber and nozzle of your airbrush. Sure, you can clean them with pipe-cleaners and special nozzle tools, but it’s best just to have good hygiene in the first place. Once you’ve done that, spray some water through the brush, if it comes out clear you’re good to go, if not you’re going to need to repeat the flushing as many times as it takes for the water to be lovely and untainted.
This does a decent job of clearing out the crud, but it’s a certainty that you will get paint building up on the inside of your brush, especially if you use primer (which is extra sticky, as paints go), so you will need to do a deep clean every now and then.
Adding Colour
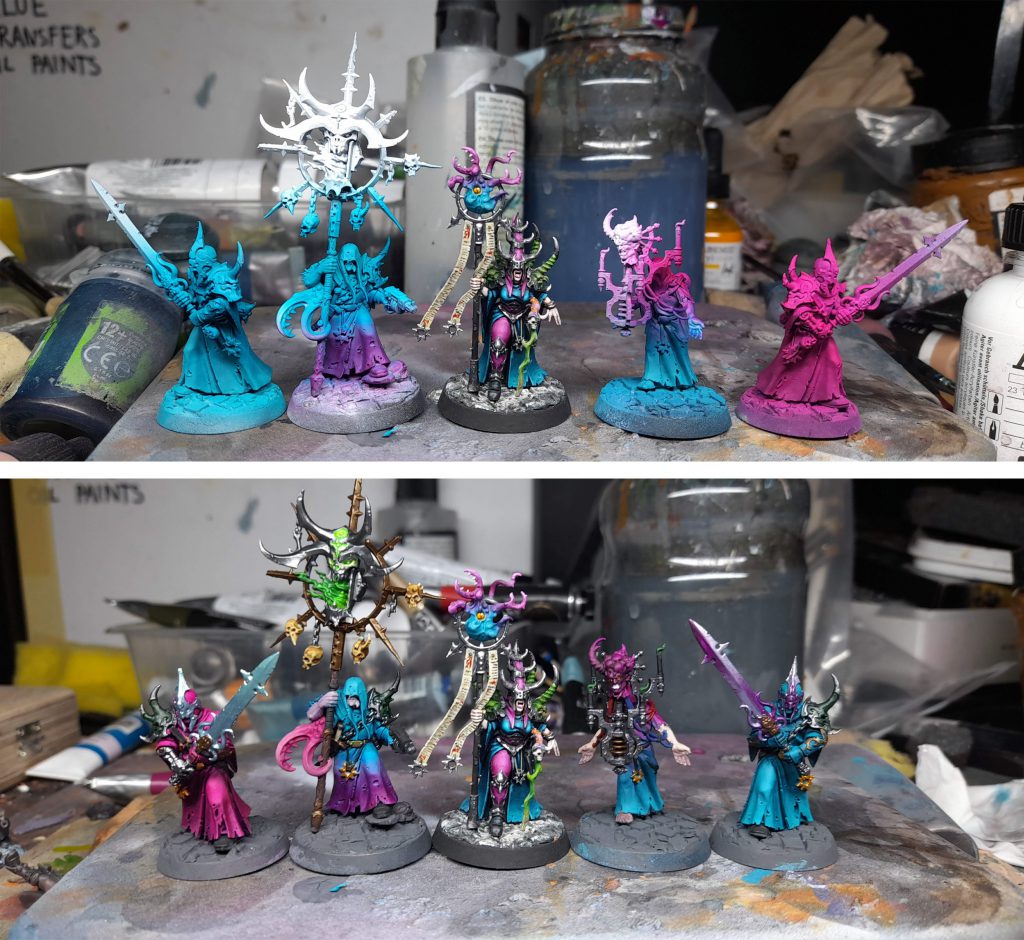
Okay, so you’ve learned to prime with your airbrush, but you want to go further than that. How about… zenithal priming? That’s the next level of airbrush whizziness. To do zenithal priming all you need is your airbrush, some black primer and some fluid white paint or ink. Prime as normal with your black primer, but after you’re done with that, load up your airbrush with some thin white paint (white ink is often preferable to paint because it flows more smoothly through the brush without clumps) and carefully paint the model from above where the light would typically fall. It’s super easy but it gives you a roadmap for where your highlights and shadows should go. By no means does this have to be black and white, you can do the same thing with base colours and highlights, the principle is the same.
Top tip: Rather than trying to angle your airbrush, angle the model instead!
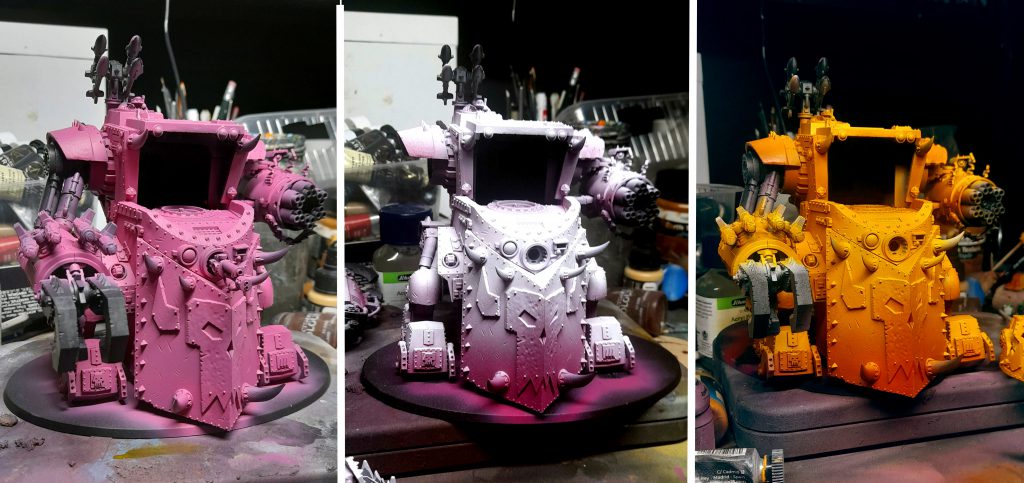
What about the next level? Well.. how about painting over your zenithal highlighting with some transparent paints like contrast paints or inks? By using transparent paints we can retain most of the value information (lights and shades) while changing the colour. Pretty nifty. YouTube legend Marco Frisoni often uses this technique a lot in his painting, to incredible effect. The problem with Marco’s technique is that it requires a small nozzle and an incredible amount of extremely fine airbrush control – but that’s ok, you can still do your main colour this way and it’ll look great. For example, I did the popular “undercoat pink to paint yellow” technique on this Ork tank and Gorkanaut.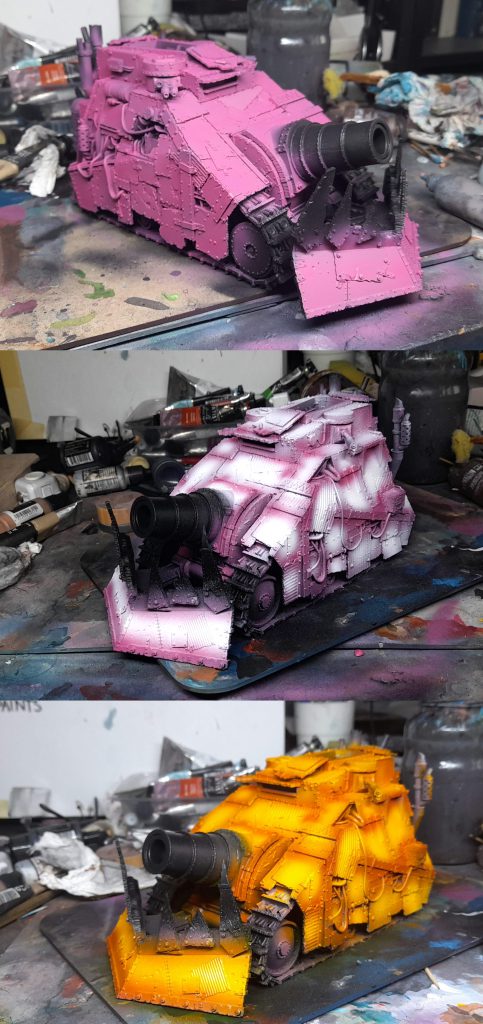


Some companies (like Army Painter, who generously sponsored this article, thanks AP!) make paints that are specially designed to work well with an airbrush without any need to thin them down. Simply give them a good shake and they’re ready to use straight from the bottle, which is handy because unless you’re an experienced airbrush slinger, getting the consistency just right can be a bit of a crapshoot depending on what paint you’re using and can be a real pain in the arse. With pre-thinned paints like these, we can more easily paint smooth blends between colours with less faff, and since the range is pretty massive, you can find just about any colour you could ever need in the range, and with the triad system, keeping consistency between colours a total breeze.


Let’s Be Clear
What else can you do with an airbrush? How about varnishing? For many hobbyists, varnishing is something of a fraught experience – you’ve just finished painting the best model you’ve ever done in your life, hours of painstaking effort and struggle. You want to protect your hard work, so you get your rattlecan of matt varnish and… [expletives] the varnish has gone all foggy and left a crystallised mess on the surface of your model! It’s ruined! It’s a common problem, and one that can’t be fixed without stripping the whole mini down to the bare plastic. But what if you could varnish without worrying about the potential for catastrophe? Well, your new airbrush will let you do just that, as long as you’re careful, you can precisely control how the varnish goes onto the surface, building up coats gradually and easily to yield a perfectly smooth finish, hell yeah.
You aren’t going to be able to paint a whole model with an airbrush alone, but using these techniques will save you a ton of time and make blending much easier as you improve your airbrushing skill. Now go forth and spray, my friends!
Have any questions or feedback? Drop us a note in the comments below or email us at contact@goonhammer.com. Want articles like this linked in your inbox every Monday morning? Sign up for our newsletter. And don’t forget that you can support us on Patreon for backer rewards like early video content, Administratum access, an ad-free experience on our website and more.

