Wednesday, October 30, 2013

Liberty and Wool Teddy Bear

I have very exciting tidings - my nephew was born!! Lukas is absolutely perfect, and I am over the moon at being an auntie. If you follow me on Instagram, you got a peek of the little munchkin as we were relaxing after supper one evening.


I've sewn all sorts of odds and ends for Lukas as we prepared for his arrival, like the bunting above. Today I thought I'd share with you Lukas' teddy! I made him with a kit and instructions from Purl Bee.


Isn't he just darling? I've only sewn small 3d objects before, so this was a bit of an undertaking. It's made with a mixture of hand and machine stitches. The instructions from Purl Bee are very clear, which helped a lot. He's just waiting for Lukas to hug him tight!


Before I leave you, I have to share a picture of Lukas' room. My brother and sister-in-law decided to go with a book theme and each selected some of their favorite childhood stories. The Peter Pan wall is by far my favorite.


The text says, "Second star to the right and straight on till morning." I helped to paint the stripes and lay the groundwork, and a dear friend of their's did the artwork using a projector. It's just magical! 

Thursday, October 24, 2013

Vintage-Style Halloween Decorating

I am very keen on decorating for holidays. I decorate for most all holidays, but my biggest efforts go into Halloween and Christmas. I've collected Halloween decorations from all over the place, and have a mix of new, vintage reproduction, and family items. So step into my home for a little tour of some of my favorite spots!


I like to mix in Halloween all over, like pumpkins on top of my little antique dresser or rats on top of my books. I also put masks on my family portraits. Everyone gets a costume, including my Lucy and Ricky dolls! 


I wish I could get a better picture of these! I have three vintage reproduction Beistle scratch cats that go across the arch between my living room and kitchen.


The always dapper Oxford dresses up extra special to greet trick or treaters. 


We're all ready for Halloween! 

Tuesday, October 22, 2013

Vogue 8811: A Vintage Halloween Novelty Print Dress

A few weeks back on ye olde Pinterest, Jessica of Chronically Vintage and Rochelle of Lucky Lucille both pinned a fabulous vintage advertisement of a spiderweb dress. I was immediately overcome by the urge to sew it! I love that the ad says, "a year around dress." I think I'll wear mine just for Halloween, thank you.

Source

Vintage Vogue 8811

In the ad, I noticed a fitted bodice, full skirt, and kimono sleeves. I knew Vogue 8811 would be the perfect pattern. I wanted to test it out for a potential winter dress anyway, so this gave me a chance to see if the pattern works for me. In the end, I think it does! There are some great French darts that are tough to see on this black fabric that are very nice.

Vintage Vogue 8811


The spider web fabric is completely sheer, so I underlined it with a black cotton. I also found a fun little bat button at the Round Top Antique Fair for the opening at the back of the dress. There's the quirky fellow in the top left-hand corner!


I wish I had kept the length a bit longer, but I'm still fiddling with a good vintage length for me that will also flatter my short stature and curvier figure. I put horsehair braid in the hem to give it a little bit of extra flare!


Oooh, and can you see my fun novelty brooch? No outfit is complete without a novelty brooch! 

Source
Later this week, I'll post up some vintage-style Halloween decor from around the house. The spooktacular fun continues! 

Thursday, October 17, 2013

Hocus Pocus Sanderson Sisters' Costume

We are now in the full swing of October, which means it's time for the Sanderson Sisters to come back to life! I am referring, of course, to the 1993 classic, Hocus Pocus. Since vintage is technically anything 20 years or older, I am stunned to tell you that Hocus Pocus can now be considered vintage!

Vintage or not, I have an annual Hocus Pocus viewing party, and I am already menu planning spooky treats for this year's festivities. I get pretty excited about it, to say the least.


Really Bringing the Sanderson Sisters Back to Life

Creating a Sanderson Sisters' costume is as easy as some thrifting, hairspray, and a wee bit of sewing!

Hocus Pocus Sanderson Sisters Costume

Mary, Winifred, and Sarah

Getting Ready to Run Amuck! Amuck! Amuck!


I will refer to the sisters by their movie names for simplicity sake, but Winifired and Sarah were played by my dear friends Whitney and Lindsay.

The Clothes

  • Mary's under and over blouse and skirt, Sarah's skirt. Thrifted at Goodwill. 
  • Striped tights. Target. 
    • Note: Winifred's tights are the same as Mary's, just dyed with green Rit Dye.
  • Winifred's dress, coat. Anthropologie. 
  • Sarah's corset. Simplicity 3623, view B.
Winifred also has on various underskirts that came from her personal closet.

The Hair

To make Mary's hair, you'll need: 

  • A wire hanger.
  • Hair spray. 
  • Bobby pins, hair tie. 

Steps: 

  1. Unwind the wire hanger and coil it into the desired shape. 
  2. Put your hair into a high pony tail. 
  3. Secure the wire hanger to your hair at the base of the pony tail. 
  4. Wrap the hair around the hanger, pinning and spraying the begeezus out of it with hair spray.
You can see the wire hanger fairly well in this photo. I did a bit too much dancing late in the evening, and it flopped. Sad Mary.


Winifred curled her hair with a curling iron, then pinned it up with bobby pins. Sarah did simple, loose curls. We also did a bit of fun 90s makeup styling to really complete the look.

Other Things You'll Need

  • A dedication to make the same face in every picture, if you've chosen to play Mary or Winifred. 
  • Brooms, mops, swiffers, etc. for your midnight ride to meet Billy in the graveyard.
  • Wigs, if you aren't lucky enough to find friends who love Hocus Pocus as much as you do and have the right hair color. I struck gold!

Hocus Pocus Sanderson Sisters Costume

Stay tuned for more Halloween sewing and decorating fun!

Tuesday, October 15, 2013

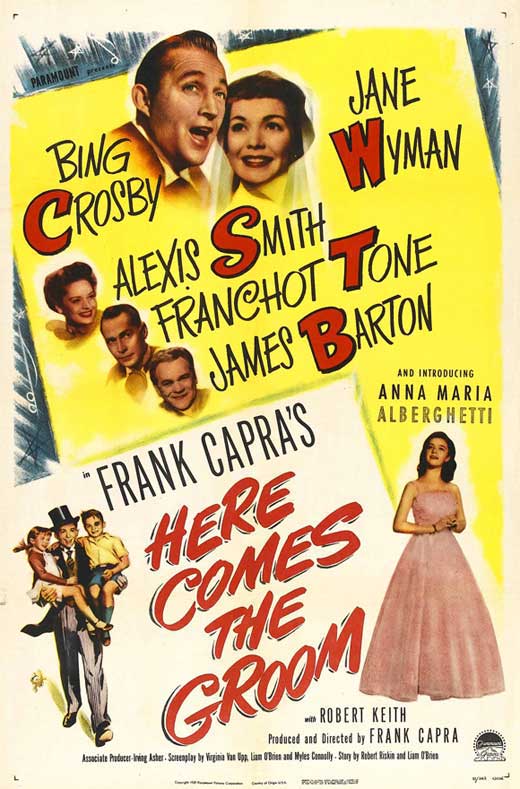
Sewing Hollywood History: Here Comes the Groom

This month's Sewing Hollywood History is Here Comes the Groom, a 1951 film directed by Frank Capra starring Bing Crosby and Jane Wyman. I know Jane Wyman best as Aunt Polly from Pollyanna, although that was much later!

Source
Bing Crosby plays Pete Garvey, a foreign correspondent during WWII, who adopts two children in a Paris orphanage. He only has 5 days to marry the gal he left back home, Emmadel, or the children must return to France. The song "The Cool, Cool, Cool of the Evening" was written for it and won the Academy Award for Best Original Song. 

Edith Head Designs Sewing Patterns
Vintage patterns for this film were very easy to find! Did you know that Edith Head, the famous costume designer for Paramount, did sewing patterns? Well, she did! 

Source
I am fascinated by Edith Head. She was an iconic costume designer, but also a really interesting study of a strong career woman at a time when that was exceptionally rare and difficult. But I digress. Back to the film! 

Sewing Garments from the Film

There are two Edith Head patterns printed from designs for Here Comes the Groom

Pete Returns at Last
The first is a lovely dress. I'd love to look closer at the construction on this one! The slit in the back is a wonderful surprise. From the pattern description, the pattern features: 
  • Button-closing front with collar
  • Slash pocket at left-side front
  • Short sleeves with cuffs
  • Four-piece skirt with open back to show top petticoat of lace
  • Removable belt
In the film:


The pattern: 

Source

At the Rehearsal Dinner
The second is a two-piece suit Emmadel wears to the rehearsal dinner with her new fiancĂ©, who is not Pete. Oh, the intrigue! From the pattern description, the pattern features: 
  • A separate four-piece skirt with side pleat at back
  • Attached belt at top
  • Button-closing jacket with V-neck and collar; 3/4 sleeves with cuffs
  • Attached 6-piece peplum
In the film: 


The pattern:


See other Edith Head Sewing Patterns on the Vintage Pattern Wiki. How wonderful would it have been to see the movie, then rush out to get the sewing pattern?!

Wednesday, October 9, 2013

Simplicity 3833, A Shapely Shift

Oh, the classic shift dress! I think like most curvy girls, I have a love/hate relationship with it. I love it for its easy style and 60s vibe, but it also doesn't do much to highlight or conceal my figure. UNTIL I found Simplicity 3833, a 1960s pattern reprint. I love this shapely shift.


Having just come out of Emery Month, I don't think any of you will be surprised to hear I've made this one before! I actually stitched it up a few years ago with a bit of color blocking and it's one of my most-worn dresses (pre-blogging, although you can see version 1 on Pinterest). It's such an easy thing to put on and go when you don't feel like a lot of fuss. 


I found the fabric when I was in Prague over the summer and knew it would be perfect for a shift. Red is by far my favorite color to wear!


The front of this dress is actually three pieces stitched together. The bust darts are dart seams, meaning that the raw edges of the dart come together to form a seam. It helps to give it some shape!

And Now a Query for You, Dear Reader

I've been thinking about doing a sew along, which is basically where we all stitch up the same garment together and I do a series of posts to walk you through it. What do you think about this dress for a sew along? Any other pattern suggestions?

Source

A shift dress is a great way to get started with vintage sewing if you're new to it or a great staple in your wardrobe even if you've been sewing for awhile. Would you want to get started this winter, or wait until spring? Let me know in the comments! 

Wednesday, October 2, 2013

Buying and Using a Sloper

Slopers have always been a bit of a mystery to me. I theoretically understood what they were, but never how to use them. Not having serious drafting abilities, I also felt that I would never actually be able to create a sloper to use.

Well, have I got news for me (and you)! I'm taking a semester-long pattern making class at the local Stitch Lab, and I have new-found knowledge to share with you that makes the whole sloper thing much simpler! So let's dive in to the magical land of slopers.

What is a Sloper? 

I am going to quote the wonderful Adele Margolis here, from her book Make Your Own Dress Patterns

"It is used as the basis for creating new designs..It has no fullness, design details, or seam allowances." 

At the risk of repetition, I will summarize in my own words. A sloper is a building-block for a pattern, and it has just enough room for it to fit your body and for you to be able to breathe. They are also sometimes called: 
  • Blocks
  • Foundation Patterns
  • Basic Patterns

Types of Slopers

There are bodice slopers...

Source

Skirt slopers...

Source

And pants slopers...
Source

With those three things, you can mix and match to create just about anything. So a dress would just be your bodice sloper + a skirt sloper, for example.

How Do You Use a Sloper? 

The two main ways you can use a sloper are to: 
  1.  Design new patterns.My pattern teacher, Tina, describes design textbooks like cookbooks. You basically open it up and say, "I want to make a cowl neck sweater" and it gives you a recipe for modifying the bodice sloper to do that.
  2. Perfect fit. 
    If you compare your sloper to the pattern you are working on, you can see where you'll need to make adjustments to make it fit you. Just don't forget your sloper doesn't have seam allowances. Threads has a great article on using a sloper for fit.
My guess is that for most of you, #2 is where a sloper is going to come in most handy. Essentially, it takes some of the concepts I outlined in the body graph method of fitting, and allows you to have a flat dressform to work with. 

How Do You Get a Sloper?

So, let's say that you're completely sold on the idea of a sloper. How on earth do you go about getting one? You can draft your own, Madalynne has a great tutorial on drafting your own sloper, but I think it's best to start out with a simpler route to focus on using the sloper first. 

Easiest: Purchase a Custom Sloper from String Codes


This is the method we are using in class, and by gollies, it's amazing! All you do is send your measurements to String Codes, tell them what kind of sloper you'd like to have, and they will send you back a custom-made sloper! The prices are even pretty reasonable.

BONUS! The size on your sloper is your name! That's pretty neat. 


Once you have that, you: 
  1. Trace the pattern onto tracing paper, freezer paper, or something similar. 
  2. Stitch up the sloper to make sure everything fits you properly. My changes were extremely minimal, and others in the class had zero changes.
  3. Make adjustments as needed to create your final sloper.
  4. Mount the final sloper onto a sturdy paper. We used tag board, which is about the weight of a manilla folder. 
  5. Cut out the pattern, including the darts. 
  6. Start using your sloper (methods outlined above)!
For more information on using Pattern String Codes, Kathleen Fasanella from Fashion Incubator has a great series. There are a few quirks I've discovered along the way that Kathleen helps to explain. Mainly, depending on your cup size, the CF may be too short because they're using your CB measurement.

Easy-ish: Purchase a Fitting Shell Pattern 

Site: Vogue or Butterick

The major companies have a pattern that is like a sloper that they call a "Fitting Shell." They come with instructions for how to alter the garment to fit you properly. 

Source
All my steps above apply, you're just likely to need more fitting than a custom-made one. And the pattern name is something ordinary like "14" as opposed to your name. Ok, so I'm easily impressed.

A Couple of Pointers on Buying from String Codes

  1. There are varying levels of custom. We did standard custom fit. This means you have a sloper based on your measurements for bust, waist, hip, center back length, and waist to ankle. My teacher didn't recommend full custom fit unless you had a professional take all the measurements. See the FAQ. 
  2. They have a few different types of pants slopers. Here's the differences between those.
    (a) Trousers fall down at the back from the waist.
    (b) Slacks hug the rear, then fall down from there.
    (c) Jeans are the most fitting and hug the body all around. 
Do you have other questions? Do you think you'd use a sloper?