Thursday, December 31, 2009

End of Year Retrospective

Today I decided that I would take a look back at what I worked on this year, which has been a busy sewing year. I am actually quite surprised at the number of items that I made...especially considering how frustrated I was with fitting pants, and feeling like I made an extraordinary number of UFOs.

Here are the totals:

This year I made 49 items for me. I also sewed 16 projects made with my niece and nephew, Sadie and Darrell. Both are busy learning how to sew, although as much as Darrell likes to wear the clothes I make him, he would rather sew things like bags and puppets. I also made 14 gifts.

This makes for a total of 79 items sewn. Of the 49 items that I made for me, here is how they break down:

A total of 8 shirts. Of those, 1 was made from a vintage pattern, and 1 was unwearable
I also make 4 skirts.
I made a total of 5 jackets, although ended up giving one away because the sleeve bands were too tight on my fat little arms. I gave it to a girl that I work with, who reports that she gets compliments every time she wears it and she happily tells them that I sewed it.
I made a total of 7 dresses. 1 was from a vintage pattern, and 1 was from a shirt pattern that I extended into a dress.
I also made in inordinate number of pants in my quest for a good fit. I made 24 total, of which 4 were unwearable. I also gave all but one of those away.
Finally, I made a cape. That doesn't really fit well into any particular category, does it?

Of the projects with the kids, my niece Sadie made 1 pair of pajamas, 2 skirts, 6 shirts, 1 pair of shorts, and 1 pair of pants. My nephew Darrell made himself 3 puppets.

Of the items that I made for gifts, I made one very nice linen shirt for my husband, a shirt for my brother Ricky, 2 shirts for his son Caiden, and a total of 5 shirts and 2 pair shorts for Little Darrell.
I also finished some UFOs and gave them to my mom. She got a matching skirt and shirt. I also gave her a very well-sewn jeans-style jacket in white linen that I thought looked like a lab coat when I wore it. for mom.
I also made a coat for my grandmother and a dress for my niece Sadie for my wedding.

This came up to a total of about 160 yards of fabric.

I made a couple of "advances" this year, as well:
  1. This year I made my first patterns from BWOF magazine. I started with a lined jacket, which probably wasn't the smartest thing that I have ever done, but it got finished all the same. Since then, I have regularly sewn from BWOF.
  2. I purchased and sewed my first ever vintage patterns. I now have a collection of about 30 vintage patterns, and have sewn two of them.
  3. I worked very hard on improving the appearance of the interiors of my garments, and learned how to do hong kong finishes, flat-felled seams, and french seams.
  4. I also got a serger, and have been practicing with it.
  5. I also made pants for the first time, and while I still have a few kinks to work out, my fit is MUCH improved.
  6. For the first time, I drafted my own patterns.
  7. I also learned much more about proper fit, and am not afraid to make even major alterations.
Here are some images of some of my favorite projects of the year, starting with a white eyelet shirt with batiste underlining:


Hot Patterns Uptown Downtown Knit Dress:


Short sleeved linen jacket. This is the one I gave away because the sleeve bands were too tight:


Motorcycles and Flames outfit for my nephew, he loves it and even wore it for his school pictures:


Burda Safari dress. One of the most complex dress projects I have ever done:


BWOF Shirt from embroidered lawn:


Sadie's pajamas:


Coat for Grandma:

As for sewing goals for this year, I would like to:
  1. Make more garments from vintage patterns.
  2. Continue to work on improving fit.
  3. Make a pair of PERFECT pants.
  4. Finally finish the coat that I started for my husband.
  5. Finish the Chanel-style jacket that I bought the fabric for, the lining, the pattern...and then never did anything with.
  6. Become more proficient using the serger.
  7. Repair and learn to use my treadle.
  8. Focus on making better fabric choices for projects, and not be afraid to use expensive fabrics.
I also have the various and sundry other New Year's resolutions...lose weight, get healthier, keep my house cleaner, make a budget and stick to it...but you don't want to hear about that boring old mess!

Monday, December 28, 2009

McCall's 5764: Cape and Belt


Or, yet another installment in "How to Make a Relatively Simple Project Incredibly Involved and Difficult."


Over the Christmas holiday, I took a short hiatus from the cape that I had started using McCall's 5764. I started with a brown, beige, rust, and black plaid from Hancock's that also had a touch of gold thread in it:


Because I wanted this to be warm for winter, I decided to do two things that the pattern did not call for....I both lined and interlined the cape. This meant that what was originally a very simple pattern suddenly became very involved and labor intensive. I started by hand-basting the flannel interlining to the suiting so that it would not shift during construction:


From there, I constructed the cape (for the most part) according to the instructions. Here is the finished product:


And from the back:


I was able to match the plaid across the front and the back, but not on the shoulder seams. I, unfortunately, did not think to buy extra fabric to match the plaid, so only had enough to match the fronts and backs. The fronts matched fairly well, even across the buttons:


The interior was a bit of a chore, I added binding to the edge of the facing and the hem so that I would not have to fold it over and hem that way. The hem is also the LONGEST HEM I have ever sewed, and all by hand. I also treated the holes for the belt like giant button-holes. The belt has to go in the holes on the back, go around the waist, under the arms, and then back out the holes in the front. The instructions have you stitch around the holes for the belt and then cut the center out. That didn't seem like a good solution considering how much the fabric raveled and also the number of layers that I was working with:


I think my method of satin-stitching around the hole looks nicer and will also help prevent the holes from getting ravelly. Had I really been thinking ahead, I would have done them as bound buttonholes. That would have looked nice, and also fit in with the theme...making a simple pattern as complex and labor-intensive as possible.

Overall, I am very happy with the way the cape turned out, although thanks to my delaying working on it, it is now frigidly cold, and much too cold to wear a simple cape rather than a full coat!

Friday, December 25, 2009

A Tiny Detour

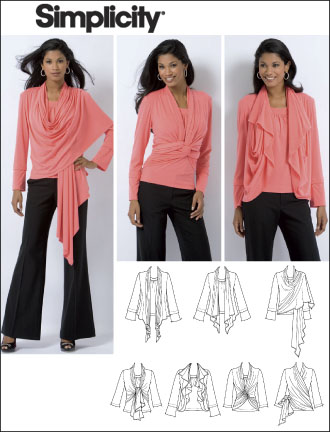
I took a small detour in finishing my cape and sewed Simplicity 2603, a pattern for both a Misses knit top and cardi wrap with front variations. The pattern includes a wrap with a long front drape, a wrap with a short front drape, choice of three-quarter or cuffed sleeves. The top is sleeveless with a neck band and gathering at the centre front.


Now, I had every intention of finishing my cape...the reason that I was at the fabric store to begin with was to get another card of buttons, since I had managed to lose half of the original buttons that I purchased for the cape. But of course while I was there I HAD to check the discount tables! I had been looking for a very lightweight knit for MONTHS to make this pattern with, and had been unsuccessful. Everything was t-shirt weight, which was too heavy, I really needed a tissue knit. But I found this heathered grey mystery knit for 1.95 a yard on the bargain table and decided to give it a shot.

Overall I like the pattern, although it is a pain to cut out, since it has to be done flat and the pieces are HUGE. I found while I was cutting out the fabric that my mystery knit was one of those that liked to curl at the edges, so I decided to take advantage of that and just let the edges curl rather than hemming it. Since I don't have a coverstitch machine, the hems wouldn't have been very pretty, and with all the flipping and twisting and tying, there was no way that they wouldn't show. So, I just cut veerry carefully, and the edges curled up like a charm.

I made a large, which is for a 40-42 inch bustline, with no alterations since, well, I had no idea how I would make any alterations to those crazy-shaped fronts. The shawl collar drape is helped along by a strip of elastic sewn to the seam at the back of the neck, but otherwise the construction is very straight-forward, especially when you completely forgo hems. The shoulders are a touch wide, but that is fairly typical for Simplicity patterns for me. However, I am not overly worried about it because that just gives it a bit of extra room should I decide to wear it over something heavier than a t-shirt or cami.

Here is the finished product:


And here are some of the drape variations:


I strongly suspect that this will get worn quite often as a cover-up in the office, where the temperature is highly unpredictable. Plus, the grey is a great neutral color that, let's face it, matches most of my wardrobe.

Happy Holidays, everyone, and I hope you have a great New Year.

Saturday, December 12, 2009

Do I Really Need a Cape?

Wow, it's been a long time since I have sewn anything! It seems like there is always something else pulling me away, now that the holiday season is in full swing. But, this weekend I was finally able to carve out a few minutes for myself and work on a project that I have been thinking about for a while.

Over the summer, my friend Laurie picked up this fantastic cape from Anthropologie while I was visiting her in Portland. I happily flounced around the hotel in it, but like fool did not immediately take myself up the street to Anthropologie and purchase one for myself. And now, they do not have this cape available any longer:


Fortunately, McCall's 5764 is a good substitute, and Hancock's had them on sale for $1.99 last weekend:


I also picked up a plaid suiting at 30% off. I decided to not do a coating, because I wanted the cape to have the nice drape of the Anthropologie cape, and all the coating available was very heavy and stiff. But, all the suiting was very thin, and would not be very warm. So, I purchased (also on sale) some nice cotton flannel for interlining. I also decided to line the cape, even though it did not call for it in the instructions. The fabric is a brown, beige, black and rust color with a little bit of gold thread, and the lining matches the rust color:


Today I spent most of the time in the sewing room doing prep-work, and attaching the interlining. I hand-basted the flannel to the fashion fabric, so that I could treat the two pieces as one:

All of the handwork is done, and tomorrow I should be able to finish up the machine sewing. My friend Monica is coming over (who also collects sewing machines...my husband is afraid, very afraid!) and she is bringing HER cape and we are going to work on them together. Hopefully I will have a finished product to show soon!

Saturday, November 21, 2009

An Early Christmas Present

Today my husband bought me an early Christmas present.

Anyone who reads this blog knows that I love classic sewing machines, and in fact do most of my sewing on a Singer 401 from the late 1950's. I also have a number of other vintage machines, and until now, my oldest had been my Singer 99 from 1928:


I had been lamenting that the one thing that my collection lacked was a treadle. But I didn't want just any treadle...I didn't want a Red Eye...because everyone had a Red Eye. Red Eyes popped up on Craig's List every day. And I wanted a coffin-top cabinet or something really nice, not just any old thing. So, needless to say, I had been perusing Craig's List for about a year with no luck, until this week.

This week I saw it...the one I wanted...so I sent the link to my husband. Who pointedly ignored it for two days. Dork. So I simply called him and informed him that I had called the flea market where it was, they still had it, and if he wanted an idea for a Christmas gift for me, Saturday at 8 am we would be departing for Clarksville. Seriously, why do boys have to be so dense?

Anyway, it turned out to be a fun adventure. I had my niece and nephew with me this weekend, so we all piled into the Jeep and drove the 70 miles to Clarksville for a little adventure. Clarksville is up the Mississippi River from St. Louis and is a super-cute town. We hit the Blue Rose flea market, which is a bit outside town and benefits adults with disabilities. There is both a flea market and a really nice antique shop, as well as a restaurant that overlooks the river. The sewing machine was marked "$150.00, OBO" so I asked if they would take $100.00 thinking they would bargain. Except they said "Sure." Well, then! We'll take it! And also all the rest of this stuff the kids have found that they want....

The machine is a Singer 66, which was the full-size equivalent of the 99. Based on the serial number, it was manufactured in 1908, in Elizabeth, New Jersey. It also uses the Lotus decal. The Lotus and the Sphinx decals were two designs that had distinctive Egyptian motifs. As an archaeologist who worked in the near east, these two designs were particularly attractive to me. The one thing that I did not get was my coffin top. This one is in a "parlor cabinet," so the treadle mechanism is completely hidden away. Overall, the machine is in very good repair, needing only a treadle belt, a small rubber ring for the bobbin winding mechanism (these things always disintegrate with age) and one screw needs tightening on the bobbin winding mechanism to hold the thread guide. Other than that, the machine is clean and runs smoothly. It is not locked up, and just needs a little oil.

Here are some photos:

In the cabinet, with the cabinet closed:


Cabinet open and treadle mechanism visible:


Two little drawers attached to door:


Machine head:


Thread guide needs repair, and rubber ring needs replaced:


Some wear to decals on the bed of the machine:


Even the faceplate is decorated with a lotus motif:


From the back:


The little drawer inside the case was full of all sorts of stuff, including hundreds of vintage buttons. Here are just a few:


After picking up the machine, we took the kids to lunch, and then headed back to St. Louis. All in all, a great day, and I would say that the machine is definitely a great find. I can't wait to get it back into working order.

Friday, November 20, 2009

Aaand Another One...

On Wednesday when I got home from work I immediately adjourned to the sewing room with the good intentions to clean up and get ready for our out-of-town guests. Since the sewing room doubles as our second guest room, I need to clean up in there so J's brother has a place to sleep next week! But, I ended up not cleaning anything and instead just sewed another Uptown Downtown Knit Dress instead.

Seriously, these things are so easy to make!! I was done and watching Top Chef by 9. Of course, I still haven't cleaned up the sewing room, but that is completely beside the point:


Plus, I needed a brown dress. I have hardly anything brown in my closet. This one I also made with long sleeves, and shortened the bottom band to gather the bottom edge of the skirt more like the pattern illustration. My first version, the band was more of a 1:1 ratio to the bottom edge of the skirt, and didn't gather at all. So I shortened the pattern piece by 1 1/2 inches (for 3 inches off the bottom band) and this is what I got. I am much happier with this look.

I also styled this version a bit more formally for work, with tights and boots. I also found a stack of gold bangles that I haven't worn in YEARS. I should take a close-up photo of them because they are very pretty. The story behind them is when I was in graduate school, each year I would travel overseas to do archaeological work...to Syria, Turkey, Morocco, Egypt...and one of the very common items that you see in shops there are gold bangles. So every year, I would purchase a single gold bangle to remember my time there that season. I have a whole arm full, 9 in total. The funny part is because it is more common that the gold used in those countries is 21 to 24 karat, it looks "too yellow" to us, who are used to seeing 14 karat gold, and most anyone who sees them assume that they are "fake."

But, "fake" or not, it was still nice to get a change to wear them and remember bargaining in the shops and agonizing over designs. I do miss those days.

Sunday, November 15, 2009

Jammies for Sadie

This weekend my niece, Sadie, spent the weekend with me to continue with her sewing projects.

A few weeks ago, I let her buy some flannel while it was on sale at Hancock's. She opted for an incredibly bright pink and green with butterflies printed on it. I also taught her how to start making some alterations to her patterns, and the pajama pants gave us a very simple palette to start with. Like me, Sadie has a round bottom, which means that she is constantly hiking up the back of her pants. So, I showed her how to add a wedge to the back of a pants pattern to cover her bottom. Now, she wants to make MORE PANTS.

Her she is in her new jammies:


The pants were made using Simplicity 3571, and her measurements are such that even though she is petite she is between a size 14 and 16 in sizes.


I also let her make a t-shirt to go with the pants using a remnant that had been floating around in the stash for about two years. She added two pockets of the pants fabric as well:


The shirt was made from a pattern that she has used before, New Look 6735, although we do have to raise the neckline by 1 1/2 inches and shorten the neckband as well. I also let her use the serger to assemble the shirt, which she was very excited about.


My dog is also very excited about the niece and nephew's visits, because it gives him an opportunity to be completely pathetic:

Friday, November 13, 2009

Weightloss Progress

I am pleased to report that the weightloss has been going well enough that yesterday I was able to wear a skirt that I actually made before the whole issue with the steroids even started. I made this skirt in February, and my surgery wasn't until April.


This skirt was made from Vogue 8455, which is unfortunately now out of print, but still available on the Vogue website at a relatively exorbitant price.

If you have this pattern lurking in your stash, I would certainly recommend sewing it up, it is super-comfortable and easy to make. Here is the original post on the skirt if you want a review.

So far I have lost about 12 lbs...it's been slow going, but hopefully I'll get back to normal (or at least what is "normal" for me) soon.

This weekend I will have my niece with me, so probably no sewing for myself but perhaps will have a project of Sadie's to post!

Wednesday, November 11, 2009

Sweater Dress Version Complete

Oh my gosh, I can't believe the response on the last post! Thank you, everyone! I really appreciate everyone's comments and am glad if I helped anyone make a decision to get this pattern because I sure do think it's a winner.

Anyway, I finished my version in the merino wool. I bought this as a wool jersey from Fabric.com when they had the sale on all the Vera Wang fabrics, and it was sold as a jersey and all I can say is "it's not." But, it is a really nice sweater knit.


One of the reasons that I bought the Uptown, Downtown Knit Dress pattern was to use for this fabric because I really had no idea what to do with it, or any idea really how to work with it. I am a complete newbie to working with sweater knits and had no clue how to finish or hem the edges, so I was really attracted to this dress because the bands of ribbing which could also be done in self fabric eliminated the need for me to worry about how to finish the edges.

If anyone is considering doing this dress in a sweater knit there are a couple of important things that you have to change in your construction to accommodate the different kind of knit. One thing that did not cross my mind was the lack of lycra in my knit and how that would impact the behavior of the fabric. I know that one of the things that we always say on PR to beginners is "always use the recommended fabrics" and here I am breaking the rules and wondering what happened.....

But, I was able to fix it! So, the construction of the dress assumes that you are using a knit with lycra, and I used a knit without lycra. When I put the dress together, here is what I got:

See how the neckline is distorted and the sleeves look overly long? The weight of the top is pulling the neckline out of shape. It never occurred to me that the reason that the neckline sat where it did on the original was because the lycra in the fabric held it there. So, how to "add" lycra to this fabric?

My solution was to add elastic. I used the same method of serging a thin strip of elastic directly into the seam that Trudy uses for the waist, and added a 24 inch strip of elastic to the neckline. I then applied some steam from the iron to shrink the fabric back into shape:


Now the neckline is in the proper place, the sleeves are the right length, and the front is not blousing so dramatically.

Another thing that I had to change was how I assembled the cuffs, collar, and bottom band. Rather than stretching the bands, I gathered the fabric instead. Without lycra, the fabric in the bands just didn't have the recovery to take all that stretching. Because the fabric will not be able to take the abuse that the RPL of the first version, I made a heavier, thicker belt for this version as well, more of a kimono-style.

I also shortened the bottom band by three inches (or one and one half inches on the pattern piece, since it is cut on the fold) to bring in the bottom of the skirt a bit more than on the muslin. You can see that this does give the skirt more of that sweatshirt shape, without making it blouse and cause a "hippy" look (that I definitely do not need). Overall, I am very happy with this second version and feel that it will get a lot of wear. I feel like this one is a little dressier than the first version, and styled it with tights and a pair of Cole Haan booties for work today.

Sunday, November 8, 2009

Seriously, the Fastest Project I Have Ever Sewn

This dress was like the polar opposite of the Most Tedious Safari Dress Ever.

This morning I woke up at about 7, and thought that I would trace off a copy of the Hot Patterns Uptown Downtown Knit Dress, since my new patterns had arrived on Saturday. I have grand plans for this dress, and would like to use it for my Vera Wang Wool-Jersey-That-Is-Really-More-Like-Sweater-Knit from Fabric.com, but before I cut into that I wanted to make a muslin in a less-irreplaceable RPL knit from Hancock's that was about the weight of a sweatshirt knit.

Seriously, by 11 I was showered and wearing my dress. This was THE FASTEST project I have ever made. Only 4 hours to trace, cut out, and sew. I NEVER work that fast. That was tracing included!


While I am not the fastest sewer in the world, I do not poke along either and I do have to admit to being rather nervous about sewing exclusively on the serger. I am relatively new to serging, and generally what I do is I sew the seam on the sewing machine and then finish the edge on the serger. The serger is just a little to zippy for me to feel entirely comfortable sewing constructions seams on it. But, I watched all of Trudy's videos for this dress, and the seam allowances are drafted as 3/8" so it is designed to be sewn that way. So, I steeled myself and just did it. Or as the Hot Patterns Motto says: "Feel the fear...And do it anyway!"

I made the pattern exactly to their specifications, selecting a size 18 based on my measurements. I did not do an FBA or any alterations. They offer three different lengths for the bodice, one for heavy fabrics (the shortest), with the longest length for lightweight fabrics. I cut mine to the shortest length. I also made a narrow sash.

Here is the final product:


And here it is from the back:


AND, because of the weight of the sweatshirtish material, that is sans-spanx. Yep, that is just me under there. How awesome is that? I might have to go get some more of this fabric!

There is one change that I am going to make before putting together the final product and that is to shorten the length of the band around the bottom of the skirt. As you can see, it does not gather the skirt in at all, even though it looks as though it does in the pattern illustration. On one hand, for someone with wide hips like me, a more A-line skirt is definitely a more flattering shape. On the other hand, that is not how this dress is supposed to look, so I will shorten it...but just slightly. Just enough to make it smaller than the hem of the skirt, but not enough to make the skirt blouse and make me look even more hippy than I already am. I will also make the long-sleeved option when I make the final version.

I think that this dress also has great potential to be a flexible addition to any wardrobe. Today I am wearing it paired with Kenneth Cole Mary Janes and jean jacket for a casual day with the family:


But it could easily be paired with tights, heels, and a cardigan for a more work-appropriate look. I would highly recommend this pattern, and even though it is rated "easy," it is still very fashion-forward.