I haven't sewn much since my last post, not by choice. My upper back is still bothering me. I think it's from spending to much time at the sewing machine and reading.
I need to find a way to elevate my machine a little higher. I tried lowering my chair but that's not enough. Any suggestions, anyone!
Any way, I'm planning on finishing my jacket and skirt by Sunday which will be the last winter project. I will beginning my Spring and Sumner sewing. This is the only way I will get some things done.
I spend a lot of time scanning sewing books and only reading topics related to
what I'm working on. In doing my usual scanning, I ran across something I want to know about, block fusing. Erica B. briefly mention it on her blog and I didn't know what is was. But instead of asking, I decided to do a little researching on my own, and what do you know? It's in one of my sewing books, "Tailoring, The Classic Guide to Sewing the Perfect Jacket".
I find this book to be very interesting. So, I downloaded the ebook version to my Evo (I love my phone) also. The book is filled with colorful pictures which I love because if you don't understand everything you read the pictures help you to figure it out.
Since I taught myself to sew, for so many years, I relied on books to improve my skills. In addition, to my collection of books, and I have a lot, I also have you guys. The problem is, I have always done more surfing and reading blogs then sewing. Thanks to all of you who have attempted to answer any questions I may have had via your blog or by email. I'm truly grateful for that. No one in my family really sews. I have tried to get my mom and cousin involved but they start and stop more than I do.
I attempted to start a beginner sewing class at my church but now I only have one dedicated male student. The whole idea was to get people involved and just maybe they would come to love sewing or the idea of sewing that I would have someone at home to share my love.
I love talking about sewing and what I have learned and is learning. I'm trying to manage my time more so that I can dedicate some effort to my blog and sewing. Despite my current set back, I think I'm doing well so far or at least better than previous years. So, I may not always leave a comment on your blog but I do keep track of what everyone is working on. :-)
In managing my time, I pay close attention to the weeks when I'm going to be off on a Monday so that I have an idea what I'm going to sew. Guess what? I have a three weekend upcoming and I can wait.
Well, it's that time now. Until next time, good night!
Tuesday, February 1, 2011
Sunday, January 23, 2011
Under the Needle (Jacket and Skirt)
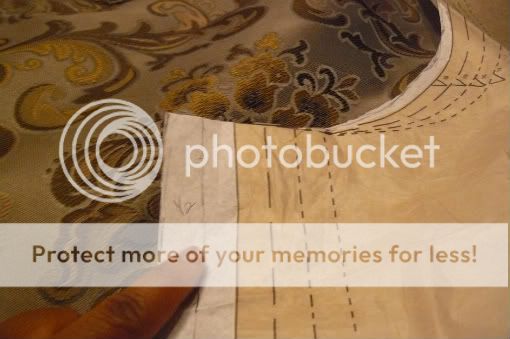
I spent the my entire Saturday cutting and sewing and it felt wonderful.

I'm working of a jacket and skirt. Below is a sneak preview of the jacket.

I would have finished the skirt but when I went to insert the zipper, it
was the wrong color. :-(
My 11 year old suggested that I just use a black zipper. "Black goes with everything", she said. But no, I had to find a zipper to match. Well, after driving to the local sewing store, I was not able to find the right color after all. So, when I told her, she smiled and said, "I told you so". I just laughed.
Anyway, I need to slow down and regroup before I do my buttonholes. It's my intention to sew bound buttonholes for the first time, after I get some practice in (LOL).
Once I'm finish, I will provide all the detail of my sewing journey.
I decided to rest today and do some blog reading because my upper back is hurting me. I guess from all that sewing I did.
Good Night!
Sunday, January 16, 2011
First Project of 2011, Vest and Pants
Carolyn (sewingfantaticdiary.blogspot.com) and some others are participating in a jacket a month sew-a-long. For a second, I started to join-in as motivation to sew. However, since I don't do much sewing, I decided not to join. Instead, I have set a personal goal for myself, that's to sew an item a month. This way, I can throw in some simple pieces so that I wouldn't get overwhelmed by a long project.
I love sewing and reading about others sharing their talent so that I decided that 2011 will be a more productivity year for myself.
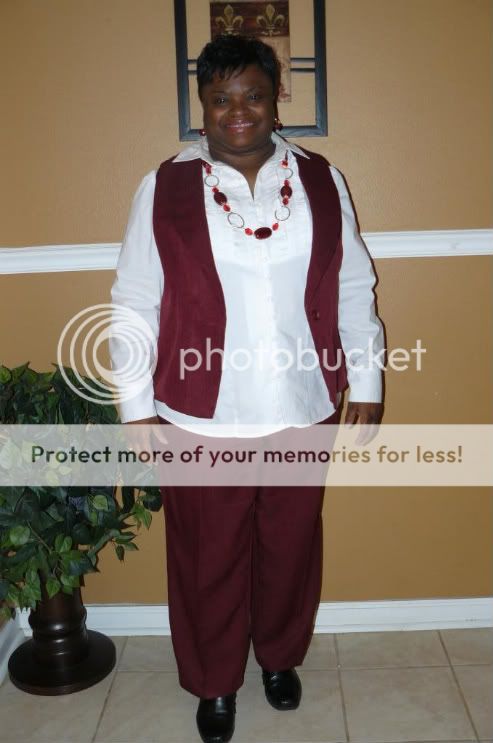
So, My first to two items are a vest and pants. The fabric I purchased last year from Joanns.
Sorry for the wrinkles, I wore it all day before having my DD take the pictures.
Vest, Butterick 5534 View B
Pant, McCall’s 5239 View B


Fabrics: 100% polyester
Did it look like the photo/drawing on the pattern envelope once you were done sewing with it? Yes.
Were the instructions easy to follow? Yes
What did you particularly like or dislike about the pattern?
When I applied the fusible interfacing to the vest, it shrunk the pattern piece. So, the side with the interfacing didn’t match the other piece. It didn’t occur to me to cut the other piece, until now , to match the piece with the applied interfacing. However, the pants were my biggest challenge, especially the inter thighs. I will explain later
Pattern Alterations or any design changes you made:
PANTS:
Using FFRP, I started with the size 22 for the pants but with additional alterations.
I added the following:
¾ to the top of back waist area

Also, in the above picture, I straighten out the back seam. However, after the pants were sewed, I realized that the change wasn't needed.
1 ½ wedge to back of pants

I added the 1 ½ wedge to back of the pants for additional length to cover my buttock, I sewed the side seams at the recommended 1 inch. However, after sewing the inner seam at 1” inch, I later decided to let the pants out at the inter thigh in the attempt to remove the wrinkles in the back just below my buttock. It removed some of the wrinkles but not all of them.
Additional changes:
1/2 to waist
3/4 to hip and things area
On the pattern front, I decreased the crotch length on the pants by approx. 2 inches (the green line I'm pointing to and the blue line right below the pattern number). When I tried the pants on, I need to remove about an inch to the top of the front pant because the waist line was to high, work in progress.

The inner thigh alteration, in the above picture right below where I'm pointing, was removed because I didn't like the way the pants looked at the thigh area. It was originally added to add room for my thighs because when I moved the pants felt snug across my thighs.
Finally, I sewed the crotch at 3/8 so that the pants would curve around my figure better and trimmed about ¼ off the seat of the pant where the stitching lines meet.

VEST:
I grated the pattern up to a size 22 instead of doing a full bust adjustment. I just followed the spacing under the arms and side seam. Next, starting at the underarm, I added 1/2 inches and increased out 3/4 inches at the hip line. I added approx. 1 1/4 swayback adjustment. After sewing, I realized that I didn't need to entire 1/2 inch at the undearm. This is required when sewing sleeves.

Would you sew it again? Would you recommend it to others?
I like the style of the vest but I need to find a better way of doing the interfacing with the lining because I didn’t like the way it look on the inside.
Conclusion:


I love sewing and reading about others sharing their talent so that I decided that 2011 will be a more productivity year for myself.
So, My first to two items are a vest and pants. The fabric I purchased last year from Joanns.
Sorry for the wrinkles, I wore it all day before having my DD take the pictures.
Vest, Butterick 5534 View B
Pant, McCall’s 5239 View B


Fabrics: 100% polyester
Did it look like the photo/drawing on the pattern envelope once you were done sewing with it? Yes.
Were the instructions easy to follow? Yes
What did you particularly like or dislike about the pattern?
When I applied the fusible interfacing to the vest, it shrunk the pattern piece. So, the side with the interfacing didn’t match the other piece. It didn’t occur to me to cut the other piece, until now , to match the piece with the applied interfacing. However, the pants were my biggest challenge, especially the inter thighs. I will explain later
Pattern Alterations or any design changes you made:
PANTS:
Using FFRP, I started with the size 22 for the pants but with additional alterations.
I added the following:
¾ to the top of back waist area

Also, in the above picture, I straighten out the back seam. However, after the pants were sewed, I realized that the change wasn't needed.
1 ½ wedge to back of pants

I added the 1 ½ wedge to back of the pants for additional length to cover my buttock, I sewed the side seams at the recommended 1 inch. However, after sewing the inner seam at 1” inch, I later decided to let the pants out at the inter thigh in the attempt to remove the wrinkles in the back just below my buttock. It removed some of the wrinkles but not all of them.
Additional changes:
1/2 to waist
3/4 to hip and things area
On the pattern front, I decreased the crotch length on the pants by approx. 2 inches (the green line I'm pointing to and the blue line right below the pattern number). When I tried the pants on, I need to remove about an inch to the top of the front pant because the waist line was to high, work in progress.

The inner thigh alteration, in the above picture right below where I'm pointing, was removed because I didn't like the way the pants looked at the thigh area. It was originally added to add room for my thighs because when I moved the pants felt snug across my thighs.
Finally, I sewed the crotch at 3/8 so that the pants would curve around my figure better and trimmed about ¼ off the seat of the pant where the stitching lines meet.

VEST:
I grated the pattern up to a size 22 instead of doing a full bust adjustment. I just followed the spacing under the arms and side seam. Next, starting at the underarm, I added 1/2 inches and increased out 3/4 inches at the hip line. I added approx. 1 1/4 swayback adjustment. After sewing, I realized that I didn't need to entire 1/2 inch at the undearm. This is required when sewing sleeves.


Would you sew it again? Would you recommend it to others?
I like the style of the vest but I need to find a better way of doing the interfacing with the lining because I didn’t like the way it look on the inside.
Conclusion:


Wednesday, January 5, 2011
How I Sew
I don't have a dedicated sewing room but I do have somewhere to sew. I started out in my guest bedroom which is located on the second level of my home. The stairs were causing me problems. I found myself having to go up and down them to often, although its great exercise, my knees begun to hurt and it didn't seem normal.
So, I bought a collapsible sewing table and started using it in my living room. However, things started accumulating in there and I didn't like that. Now, I in my bedroom which I like much better. I just use the sewing card board and place it on my bed to cut out the fashion fabic and muslins. I have everything I need including reference books.
My dream is to have a sewing room with all the bells and whistles.


I'm using a fishing tackle box for all my tools. I love it! I'm more organized. I was strolling in Acedemy with my DD. When I saw the box, I knew right away how it would be used.


Monday, January 3, 2011
New Simplicity Patterns (Sale)
Hancock had a sale on Simplicity patterns priced at $1.99. Below is what I purchased. The first pattern will be made in a linen fabric. It look like a simple project and will provide balance to my tenatitve sewing goal for 2011 which I will discuss later.


I only like the little jacket in the lower right hand corner.

I plan to make this dress for my sister.


I only like the little jacket in the lower right hand corner.

I plan to make this dress for my sister.


Saturday, January 1, 2011
Happy New Year!
Well, I can't say that 2010 was very productivity. I have only completed three items, as far as I can remember, besides a pair of pants which I will review later.
The picture below is from S3831 Style C. I will post the fitting process later, that's if I wrote it down. What I do remember, I raised the waistline and took in the side seams. I love the way the dress came out. The fit was great and I received many compliments on the dress from my family especially my Mom.
I need to work on lining up my plaid in the future, its a little off.

This pencil skirt was previously made by Erica B. and because the way the skirt fitted her, I decided to give it a try. I was not disapproved.
Becuase my backside is very healthy, my skirt ofter hang low in the front and high in the back. However, with a few alterations, I was able to get a balanced well fitting skirt, which has become my TNT pattern M3830, for now any.


Subscribe to:
Posts (Atom)